Amazon GameLift Servers: Globally-scalable Fleets in an Afternoon

TL;DR
1. Clone the repo in an AWS CloudShell session and run scripts
# Clone the repo and cd into it
git clone https://github.com/Rushdown-Studios/GameLiftDemo.git && cd GameLiftDemo/

# Set up the Amazon GameLift Server SDK for Golang
./scripts/setup.sh

# Build the server binary and upload it as an Amazon GameLift Build
# This will take about 5 minutes
# Make a note of the Build ID in the output
./scripts/build-and-upload.sh

# Wait ~5 minutes for the command to complete

# Create an Amazon GameLift Fleet
# The fleet needs some time to activate - for a small build like this you can expect this to take about 5 minutes
# Make a note of the Fleet ID in the output
./scripts/create-fleet.sh --build-id <Build ID>

# Wait ~5 minutes for the fleet to activate

# OPTIONAL: call the wait-for-fleet script to poll for fleet events using the AWS CLI
./scripts/wait-for-fleet.sh --fleet-id <Fleet ID>

# You can check the status in the AWS Developer Portal, or by running this command:
aws gamelift describe-fleet-events --fleet-id <fleet ID>
# {
#   "Events": [
#     {
#       "EventId": "a37b6892-5d07-4d3b-8b47-80244ecf66b9",
#       "ResourceId": "fleet-00000000-0000-0000-0000-000000000000",
#       "EventCode": "FLEET_STATE_ACTIVE",
#       "Message": "Fleet fleet-00000000-0000-0000-0000-000000000000 changed state to ACTIVE",
#       "EventTime": 1579649342.191
#     },
#     ...
# }

# Once the fleet is active, start a game session to get a server IP
aws gamelift create-game-session --fleet-id <fleet ID> --maximum-player-session-count 1
# {
#   "GameSession": {
#     "GameSessionId": "arn:aws:gamelift:us-west-2::gamesession/fleet-00000000-0000-0000-0000-000000000000/gsess-00000000-0000-0000-0000-000000000000",
#     "Status": "ACTIVATING",
#     "IpAddress": "1.2.3.4",
#     "DnsName": "ec2-1-2-3-4.us-west-2.compute.amazonaws.com",
#     "Port": 9000,
#     ...
#   }
# }
2. Clone the repo on your local machine and run the game client
git clone https://github.com/Rushdown-Studios/GameLiftDemo.git
cd GameLiftDemo/
go run ./cmd/client --host <IP Address> --port <Port> # replace host and port from the output from CloudShell
# The first build may take a few minutes
3. Clean up when you're done
From your CloudShell session:
aws gamelift delete-fleet --fleet-id <Fleet ID>

# You aren't charged for builds, only active fleets, but you can clean up your build if you'd like:
aws gamelift delete-build --build-id <Build ID>
Table of Contents
- Introduction: Why GameLift, Why This Post
- Hello, World: A Minimal GameLift Demo
- Setting Up In AWS
- Uploading a Build, Creating a Fleet
- Clean Up
- Debugging
- What's Next?
Introduction: Why Amazon GameLift, Why This Post
Amazon GameLift Servers is a powerful managed service for hosting multiplayer game servers - handling session management, autoscaling, fleet health, and global deployment for you. If you’ve ever wrestled with server orchestration or flaky production servers, Amazon GameLift Servers might be for you.
That said, getting started with GameLift can be intimidating. The docs are comprehensive but massive, and it can be tricky to find a good way to try things out without committing engineering hours to learning the ecosystem as a whole.
This post is for engineers who want to kick the tires without spending a full week on IAM and YAML. Our goal:
Deploy a working GameLift fleet in one afternoon.
We’ll highlight common pitfalls, debug tips, and where to go next. Let’s get to it.
Hello, World: A Minimal GameLift Demo
To keep things approachable, we're starting with a barebones multiplayer setup - simple enough to grasp quickly, but complete enough to deploy and test with GameLift. We're intentionally skipping advanced topics like matchmaking and autoscaling for now; the focus is just on getting a server deployed and talking to clients.
Sample Server
See also: Amazon GameLift Servers Developer Guide: Add Amazon GameLift Servers to your game server
Written in Go, the server integrates with the GameLift Server SDK and does the following:
- Calls the
InitSDKandProcessReadyfunctions on startup- These are functions in the GameLift Server SDK that inform GameLift when the server process has started and is ready for connections
- Calling these functions is required for GameLift servers to work properly
- Listens for TCP connections on port 9000
- Accepts JSON position updates from players
- Maintains shared state of all player positions
- Broadcasts the current state to all players every 100ms
It’s not a full game, but it covers the fundamentals: connecting clients, synchronizing state, and talking to GameLift.
Sample Client
We have two options for clients:
- Graphical Client (Raylib): Controls a cube in 3D space. This is overkill for our purposes, but it's way more fun to play with than console output.
- Mock Client: Simulates a player moving in a circular path. This can be handy when you want to test multiple players moving around.
You don’t need a full game to evaluate GameLift — just enough networking to validate the server flow.
Goal: Running the Sample Locally
Before moving on, let's make sure you can successfully clone, build, and run the server and client.
You'll need Go 1.24+, which you can download here. You also need to set up Raylib - you can follow the instructions on the gen2brain/raylib-go GitHub repo.
# Clone the repo via HTTPS
$ git clone https://github.com/Rushdown-Studios/GameLiftDemo.git
remote: Enumerating objects: 1234567, done.
...
Filtering content: 100% (3/3), 12.34 MiB | 5.67 MiB/s, done.

# cd into the root of the repo
$ cd GameLiftDemo/
If you're in a Bash environment like Linux, macOS, or Git Bash for Windows, you can run ./scripts/setup.sh to download and extract the GameLift Server SDK:
$ ./scripts/setup.sh
Downloading and extracting GameLift Server SDK for Golang...
Setup finished!

# verify that the project cloned and set up properly
$ ls
amazon-gamelift-go-sdk  cmd  docs  go.mod  go.sum  README.md  scripts
Or, if you're on Windows, you can run ./scripts/setup.ps1 in Powershell:
> .\scripts\setup.ps1
Downloading and extracting GameLift Server SDK for Golang...
Setup finished!

# verify that the project cloned and set up properly
> ls -n
amazon-gamelift-go-sdk
cmd
docs
scripts
.gitignore
go.mod
go.sum
README.md
Run the server:
# Run the server
$ go run ./cmd/server
2025/04/23 19:32:51 Server listening on :9000
Then start clients in new terminals:
# Mock client
$ go run ./cmd/mockclient

# Graphical client (WASD + mouse)
$ go run ./cmd/client
You should be able to control a little red cube with third-peron WASD and mouse controls. If you start multiple clients, you should be able to see other clients moving around as blue cubes. If you started the mock, you should see an extra player trace out a circle in the middle of the "map".

GameLift Client Demo (GIF)
Setting Up In AWS
GameLift is available for paid plans in AWS, but you have up to $200 in free credits available - plenty for testing!
If you don't already have an AWS account, you'll need to create one.
Goal: List Fleets
You can install the AWS CLI locally, but managing permissions when authenticating can be tricky to set up. If you want to run the AWS CLI locally, refer to the official AWS CLI User Guide for Version 2 to get started.
In the AWS Developer Console, click on the terminal icon in the top navbar to start a Cloudshell session. Once the session starts, you should be able to run aws gamelift list-fleets to get an empty list. Not the most interesting thing in the world, but now you can interact with Amazon GameLift programmatically.
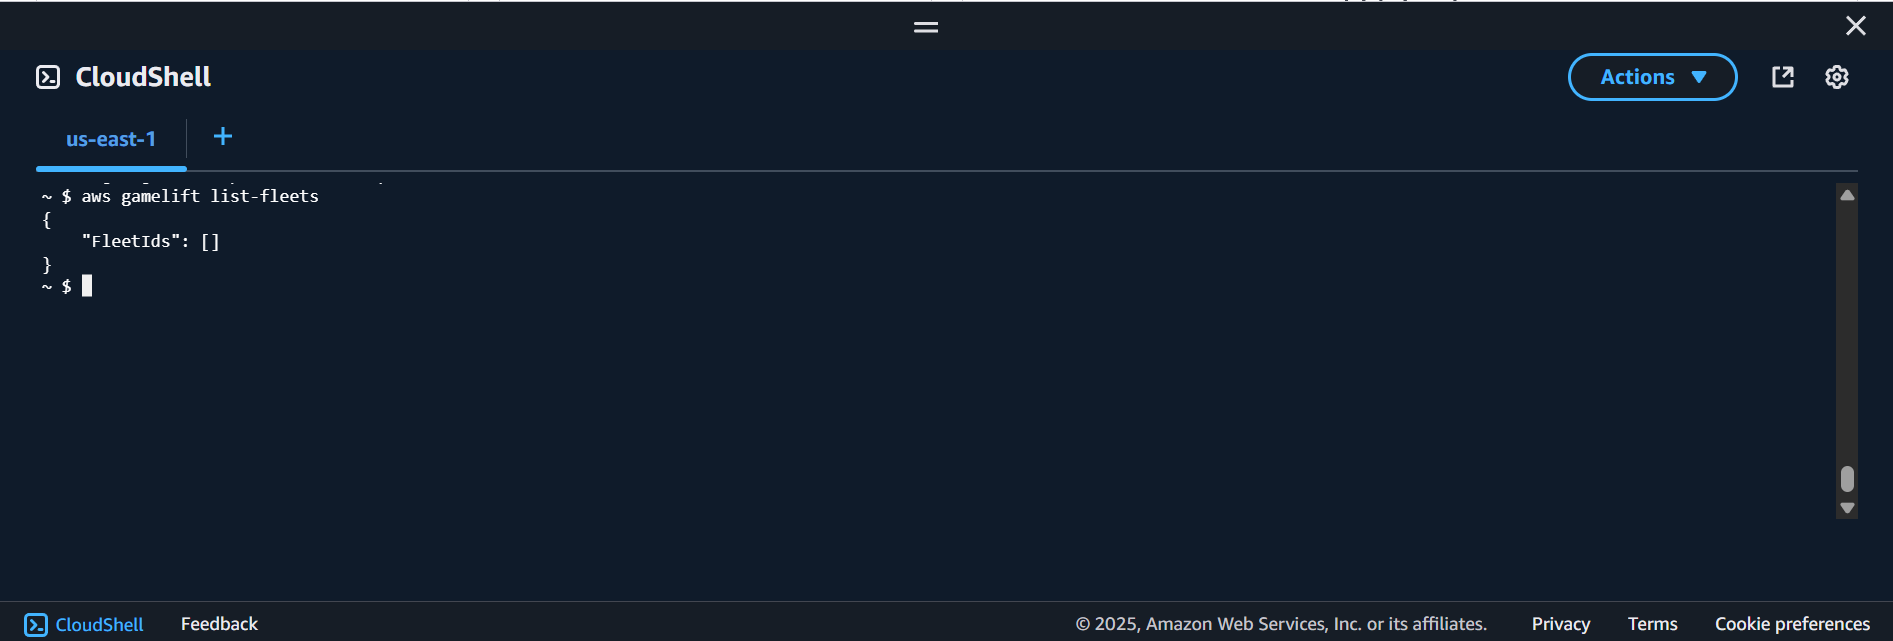
List Fleets in CloudShell
Uploading a Build, Creating a Fleet
Now that we’ve confirmed the demo works locally, it’s time to package it up and launch it into the cloud.
Step 1: Clone the Sample Repo in CloudShell
To get started, open CloudShell in the AWS Console (top navbar → terminal icon) and clone the demo project. It's important to clone via HTTPS when in CloudShell since cloning via SSH will result in Permission denied, even for public repos.
# Clone the repo via HTTPS
$ git clone https://github.com/Rushdown-Studios/GameLiftDemo.git
remote: Enumerating objects: 1234567, done.
...
Filtering content: 100% (3/3), 12.34 MiB | 5.67 MiB/s, done.

# cd into the root of the repo
$ cd GameLiftDemo/

# Pull the AWS GameLift Server SDK for Golang
$ ./scripts/setup.sh

# Verify that the project cloned and set up properly
$ ls
amazon-gamelift-go-sdk  cmd  docs  go.mod  go.sum  README.md  scripts
Step 2: Build and Upload
See also: Amazon GameLift Servers Developer Guide: Create a build from a file directory
Next, we'll build the server and upload it as an Amazon GameLift Servers Build. Since the CloudShell instance doesn't have Golang installed, we'll build the server in a Docker container. To simplify the process, there's a helper script to build the server binary and upload it all in one shot. If you want to know what it's doing under the hood, take a look at the script in scripts/build-and-upload.sh.
For now you can go ahead and run it without params. Note that this might take around 5 minutes to complete.
$ ./scripts/build-and-upload.sh
go: downloading github.com/golang/mock v1.6.0
go: downloading github.com/google/uuid v1.5.0
go: downloading github.com/gorilla/websocket v1.5.1
...

Uploading out:  2.6 MiB / 2.6 MiB  (100.00%) Successfully uploaded out to AWS GameLift
Build ID: build-00000000-0000-0000-0000-000000000000
Make a note of the Build ID, since you'll need it when making a fleet in the next step.
Step 3: Create a Fleet
See also: Amazon GameLift Servers Developer Guide: Create an Amazon GameLift Servers managed EC2 fleet
Now that we have a proper build uploaded, we can create a GameLift fleet that will pull that build and run it for us. Again, I have a helper script to simplify things here. Take a look at scripts/create-fleet.sh to see what's happening under the hood if you'd like, or run it like so to continue:
$ ./scripts/create-fleet.sh --build-id <Build ID>
{
    "FleetAttributes": {
        "FleetId": "fleet-00000000-0000-0000-0000-000000000000",
        "FleetType": "ON_DEMAND",
        ...
    }
}
Fleet created successfully.
Creating a new fleet takes some time. This example usually enters the ACTIVE state about 5 minutes after creation.
You can check the status of the fleet in two ways:
- From the AWS Developer Console, under
Amazon GameLift Servers->Fleets, then choosing your fleet ID and looking in theEventstab - From the AWS CLI in your CloudShell session by running
aws gamelift describe-fleet-events --fleet-id <fleet id>- You're ready to move on to the next section when you see a fleet event with
FLEET_STATE_ACTIVE.
- You're ready to move on to the next section when you see a fleet event with
There's a helper script in scripts/wait-for-fleet.sh that uses the AWS CLI to poll every 30 seconds and print new status updates:
$ ./scripts/wait-for-fleet.sh --fleet-id <Fleet ID>
Monitoring fleet: fleet-00000000-0000-0000-0000-000000000000
Polling every 30 seconds

[2025-04-25 18:02:47] FLEET_CREATED
    -> Message:     Fleet fleet-00000000-0000-0000-0000-000000000000 has been created with state NEW.
    -> Description: Fleet resource created with status NEW.
...
[2025-04-25 18:08:32] FLEET_STATE_ACTIVE
    -> Message:     Fleet fleet-00000000-0000-0000-0000-000000000000 changed state to ACTIVE
    -> Description: Fleet is ACTIVE and ready.
If something goes wrong here, take a look at the debugging section.
Goal: Connecting Clients
Once the fleet is active, we're ready to spin up servers to host games. GameLift uses Game Sessions to manage server processes running on a fleet, so we'll need to start a Game Session on the fleet to start a server and get an IP and port. Then we can start the client and supply the IP and port.
In your CloudShell session, start a session with the AWS CLI:
$ aws gamelift create-game-session --fleet-id <fleet id> --maximum-player-session-count 1
{
    "GameSession": {
        "GameSessionId": "arn:aws:gamelift:us-west-2::gamesession/fleet-00000000-0000-0000-0000-000000000000/gsess-00000000-0000-0000-0000-000000000000",
        "Status": "ACTIVATING",
        "IpAddress": "1.2.3.4",
        "Port": 9000,
        ...
    }
}
Back on your local machine, you can use that IP and port when starting the client:
go run ./cmd/client -host <IP Address> -port <Port>
Like when we ran locally, you should be able to move around and see your character. You can start a mock client and see it moving in a circle:
go run ./cmd/mockclient -host <IP Address> -port <Port>
Clean Up
Remember that actively running instances in a fleet count against your quota, so when you're done, you'll want to delete your fleet so that you aren't burning your free balance (or being charged if you go over).
aws gamelift delete-fleet --fleet-id <Fleet ID>
You aren't charged for builds hanging around, but it's a good idea to clean up your builds when you're done:
aws gamelift delete-build --build-id <Build ID>
Debugging
See also: Amazon GameLift Servers Developer Guide: Debug Amazon GameLift Servers fleet issues
Even with a clean build and a solid deployment script, GameLift can sometimes feel like a bit of a black box—especially when something silently fails. This section covers the most common pain points you might hit and how to investigate them effectively.
Fleet Fails to Activate
If you're waiting for your fleet to spin up and it doesn't enter the ACTIVE state within 5-10 minutes, you might want to check in on it.
The easiest way to see what's going on with a fleet before it starts running is by going to the AWS Developer Console, under Amazon GameLift Servers -> Fleets, then choosing your fleet ID and looking in the Events tab. It should look something like this:
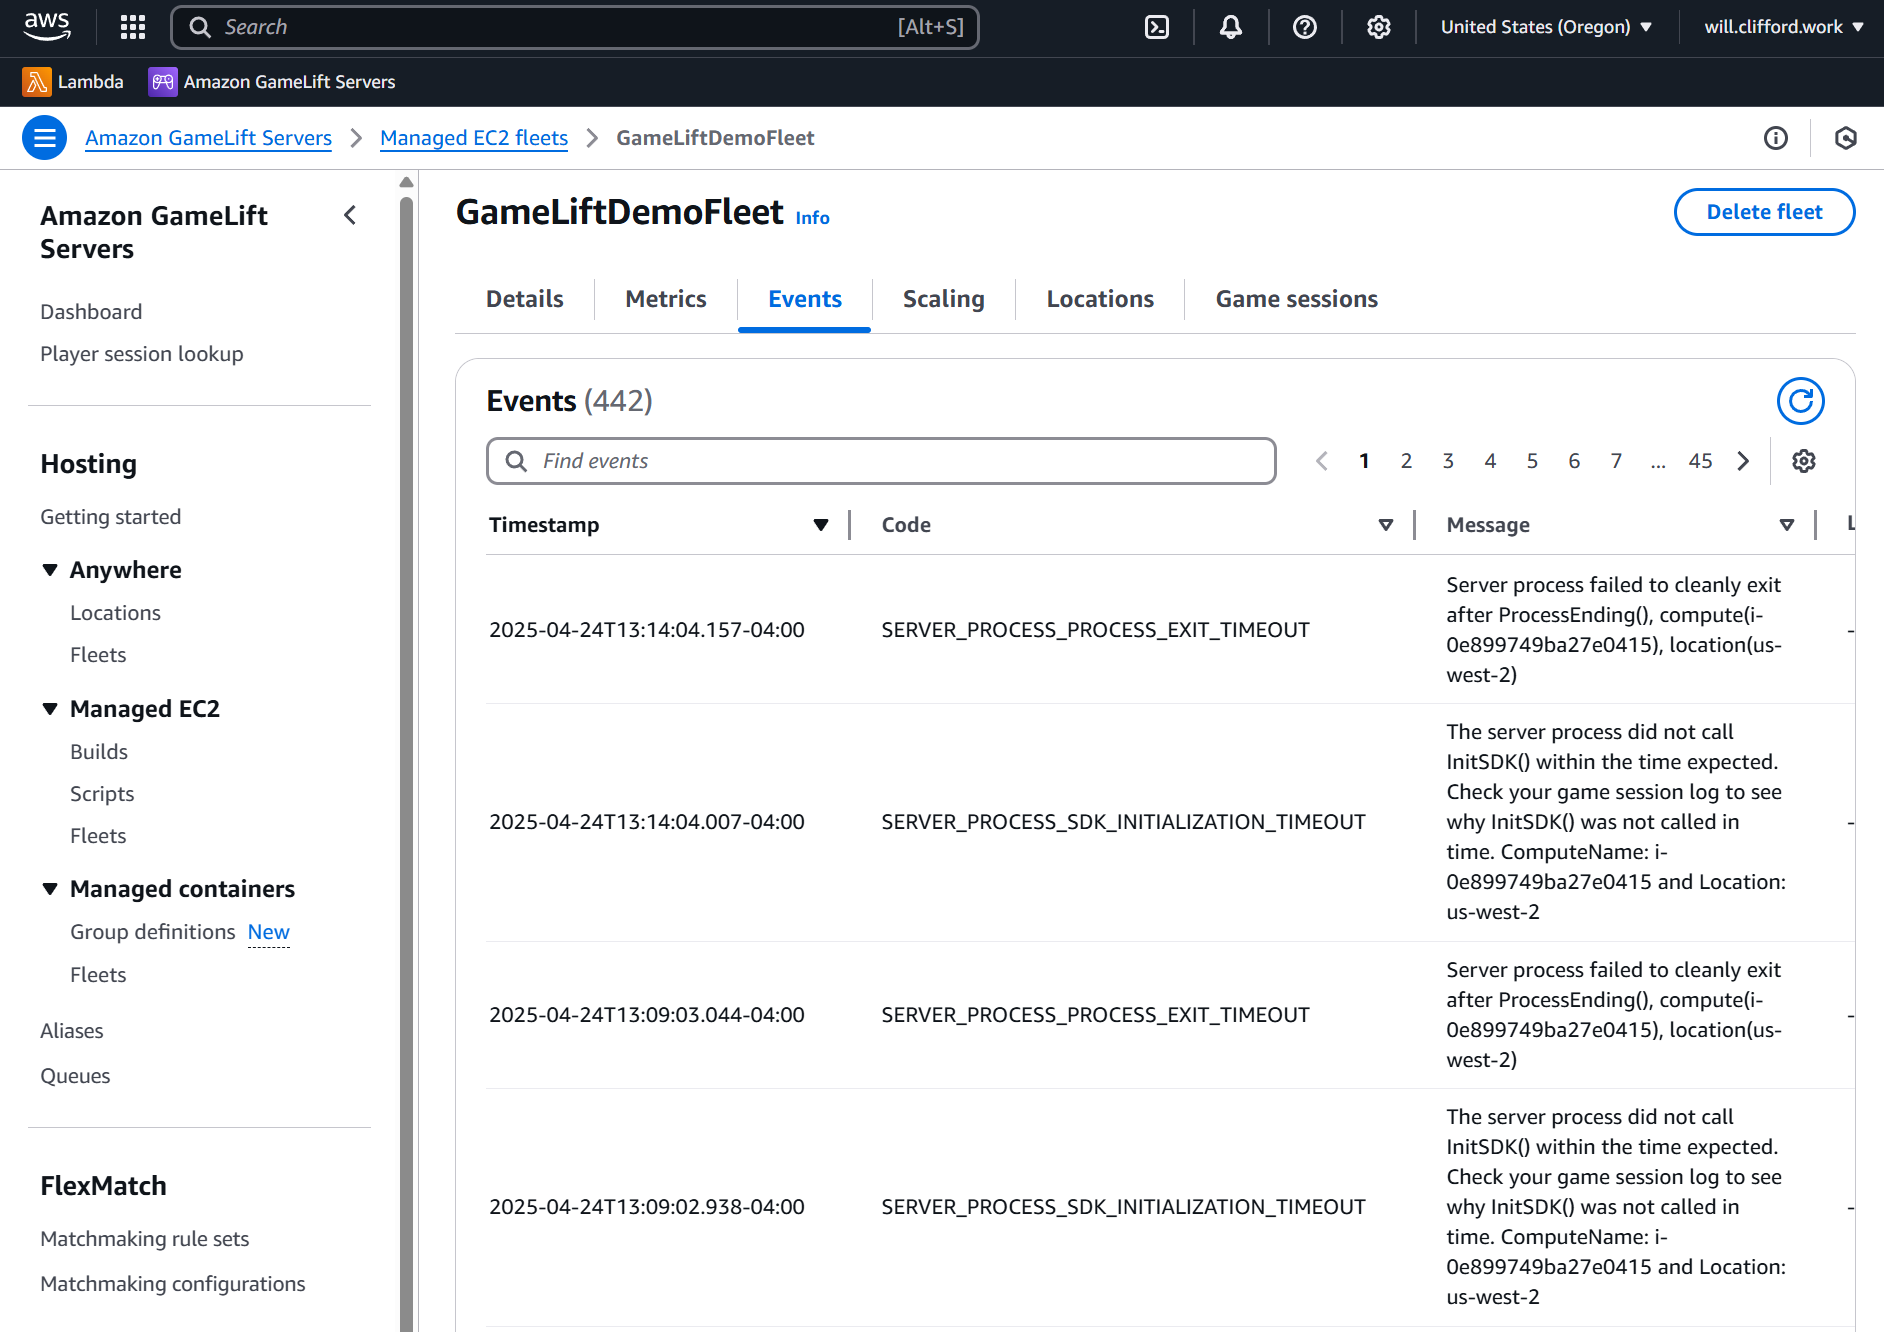
AWS Developer Console: Fleet with
failed to initializeevents
In the example image above, we can see the SERVER_PROCESS_SDK_INITIALIZATION_TIMEOUT event, which tells us that GameLift found the server binary and tried to start it, but it either didn't start or it didn't successfully call InitSDK on startup. In this case, the message is telling us that we can try to get the game session log to investigate. We can't start a game session on a fleet that's in the ERROR state, but we can still try to connect to the instance and poke around ourselves! Check out the next session to see how to do that.
Sometimes the error messages will include a log reference, which will let you download logs from the failed step right from the Events tab and get more information about what went wrong. It's a good idea to check the build extraction step, just to make sure that all of your files extracted and are in the right place.
Even if your fleet is in an ERROR state, you can sometimes explore the compute instance to investigate further - see the next section to see how to do that.
Investigating a Running Fleet
Downloading Game Session Logs
If your fleet ran a game session (even briefly), you may be able to download logs from the Game Sessions tab in the AWS Console.
A couple tips:
- We configure the fleet to collect logs via the --log flag when creating the fleet and starting the server.
- GameLift will package and upload logs after the session ends.
- To see terminated sessions, you may need to remove the "ACTIVE" filter in the Game Sessions list.
This will download a ZIP file with your server's log output.
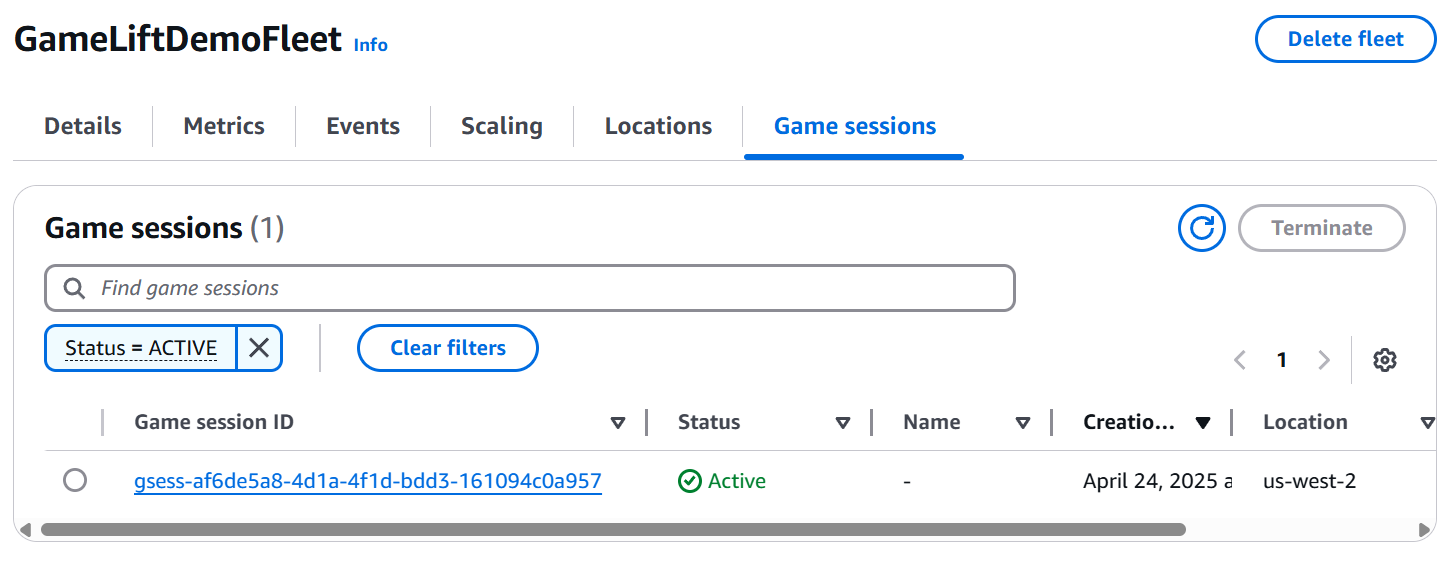
AWS Developer Console: Game Sessions tab on a running fleet
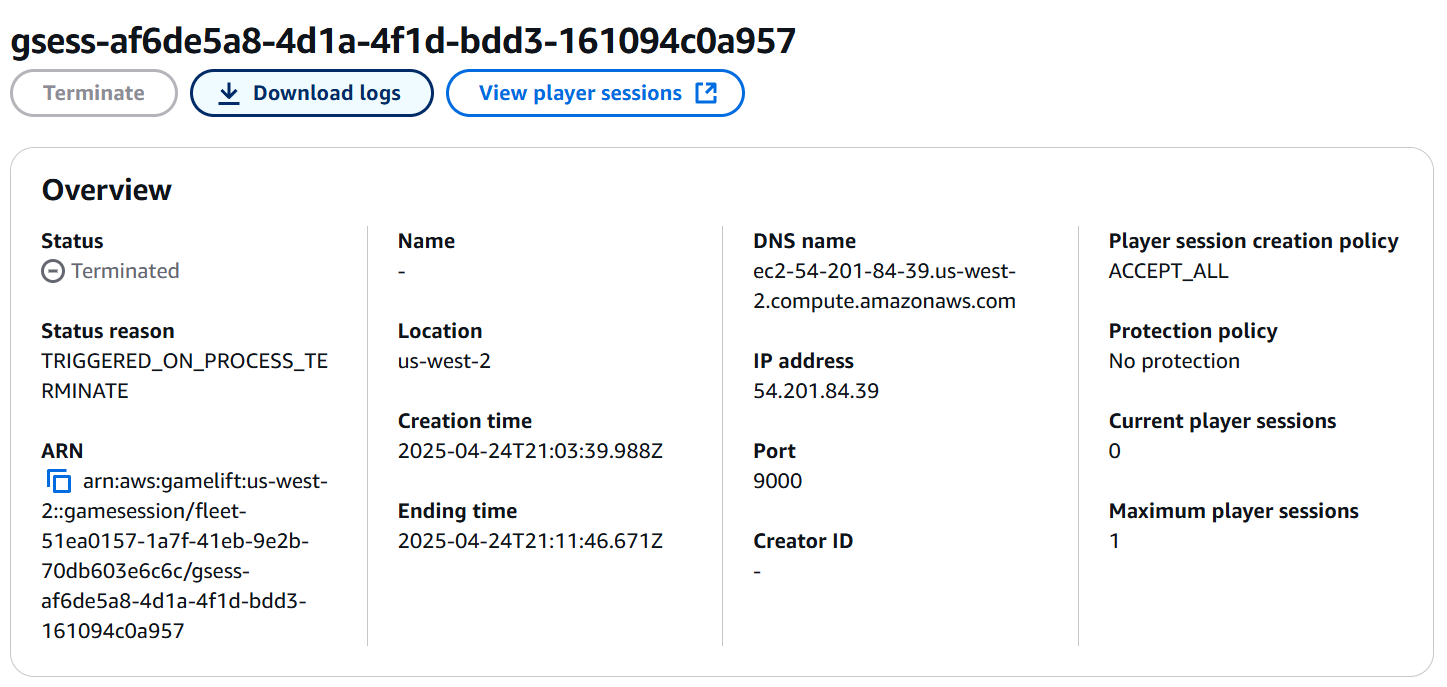
AWS Developer Console: Download Game Session Logs for a terminated Game Session
Connecting to the Fleet with CloudShell
See also: Amazon GameLift Servers Developer Guide: Remotely connect to Amazon GameLift Servers fleet instances
Sometimes logs aren't enough or you can't access them through the AWS Developer Portal and you want to poke around the server itself. GameLift doesn’t support direct SSH access, but you can start an interactive shell session using AWS Systems Manager (SSM). I’ve included a helper script scripts/connect-to-fleet.sh that uses the AWS CLI to start a session.
Quick notes:
- Using this script (or the underlying
aws ssm start-sessioncommand) required that the AWS SSM plugin is installed in your shell environment. When using CloudShell, this is preinstalled. - If your fleet has multiple instances, the script connects to the first one it finds. You can customize the script to target others as needed.
Let's take a look at how we can use the script. Run this from your CloudShell instance:
$ ./scripts/connect-to-fleet.sh <fleet-id>
Getting compute data...
Getting compute name...
Getting compute access for i-012345abcdef67890...
Starting SSM session...
Starting session with SessionId: FleetsService-GetComputeAccess-00000000-0000-0000-0000-000000000000

This session is encrypted using AWS KMS.
sh-5.2$ cd /local/game
sh-5.2$ ls -la
total 6504
drwxrwxr-x. 2 gl-user-server gl-user             50 Apr 23 23:10 .
drwxr-xr-x. 7 root           root                87 Apr 23 23:08 ..
-rw-r--r--. 1 gl-user-server gl-user-server   24911 Apr 24 18:54 GameLiftDemoServer.log
-rwxr-xr-x. 1 gl-user-server gl-user        6627620 Apr 23 23:08 server
Let's use this to investigate the error from the previous section. We saw that the fleet got a SERVER_PROCESS_SDK_INITIALIZATION_TIMEOUT, which meant that the server process either didn't start, or it failed to call InitSDK. We can see that the GameLiftDemoServer.log is present, which means that our server started at least long enough to log to the file. Let's get the last few lines and see if we can find anything out:
sh-5.2$ tail -5 GameLiftDemoServer.log
2025/04/24 18:49:25 Server listening on :9000
2025/04/24 18:54:26 logging to: GameLiftDemoServer.log
2025/04/24 18:54:26 Server listening on :9000
2025/04/24 18:59:27 logging to: GameLiftDemoServer.log
2025/04/24 18:59:27 Server listening on :9000
We see that the server is starting and logging, but we’re missing the usual GameLift messages like:
Amazon GameLift InitSDK OKAmazon GameLift ProcessReady OK
If the server tried but failed to initialize, we’d typically see something like:
Failed to initialize Amazon GameLift Servers
So what went wrong? In this case, I added a -gamelift flag which is required to run the server in GameLift mode but forgot to pass that flag in the fleet configuration. I confirmed this by checking the Runtime Configuration section of the Fleet’s Details tab:

AWS Developer Console: Fleet with misconfigured launch parameters
The solution was to modify the RUNTIME_CONFIGURATION variable in the create-fleet.sh script
RUNTIME_CONFIGURATION=$(cat <<EOF
{
  "ServerProcesses": [
    {
      "LaunchPath": "/local/game/server",
      "ConcurrentExecutions": 1,
      "Parameters": "-gamelift -port=9000 -log=GameLiftDemoServer.log"
    }
  ],
  "GameSessionActivationTimeoutSeconds": 600
}
EOF
)
After fixing the script, I deleted the old fleet and recreated it with the updated configuration.
What's Next?
Now that you've got a fleet up and running, here are a few next steps and tools worth checking out:
- Amazon GameLift Servers Anywhere – Run GameLift-compatible servers on your own hardware for faster local iteration and hybrid deployment setups.
- Managed Container fleets - Use Docker containers to simplify deployments and dependencies (great for portable server builds).
- Fleet Autoscaling - Dynamically adjust capacity based on player traffic and availability needs.
- Install the AWS CLI locally - Upload builds, manage fleets, and script tasks from your machine or CI/CD pipelines.
- Fast Update Tool - Accelerate iteration by swapping builds without tearing down fleets
- Amazon GameLift Servers FlexMatch – Built-in matchmaking based on custom rules and player attributes