An Introduction to Building an HTTP Client Plugin, and JSON Serialization Patterns in Unreal Engine

Hey friends! Ever needed to pull data from a REST API in your Unreal project? Whether it's player accounts, leaderboards, or third-party services, HTTP requests are becoming a core part of modern game development. In this post, we'll walk you through building a reusable HTTP client plugin, covering how Unreal handles requests, the different JSON serialization patterns available, and miscellaneous useful tips.
So why a Plugin?
Plugins are Unreal's recommended way of building modular and bespoke code. They allow you to easily include them in a multitude of projects, and create a strong separation from your game-specific code.
Creation and Structure of a Plugin
This is very easy! There are 2 main ways you can create a plugin: The first is from within the Editor you can open the Edit Menu -> Plugins -> Create a New Plugin. The other method is creating the files manually (gross).
File Structure
Once created you will notice a new folder with your plugins name, starting with these files: MyPlugin.uplugin, the MyPlugin.h file, and the MyPlugin.Build.cs file. My full file structure for the plugin is shown below
Plugins/MyAPI/
├── MyAPI.uplugin              # Plugin descriptor
└── Source/MyAPI/
    ├── MyAPI.Build.cs         # Module build configuration
    ├── Public/                # Headers exposed to other modules
    │   ├── MyAPI.h            # Module interface
    │   ├── MyAPIClient.h      # HTTP client class
    │   ├── MyAPIModels.h      # Response data structures
    │   ├── MyAPITypes.h       # Delegates and enums
    │   ├── MyAPIHelpers.h     # JSON / File utility functions
    │   ├── MyAPISettings.h    # Plugin configuration (ini settings)
    │   └── MyAPIGameSubsystem.h # Subsystem that Manages Lifetime of MyAPIClient
    └── Private/                # Implementation files
        ├── MyAPI.cpp
        ├── MyAPIClient.cpp
        └── ...
Build Modularity
If you’re fairly new to Unreal you might just be noticing that Unreal really likes everything to be modular. And a part of this modularity is the Build.cs file. This allows Unreal’s build tool to only include dependencies that a particular module needs to reduce compile times. Since we are building an HTTP client and using JSON Serialization, we’ll add them to our dependency lists:
PublicDependencyModuleNames.AddRange(
    new string[]
    {
        "Core",
        "CoreUObject",
        "Json",              // FJsonObject, FJsonValue
        "JsonUtilities",     // FJsonObjectConverter
        "DeveloperSettings", // For plugin configuration
    }
);


PrivateDependencyModuleNames.AddRange(
    new string[]
    {
        "Engine",
        "HTTP",              // FHttpModule, IHttpRequest
    }
);
Module Interfaces
The last important thing to note about plugins is within MyAPI.h, this is where Unreal sets up the Plugin as a Module, You can inject code to do whatever you want when the module gets created or destroyed (more info here IModuleInterface).
Adding Settings/Config to the Plugin
Unreal has a very useful class called UDeveloperSettings which you can inherit from. gives you access to settings within the editor via Projects Settings -> Plugins -> MyAPI, these values get saved to DefaultGame.ini (version controllable). This allows you to also have different values per-platform or build configuration (like staging, production, development, etc.). So lets set up a basic UDeveloperSettings class that includes a base URL, and a way to easily access it from C++ and Blueprints:
UCLASS(Config=Game, DefaultConfig, meta=(DisplayName="My API"))
class MYAPI_API UMyAPISettings : public UDeveloperSettings
{
    GENERATED_BODY()
public:
    UMyAPISettings();

    UPROPERTY(Config, EditAnywhere, Category = "API")
    FString BaseURL = TEXT("https://api.example.com/v1");

    static TObjectPtr<const UMyAPISettings> Get();

    // Place in Plugins category in Project Settings
    FName GetCategoryName() const override { return FName(TEXT("Plugins")); }
};

// Implementation
TObjectPtr<const UMyAPISettings> UMyAPISettings::Get()
{
    return GetDefault<UMyAPISettings>();
}
For accessing it in raw C++ it is recommended to do GetDefault<UMyAPISettings> as it provides a global, and immutable way of accessing the class’s preset values. It also automatically loads values set in the project settings/.ini file.
Building the Reusable HTTP Client
Let's look at a very simple example of a Reusable HTTP Client, here's the class structure
UCLASS()
class MYAPI_API UMyAPIClient : public UObject
{
    GENERATED_BODY()
public:
    UMyAPIClient();
    virtual void BeginDestroy() override;

    // Blueprint-callable methods
    UFUNCTION(BlueprintCallable, Category = "MyAPI")
    void GetFooDetailsBP(const FString& Index, FFooDetailCallbackBP OnCompletedRequest);

    // Native C++ methods
    void GetFooDetails(const FString& Index, FFooDetailDelegate OnCompletedRequest);

    void CancelAllRequests();

private:
    void SendRequest(const FString& Endpoint, const FString& Verb, FResponseCallback OnCompletedRequest);

    void LogHttpResponse(const FHttpRequestPtr& Request, const FHttpResponsePtr& Response, bool bSuccess);

    TArray<TSharedPtr<IHttpRequest, ESPMode::ThreadSafe>> PendingRequests;
};
This includes simple fetchers that trigger HTTP requests in both Blueprint (GetFooDetailsBP) and native C++ situations (GetFooDetails). A generic method to send an HTTP Request, cancel current requests (in case of game shutdown), and log the response. The meat of the code is in the SendRequest function so lets take a dive into that!
void UMyAPIClient::SendRequest(const FString& EndPoint, const FString& RequestType,FResponseCallback OnCompletedRequest)
{
    // Create the request
    TSharedRef<IHttpRequest, ESPMode::ThreadSafe> Request = FHttpModule::Get().CreateRequest();

    // Track for cancellation
    TSharedPtr<IHttpRequest, ESPMode::ThreadSafe> RequestPtr = Request;
    PendingRequests.Add(RequestPtr);

    // Configure request
    const FString FullURL = UMyAPISettings::Get()->BaseURL + EndPoint;
    Request->SetURL(FullURL);
    Request->SetHeader("Accept", "application/json");
    Request->SetHeader("Content-Type", "application/json");
    Request->SetVerb(RequestType);

    // Bind completion callback
    Request->OnProcessRequestComplete().BindLambda(
        [this, RequestPtr, OnCompletedRequest](FHttpRequestPtr InRequest,
                                                FHttpResponsePtr InResponse,
                                                bool bWasSuccessful)
        {
            // Remove from tracking
            PendingRequests.Remove(RequestPtr);

            // Handle no response (network error, timeout, etc.)
            if (!InResponse.IsValid())
            {
                FResponseBase Error;
                Error.bSuccess = false;
                Error.StatusCode = 0;
                Error.ErrorMessage = TEXT("Request Failed: No response received.");
                OnCompletedRequest.ExecuteIfBound(Error);
                return;
            }

            // Build response
            FResponseBase Response;
            Response.bSuccess = bWasSuccessful && EHttpResponseCodes::IsOk(InResponse->GetResponseCode());
            Response.RawJson = InResponse->GetContentAsString();
            Response.StatusCode = InResponse->GetResponseCode();

            LogHttpResponse(InRequest, InResponse, bWasSuccessful);
            OnCompletedRequest.ExecuteIfBound(Response);
        });

    // Actually send the request
    if (!Request->ProcessRequest())
    {
        PendingRequests.Remove(RequestPtr);
        FResponseBase Error;
        Error.bSuccess = false;
        Error.StatusCode = -1;
        Error.ErrorMessage = TEXT("HTTP Request failed to start.");
        OnCompletedRequest.ExecuteIfBound(Error);
    }
}
So that's pretty much it (additional information at IHttpRequest).The FHttpRequestCompleteDelegate you get back when binding the completion callback ( Request->OnProcessRequestComplete().BindLambda ) gives you access to both the request and response info from the request. Which you can read and store out for additional data if desired.
Adding Logging
Let's take a look at a good default logger as well so you can quickly identify any potential problems with your request in the editor or IDE’s output tab.
void UMyAPIClient::LogHttpResponse(const FHttpRequestPtr& Request, const FHttpResponsePtr& Response, bool bWasSuccessful)
{
    // Request Info
    const FString Verb = Request.IsValid() ? Request->GetVerb() : TEXT("UnknownVerb");
    const FString URL = Request.IsValid() ? Request->GetURL() : TEXT("UnknownURL");
    const float ElapsedMs = Request.IsValid() ? (Request->GetElapsedTime() * 1000.0f) : -1.0f;

    // If no response object, this means transport-level failure
    if (!Response.IsValid())
    {
        UE_LOG(LogMyAPI, Error, TEXT("[HTTP] Verb=%s URL=%s Code=NO_RESPONSE Time=%.2fms Success=%d Size=0 Body=<NONE>"),
            *Verb,
            *URL,
            ElapsedMs,
            bWasSuccessful
        );
        return;
    }

    // Response Info
    const int32 Code = Response->GetResponseCode();
    const FString Body = Response->GetContentAsString();
    const int32 BodySize = Body.Len();

    UE_LOG(LogMyAPI, Log, TEXT("[HTTP] Verb=%s URL=%s Code=%d Time=%.2fms Success=%d Size=%d Body=\"%s\""),
        *Verb,
        *URL,
        Code,
        ElapsedMs,
        bWasSuccessful,
        BodySize,
        *Body
    );
}
Canceling Requests
If you noted that we added our requests in SendRequest to a PendingRequest array, we did this to be able to clean up any in-flight requests during shutdown. This is fairly simple to do as the IHttpRequest pointer provided has easy ways to unbind and cancel the request:
void UMyAPIClient::BeginDestroy()
{
    CancelAllRequests();
    Super::BeginDestroy();
}

void UMyAPIClient::CancelAllRequests()
{
    for (TSharedPtr<IHttpRequest, ESPMode::ThreadSafe>& Request : PendingRequests)
    {
        if (Request.IsValid())
        {
            Request->OnProcessRequestComplete().Unbind();
            Request->CancelRequest();
        }
    }
    PendingRequests.Empty();
}UObject’s BeginDestroy method, as this is the first step in Unreal's garbage collection (see garbage collection section here )Adding Authentication
If you need to manage authentication within your request, that is simple to add as well you would just need to add the appropriate header with your token.
// Bearer Token (e.g. JWT)
Request->SetHeader(TEXT("Authorization"), FString::Printf(TEXT("Bearer %s"), *AuthToken));
Adding Content to the Request Body
And if you need to add information the request body, for a PUT/POST request you can do that via:
Request->SetVerb(TEXT("POST"));
Request->SetContentAsString(JsonBodyString);
Managing Instances with a Subsystem
So now that we have built the HTTP Client, how are we going to instantiate our HTTP client object (UMyAPIClient)? Meet Subsystems!
Subsystems are Unreal's recommended way of handling singletons. They manually handle the lifecycle of your object and can be easily accessed from anywhere (C++ and Blueprints). Since we are just building a simple HTTP client the lifecycle is maintained via a UGameInstanceSubsystem. Let's take a look at how we’d manage the lifecycle of our UMyAPIClient:
// MyAPIGameSubsystem.h
UCLASS()
class MYAPI_API UMyAPIGameSubsystem : public UGameInstanceSubsystem
{
    GENERATED_BODY()
public:
    virtual void Initialize(FSubsystemCollectionBase& Collection) override;
    virtual void Deinitialize() override;

    UFUNCTION(BlueprintPure, Category = "MyAPI")
    UMyAPIClient* GetAPI() const { return APIClient; }
private:
    UPROPERTY()
    TObjectPtr<UMyAPIClient> APIClient;
};

// MyAPIGameSubsystem.cpp
void UMyAPIGameSubsystem::Initialize(FSubsystemCollectionBase& Collection)
{
    Super::Initialize(Collection);
    APIClient = NewObject<UMyAPIClient>(this);
}

void UMyAPIGameSubsystem::Deinitialize()
{
    if (::IsValid(APIClient))
    {
        APIClient->CancelAllRequests();
    }
    APIClient = nullptr;
    Super::Deinitialize();
}
Easy! Now our Client’s lifecycle is fully managed for us and we can access it via a simple getter (checkout Unreal Object Handling).
CancelAllRequests() here first as this happens before garbage collection, we cancel in UMyAPIClient::BeginDestroy as a safety net.Data Structures and Delegates
For both parsing JSON received from your HTTP request, and end-user access to the parsed data, we need to set up data structures and delegates.
Setting up the Data Structure
When setting up your data structures you want to make sure that the Name (case-insensitive) and Type should match that of your expected API’s JSON. Unreal’s JSON parsing even supports nested JSON so you can have nested UStruct`s that match nesting in your JSON. Take this example below of a matching UStruct to JSON.
struct FBar
{
    GENERATED_BODY()

    UPROPERTY(BlueprintReadOnly)
    FString Index;

    UPROPERTY(BlueprintReadOnly)
    FString Name;
}
// Specific response type
USTRUCT(BlueprintType)
struct FFooDetail : public FResponseBase
{
    GENERATED_BODY()

    UPROPERTY(BlueprintReadOnly)
    FString Index;

    UPROPERTY(BlueprintReadOnly)
    FString Name;

    UPROPERTY(BlueprintReadOnly)
    FString Title;

    UPROPERTY(BlueprintReadOnly)
    TArray Description;

    UPROPERTY(BlueprintReadOnly)
    TArray Items;  // Nested struct array
};
{
"Index": "foo_1",
"Name": "Example Foo",
"Title": "The Complete Foo",
"Description": [
"This is the first line of the description.",
"This is the second line with more details."
],
"Items": [
{
"Index": "bar_1",
"Name": "First Bar"
},
{
"Index": "bar_2",
"Name": "Second Bar"
}
]
}Setting up the Delegates
Next you'll want to set up a delegate per struct you wish to serialize into. This delegate can then be re-used in any function/endpoint that has matching JSON output. There are 2 main types of delegates shown below, dynamic and regular delegates. Dynamic delegates are needed for access to the callback in Blueprints, while they can technically be used for native C++ as well, they carry additional overhead that can be avoided.
// Blueprint delegates (DYNAMIC) - can bind in BP Event Graphs
DECLARE_DYNAMIC_DELEGATE_OneParam(FFooDetailCallbackBP, const FFooDetail&, Result);

// Native C++ delegates - more flexible, better performance
DECLARE_DELEGATE_OneParam(FFooDetailDelegate, const FFooDetail&);
Finally, to allow for polymorphic use in functions you can create a base struct that all structs inherit from; FResponseBase. This contains generic information about what happened in an HTTP request, and a corresponding delegate; FResponseCallback()
// Base struct all responses inherit from
USTRUCT(BlueprintType)
struct FResponseBase
{
    GENERATED_BODY()

    UPROPERTY(BlueprintReadOnly)
    bool bSuccess = false;

    UPROPERTY(BlueprintReadOnly)
    int32 StatusCode = 0;

    UPROPERTY(BlueprintReadOnly)
    FString ErrorMessage;

    // Raw JSON for debugging - not exposed to BP
    FString RawJson;
};

// Base delegate for a Response Callback
DECLARE_DELEGATE_OneParam(FResponseCallback, const FResponseBase&);
JSON Serialization patterns in Unreal
Unreal offers multiple approaches to Serialization/Deserialization this section will break down each pattern
Method 1: FJsonObjectConverter (one-step)
This is the simplest approach: a quick 1-1 conversion of a raw JsonString to a UStruct. With Deserialization looking like this
// Custom Wrapper Function
template<typename T>
static bool DeserializeWithJsonObjectConverter(const FString& JsonString, T& OutStruct)
{
    return FJsonObjectConverter::JsonObjectStringToUStruct<T>(JsonString, &OutStruct, 0 /*check flags*/, 0 /*skip flags*/, false /*strict mode*/, nullptr /*out fail text*/, nullptr /*ImportCB*/);
}
And a matching Serialization method
// Custom Wrapper Function
template<typename T>
static bool SerializeWithJsonObjectConverter(const T& InStruct, FString& OutJsonString, bool bPretty = false)
{
    // Last parameter controls pretty printing - false for compact, true for indented
    return FJsonObjectConverter::UStructToJsonObjectString<T>(InStruct, OutJsonString, 0 /*check flags*/, 0/*skip flags*/, 0 /*indent*/, nullptr /*ExportCB*/, bPretty);
}
Both of the FJsonObjectConverter functions have a matching FJsonObjectConverter::CustomImportCallback or FJsonObjectConverter::CustomExportCallback that can be used to handle special cases during conversion, look at this import example where when reaching the struct UPROPERTY “CreatedAt” we convert FJsonValue from a string to an FDateTime.
// Import: JSON -> UStruct (during deserialization)
FJsonObjectConverter::CustomImportCallback ImportCB =
    [](const TSharedPtr<FJsonValue>& JsonValue, FProperty* Property, void* OutValue) -> bool
{
    // Example: Parse ISO 8601 date string to FDateTime
    if (Property->GetName() == TEXT("CreatedAt"))
    {
        FDateTime* DateTime = static_cast<FDateTime*>(OutValue);
        return FDateTime::ParseIso8601(*JsonValue->AsString(), *DateTime);
    }
    return false;  // Return false to use default behavior
};
You can also do the opposite while exporting:
// Export: UStruct -> JSON (during serialization)
FJsonObjectConverter::CustomExportCallback ExportCB =
    [](FProperty* Property, const void* Value) -> TSharedPtr<FJsonValue>
{
    // Example: Format FDateTime as ISO 8601 string
    if (Property->GetName() == TEXT("CreatedAt"))
    {
        const FDateTime* DateTime = static_cast<const FDateTime*>(Value);
        return MakeShared<FJsonValueString>(DateTime->ToIso8601());
    }
    return nullptr;  // Return nullptr to use default behavior
};
FJsonObjectConverter Benefits
The advantages of using FJsonObjectConverter is that it provides minimal code, automatically maps the JSON to UPROPERTY defined in the struct, handles nested structures, and allows you to do custom conversions of JSON type to property type. However, it can be harder to debug and provides no access to an intermediate JSON object (next section), providing less control over parsing.
Method 2: TJsonReaderFactory and TJsonWriterFactory(two-step)
TJsonReaderFactory is a more verbose parsing method, it gives you access to an intermediate FJsonObject which you can manipulate and read. Let's take a look at Deserialization
// Custom Wrapper Function
template<typename T>
static bool ParseWithJsonReaderFactory(const FString& JsonString, T& OutStruct)
{
    // Step 1: Parse JSON string to FJsonObject
    TSharedRef<TJsonReader<>> JsonReader = TJsonReaderFactory<>::Create(JsonString);
    TSharedPtr<FJsonObject> JsonObject;

    if (!FJsonSerializer::Deserialize(JsonReader, JsonObject) || !JsonObject.IsValid())
    {
        UE_LOG(LogTemp, Warning, TEXT("Failed to deserialize JSON string"));
        return false;
    }

    // Rename field before conversion
    if (JsonObject->HasField(TEXT("foo_name")))
    {
        TSharedPtr<FJsonValue> Value =       JsonObject->TryGetField(TEXT("foo_name"));
        JsonObject->SetField(TEXT("FooName"), Value);
        JsonObject->RemoveField(TEXT("foo_name"));
    }

    // Step 2: Convert FJsonObject to UStruct
    if (!FJsonObjectConverter::JsonObjectToUStruct<T>(JsonObject.ToSharedRef(), &OutStruct, 0, 0))
    {
        UE_LOG(LogTemp, Warning, TEXT("Failed to convert FJsonObject to UStruct"));
        return false;
    }
    return true;
}
In here you can see that after Step 1 we have access to a FJsonObject which we can use to manipulate the object before converting to the UStruct. In this example the JSON has a field with snake case, when unreal wants camel case, so we manipulate it to fit Unreal's style and our struct.
Now let's take a look at the matching Serialization method:
// Custom Wrapper Function
template<typename T>
static bool StructToPrettyJsonString(const T& InStruct, FString& OutJsonString)
{
    TSharedPtr<FJsonObject> JsonObject = FJsonObjectConverter::UStructToJsonObject<T>(InStruct);
    if (!JsonObject.IsValid())
    {
        return false;
    }

    bool bSuccess = false;
    if (bPretty)
    {
        // Pretty print with indentation
        TSharedRef<TJsonWriter<TCHAR, TPrettyJsonPrintPolicy<TCHAR>>> Writer =
            TJsonWriterFactory<TCHAR, TPrettyJsonPrintPolicy<TCHAR>>::Create(&OutJsonString);
        bSuccess = FJsonSerializer::Serialize(JsonObject.ToSharedRef(), Writer);
        Writer->Close();
    }
    else
    {
        // Compact output - no whitespace
        TSharedRef<TJsonWriter<TCHAR, TCondensedJsonPrintPolicy<TCHAR>>> Writer =
            TJsonWriterFactory<TCHAR, TCondensedJsonPrintPolicy<TCHAR>>::Create(&OutJsonString);
        bSuccess = FJsonSerializer::Serialize(JsonObject.ToSharedRef(), Writer);
        Writer->Close();
    }

    return bSuccess;
}
One additional thing to note here is that you can change the print policy of the string. In this function as so aptly named. We make the resulting JSON string have a TPrettyJsonPrintPolicy, which makes the output look like proper JSON with tabs and spaces (see more at TJsonPrintPolicy).
TJsonReader/WritterFactory Benefits
As mentioned already the biggest benefit is that this gives you access to the intermediate FJsonObject, so you can inspect/modify fields or even compress the JSON before converting into a struct. You can also selectively extract certain fields, which is beneficial for API’s with inconsistent schemas, but you know you want to extract certain data. The major disadvantage with this method is that it incurs slightly more overhead than the FJsonObjectConverter.
Floating Point Precision Gotcha’s
One last thing to note is that serializing/deserializing floating point values to and from JSON can provide inaccuracies. Look at this example:
float Value = 1.1f;
// After JSON serialize -> deserialize:
// Value might be 1.10000002384185791
The JSON library may attempt to add as many digits as possible for accuracy, but in doing so can convert something like 1.1000 -> 1.00001234.
The get around for this is to simply store values you care about precision as strings, and then when needed use string to float converters like Value = FCString::Atof(*ValueString);
Where does the JSON serialization happen?
The diagram below looks at the entire workflow of how we go from an HTTP request to a serialized output struct that is given to the end user.
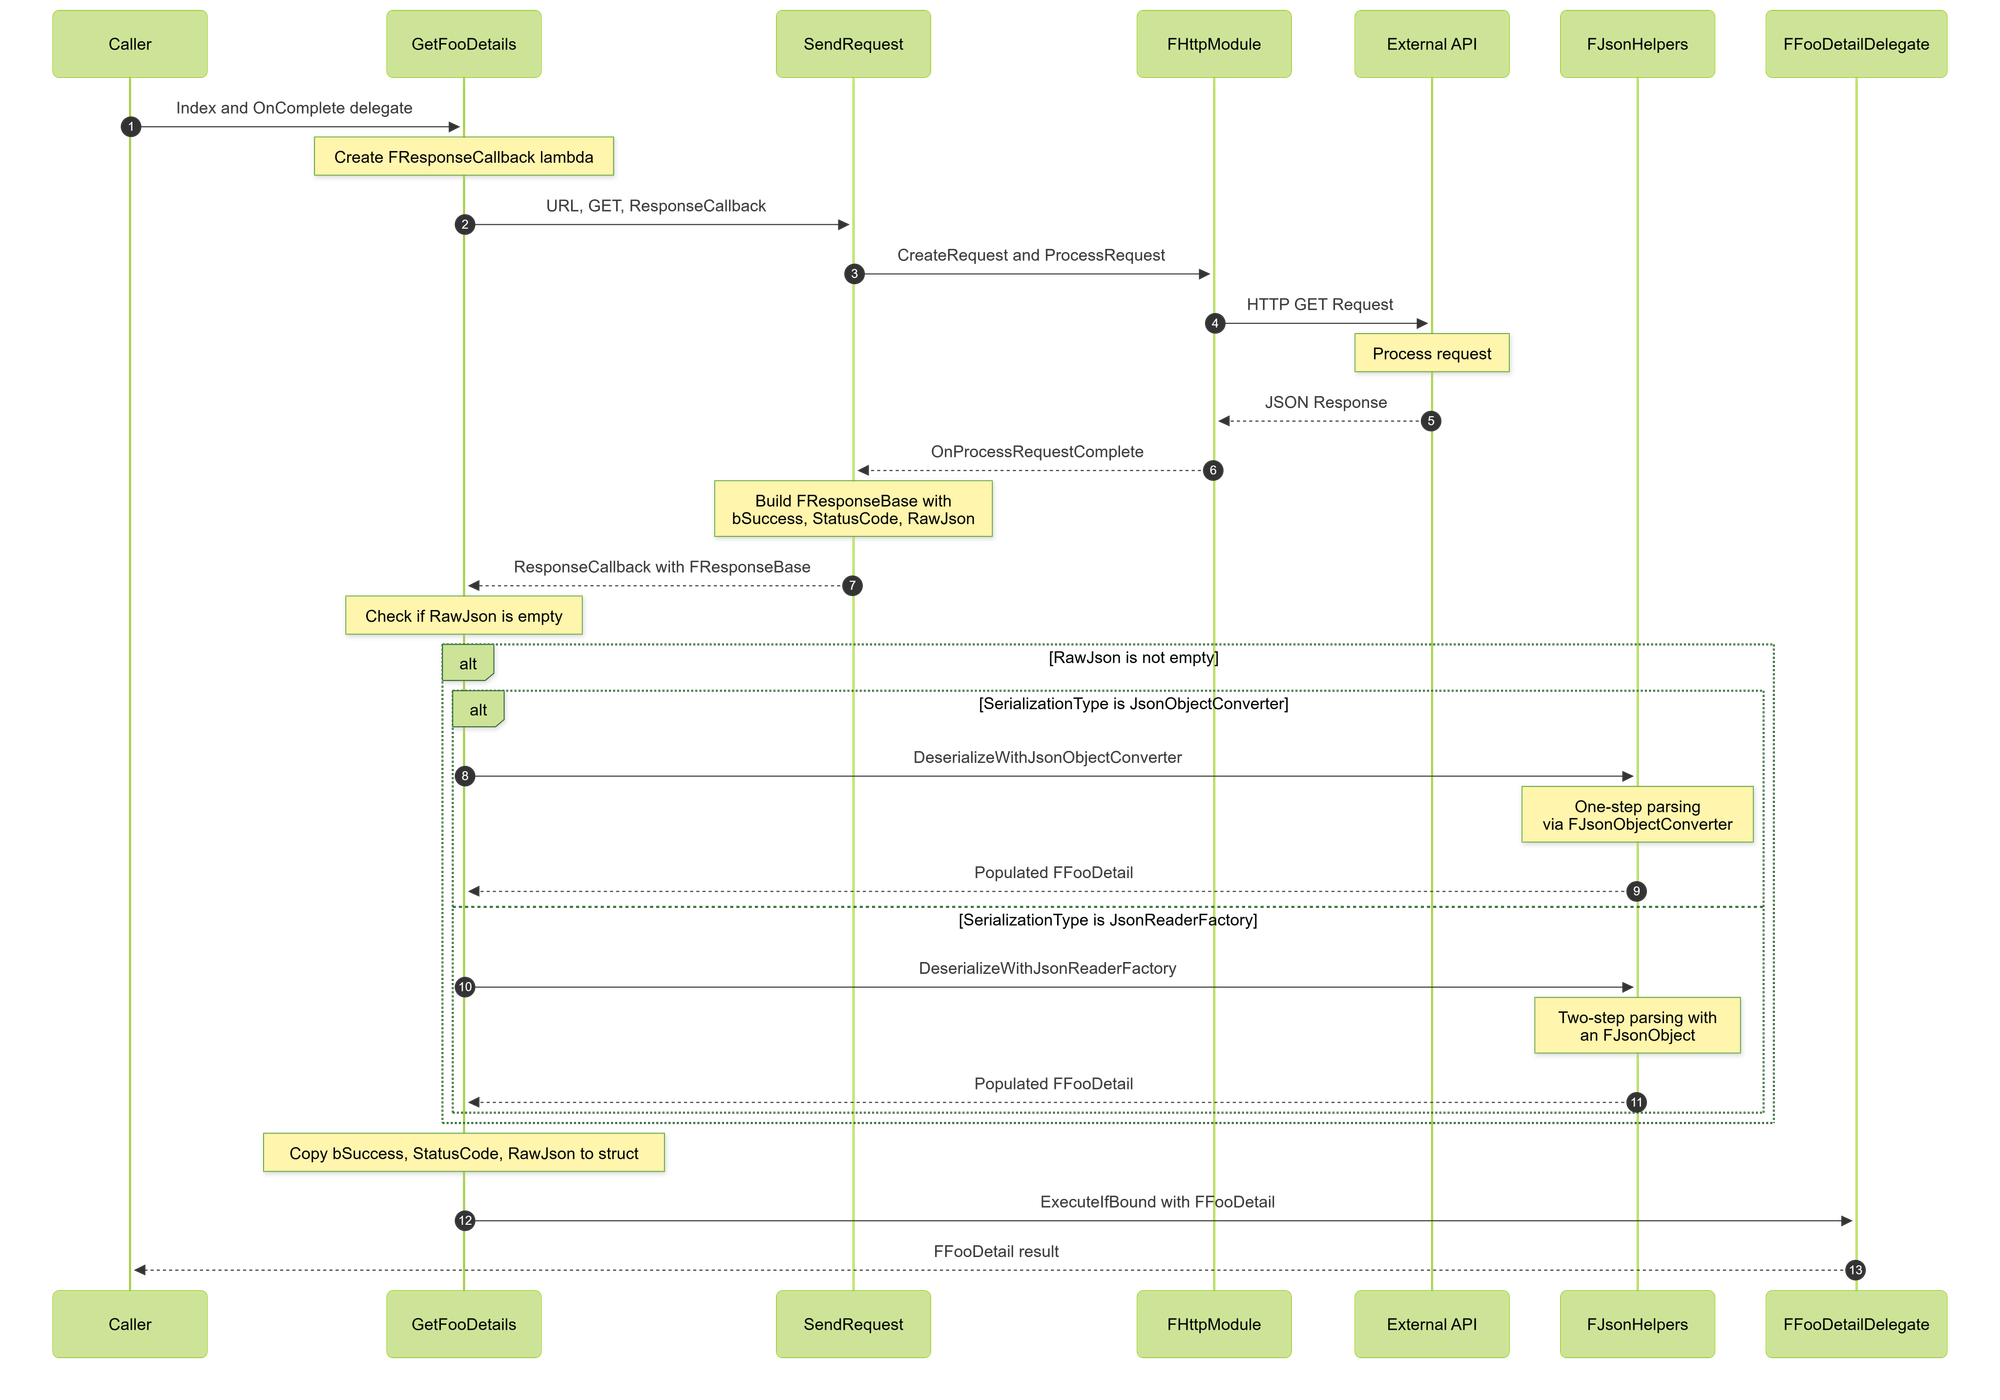
GetFooDetails is the last part of the puzzle: This is the user's entry point into the request. The user may pass in their own custom delegate which they can use to trigger subsequent requests, display UI, or anything else (the world's your oyster). After the bound delegate completes in SendRequest, the Created lambda in GetFooDetails is called. Which for demonstration purposes deserializes the JSON to our UStruct using our FJsonHelper functions discussed earlier (as long as we have a valid body). Once done whether successful or not we execute the users delegate, now they have access to the request results!
void GetFooDetails(const FString& Index, FFooDetailDelegate OnCompletedRequest)
{
    FResponseCallback Response = FResponseCallback::CreateLambda([OnCompletedRequest, SerializationType](FResponseBase InResponse)
    {
        FFooDetail FooStruct;

        // Json will be empty if the request failed (Managed in UMyAPIClient::SendRequest)
        if (!InResponse.RawJson.IsEmpty())
        {
            switch (SerializationType)
            {
            case EJsonSerializationType::JsonObjectConverter:
                FJsonHelpers::ParseWithJsonObjectConverter<FFooDetail
>(InResponse.RawJson, FooStruct);
                break;

            case EJsonSerializationType::JsonReaderFactory:
                FJsonHelpers::ParseWithJsonReaderFactory<FFooDetail
>(InResponse.RawJson, FooStruct);
                break;
            }
        }

        FooStruct.bSuccess = InResponse.bSuccess;
        FooStruct.StatusCode = InResponse.StatusCode;
        FooStruct.RawJson = InResponse.RawJson;

        OnCompletedRequest.ExecuteIfBound(FooStruct);
    });

    return SendRequest(GetFooDetailsURL, “GET", Response)
}FResponseCallback into its own custom function so other GetX functions can call it as well, reducing codebloat. Reading and Writing JSON to Disk
Unreal provides a platform-agnostic file I/O through FFileHelper and FPaths for accessing common directories .
Saving
Assuming you have already serialized your Structs to JSON string this is very straight forward. You can access your save directory via:
static FString GetCacheDirectory()
    {
        return FPaths::ProjectSavedDir() / TEXT("APICache");
    }
And then with help from FFileHelper you can encode it to disk:
static bool SaveJsonToFile(const FString& JsonString, const FString& Filename)
    {
        const FString FilePath = GetCacheDirectory() / Filename;

        // Ensure directory exists
        IFileManager::Get().MakeDirectory(*FPaths::GetPath(FilePath), true);

        return FFileHelper::SaveStringToFile(JsonString, *FilePath,
            FFileHelper::EEncodingOptions::ForceUTF8WithoutBOM);
    }
Loading
Loading is straightforward as well. We can simply access the file from the directory we saved and load it into a string. Once the string is loaded you can of course serialize it into structs like normal
static bool LoadJsonFromFile(const FString& Filename, FString& OutJsonString)
{
    const FString FilePath = GetCacheDirectory() / Filename;

    if (!FPaths::FileExists(FilePath))
    {
        return false;
    }
    return FFileHelper::LoadFileToString(OutJsonString, *FilePath);
Testing with Console Commands
Unreal provides very simple ways of triggering code without having to create game objects, or attaching scripts to levels. Meet FAutoConsoleCommand (static/global variant) and IConsoleCommands (manual and object bound variant). Since we really only care about doing this in editor and want to spin this up quickly lets use a static FAutoConsoleCommand, let's look at this simple example below that takes in arguments:
static FAutoConsoleCommand Cmd_GetItems(
    TEXT("MyAPI.GetItems"),
    TEXT("Fetch all items. Usage: MyAPI.GetItems [bSave] [bPretty]"),
    FConsoleCommandWithArgsDelegate::CreateStatic([](const TArray<FString>& Args)
    {
        UMyAPIGameSubsystem* Subsystem = GetMyAPISubsystem();
        UMyAPIClient* API = Subsystem->GetAPI();

        const bool bSaveToFile = Args.Num() >= 1 && Args[0].ToBool();
        const bool bPretty = Args.Num() < 2 || Args[1].ToBool();

        API->GetItemsList(
            FItemsListDelegate::CreateLambda([bSaveToFile, bPretty](const FItemList& Result)
            {
                UE_LOG(LogTemp, Log, TEXT("Success=%d Count=%d"), Result.bSuccess, Result.Count);

                if (bSaveToFile && Result.bSuccess)
                {
                    FJsonFileHelpers::SaveStructToFile(Result, TEXT("Items.json"), bPretty);
                }
            })
        );
    })
);
#if WITH_EDITORLooking at this the first parameter is the Console command you type to call the function, the second is the helpful tooltip provided when typing it in the console, and lastly you have your registered function. There are different commands that provide access to arguments, world context, and an output device. So this function is pretty straightforward, we read the arguments the user passed in ensuring they are correct, and then call our GetItemList API, and save the output to file if so desired.
Future Additions and Next Steps
Hopefully this gives you a good look at the basic infrastructure needed to create a HTTP API client plugin with Unreal Engine. Next steps to look into would be:
- Add response caching with TTL
- Adding retry logic for transient failures
- Batching requests
- Blueprint function libraries for common blueprint nodes.
Work With Rushdown
If you're interested in working with Rushdown on your Unreal (or other) projects, feel free to reach out! You can find us on LinkedIn here.