Edgegap: Globally-scalable Game Servers in an Afternoon

Hi friends! Here at Rushdown multiplayer games are at the center of our co-dev specialization. This is the third post in a series about how to get up and running with popular game server orchestration platforms for your multiplayer game.
For part one, which walks through setting up Amazon GameLift in an afternoon, check out our Amazon GameLift Servers post.
For part two, which walks through setting up Hathora in an afternoon, check out our Hathora Game Servers post.
Introduction: Why Edgegap, Why This Post
Edgegap is a powerful managed service for hosting multiplayer game servers - handling session management, autoscaling, fleet health, and global deployment for you. It aims to be one of the easiest hosting providers to use for this use case. If you’ve ever wrestled with server orchestration or flaky production servers, Edgegap might be for you.
Edgegap’s documentation is generally pretty comprehensive, though it might take some digging to familiarize yourself with key concepts and get a working demo.
This post is for engineers that want to kick the tires and get something working fast without understanding every nuance of Edgegap’s product offering. Our goal:
Pre-Requisites
Go (Golang)
Our sample game client and game server utilize Golang. To run them you’ll need Go 1.24+, which can be downloaded here.
raylib
Our sample game client utilizes Raylib. You can follow the instructions on the gen2brain/raylib-go GitHub repo to install it.
Docker
Edgegap uses Docker, which is a technology that allows you to package your server project in a portable way so that it can be run in any Linux environment.
Docker Desktop is the easiest way to install Docker. Select your OS to follow the specific installation instructions for your set up. Once you download it and install it you must run it as well.
Hello, World: A Minimal Edgegap Demo
To keeps things approachable, we’re starting with a barebones multiplayer setup - simple enough to grasp quickly, but complete enough to deploy and test with Edgegap. We’re intentionally skipping advanced topics like matchmaking and autoscaling for now; the focus is just on getting a server deployed and talking to clients.
Sample Server
One of the things that makes Edgeap easy to ramp up on is the decision to not require any SDKs or library integrations into your game server code in order to deploy them on the platform. This means that any game server is already set up to be deployed on Edgegap. The Edgegap docs provide instructions for deploying Unreal Games and Unity Games that utilize engine plugins. Instead of leaning on those plugins, we’re going to take a look at deploying a bare bones sample that shows you the features of Edgegap without all the overhead of configuring a whole game. This deployment flow will work for any game using any engine.
Our sample server is written in Go. The server does the following:
- Listens for TCP connections on port 9000
- Accepts JSON position updates from players
- Maintains shared state of all player positions
- Broadcasts the current state to all players every 100ms
It’s not a full game, but it covers the fundamentals: connecting clients and synchronizing state.
Sample Client
We have two options for clients:
- Graphical Client (Raylib): Controls a cube in 3D space. This is overkill for our purposes, but it’s way more fun to play with than console output.
- Mock Client: Simulates a player moving in a circular path. This can be handy when you want to test multiple players moving around.
You don’t need a full game to evaluate Edgegap — just enough networking to validate the server flow.
Goal: Running the Sample Locally
Before moving on, let’s make sure you can successfully clone, build, and run the server and client.
# Clone the repo via HTTPS
$ git clone <https://github.com/Rushdown-Studios/EdgegapDemo.git>
Cloning into 'EdgegapDemo'...
remote: Enumerating objects: 14, done.
...
Receiving objects: 100% (14/14), 7.58 KiB | 3.79 MiB/s, done.

# cd into the root of the repo
$ cd EdgegapDemo/
(Option 1 - Advanced/Required) Running The Server
To run the server with the same underlying technology that Edgegap will run it with, Docker, tag and run the image.
# Build a Docker image tagged "edgegap-demo" (we'll use this tag later)
$ docker build -t edgegap-demo .
$ docker run -p 9000:9000 edgegap-demo
(Option 2 - Easy/Optional) Running The Server
You can run also the server directly on your machine without any additional dependencies.
# Run the server
$ go run ./cmd/server
2025/12/08 11:53:46 Server listening on :9000
Running The Clients
Once the server is running, you can run clients in separate terminals:
# Mock client
$ go run ./cmd/mockclient

# Graphical client (WASD + mouse)
$ go run ./cmd/client
You should be able to control a little red cube with third-person WASD and mouse controls. If you start multiple clients, you should be able to see other clients moving around as blue cubes. If you started the mock, you should see an extra player trace out a circle in the middle of the "map".
Configuring Your Server on Edgegap
Edgegap offers various plans, but the “Free” plan provides you with everything you need to get started!
Step 1: Create an Edgegap Account
If you don’t already have an Edgegap account, you’ll need to create one.
Step 2: Configure Container Registry and Upload A Build
See also: Container Registry
The easiest way to upload your game server to Edgegap is using the Edgegap Container Registry. The Container Registry is a privately managed Docker container repository that works much like standard public container registries. If you’re unfamiliar with Docker, that’s okay. We’ll walk you through all the steps you need to follow in this post.
- On the Edgegap dashboard, navigate to https://app.edgegap.com/registry-management/repositories/list
- Click “Request Access”. Access should be automatically granted almost instantly. You should see a “Credentials” section that contains the required credentials to push your build.
- From the command line, login to to the registry
# Use your "Username" from your "Credentials" for your "REPOSITORY_USERNAME"
$ docker login -u '<REPOSITORY_USERNAME>' registry.edgegap.com

# Use your "Token" from your "Credentials" for the password
- Tag your image. We’ll add a tag to the existing image we made previously during local setup. For
YOUR_PROJECTuse the “Project” from your “Credentials”
$ docker tag edgegap-demo registry.edgegap.com/<YOUR_PROJECT>/edgegap-demo:v1
- Push your image
$ docker push registry.edgegap.com/<YOUR_PROJECT>/edgegap-demo:v1
- You are now ready to create an application!
Step 2: Create an Edgegap Application, Version, and Deployment
See also: Edgegap Apps and Versions, + Edgegap Deployments
Next, we’ll lay the foundation for the next step by creating an “Application” on the Edgegap dashboard. An application encapsulates a server project and acts as a container for all deployments.
- On the Edgegap dashboard, navigate to https://app.edgegap.com/application-management/applications/list
- Create a new application and enter a name for it (e.g.
edgegap-demo) - On the next page, you will create a version for your deployment. Use the following values for your version:
- Version Name:
edgegap-demo-v1 - Resource Requirements:
1.5 vCPU,3GiB Memory,0 GPU Units - Registry Profile: Keep the default values
- Container: Keep the default image repository, and use a
v1tag - Activate Caching:
Disabled - Time Constraints: Keep the default values
- China Gateway:
Disabled
- Version Name:

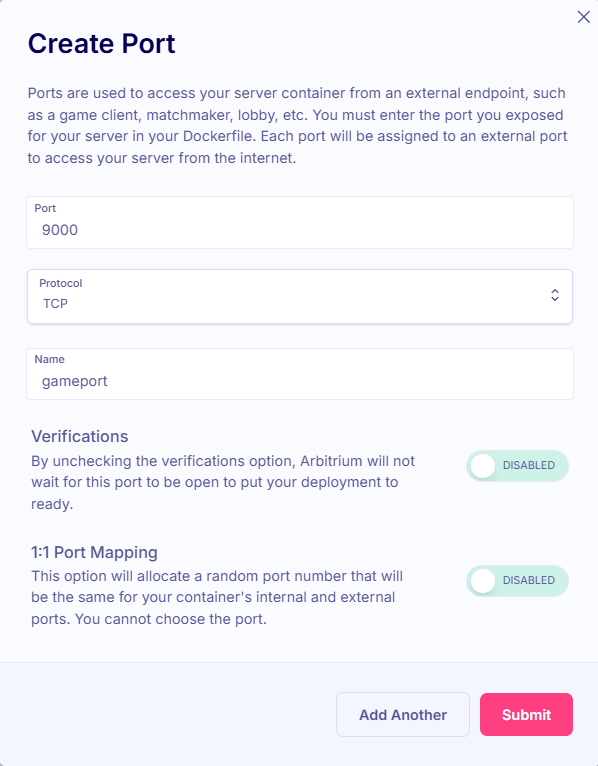
- When prompted to create a port, use the following values (note, this configuration is specific to how our game client and game server work and may be different if you’re setting up your game client and game server)
- Port:
9000 - Protocol:
tcp - Name: Keep the default value
- Verifications:
Disabled - 1:1 Port Mapping:
Disabled - Note: This configuration is specific to how our game client and game server work
- Port:
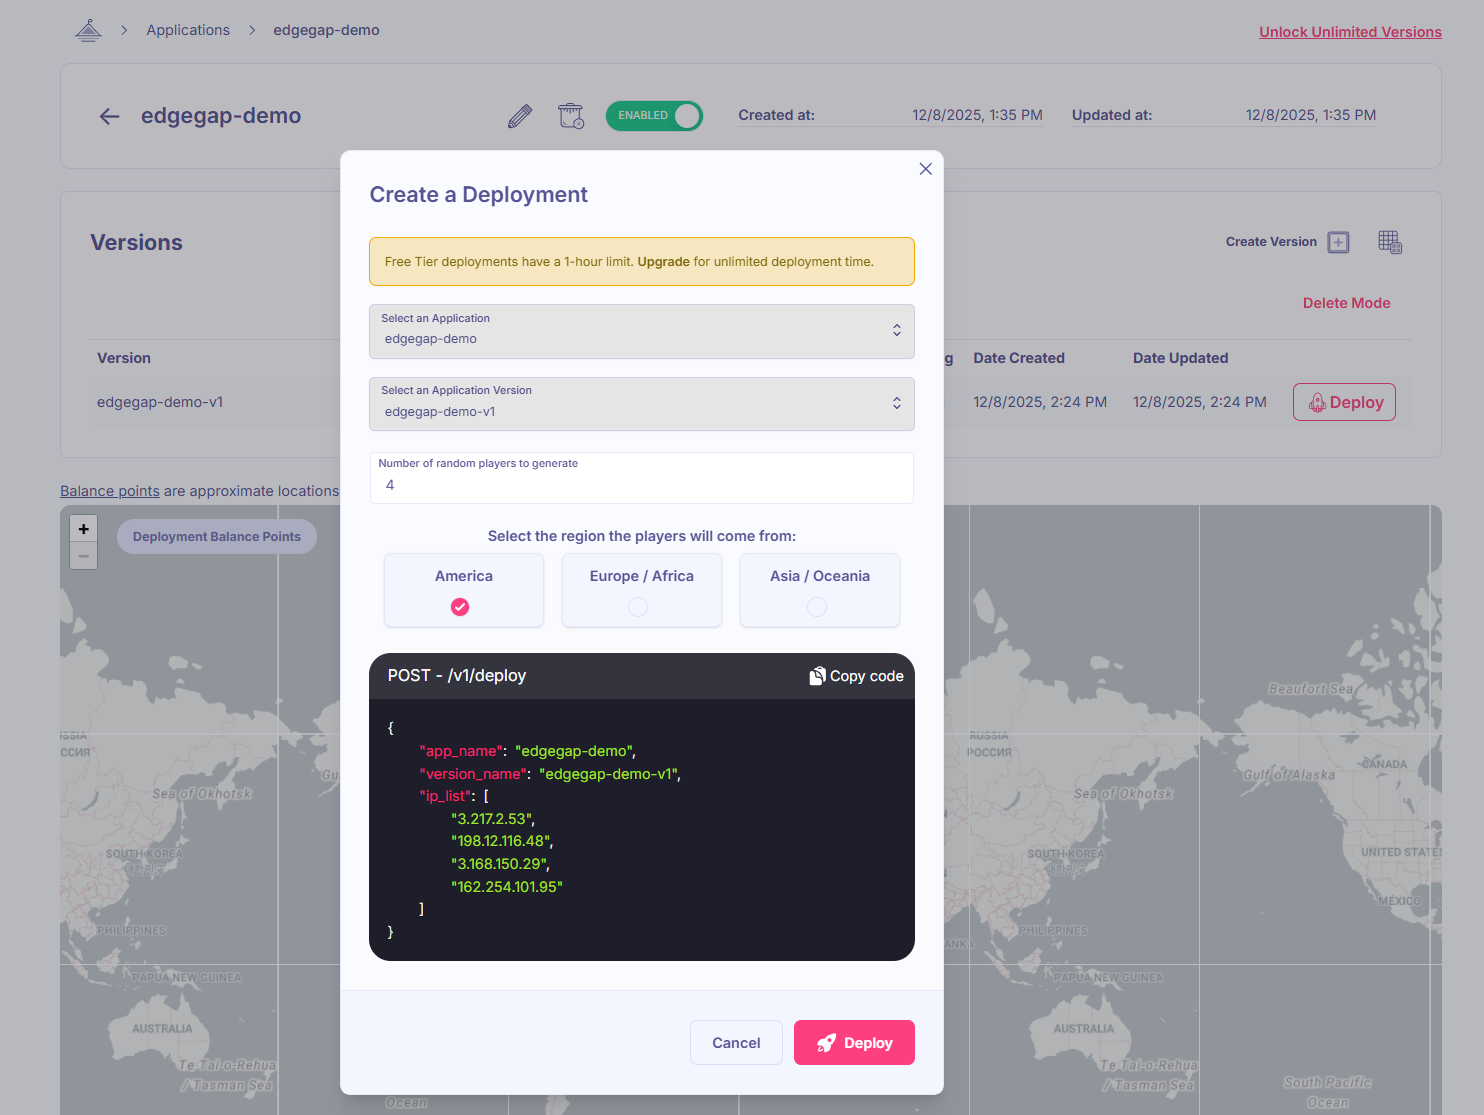
- Once you have the version configured, click the “Deploy” button
- Choose the region that is closest to you.
- Leave the number of random players +
ip_listas-is. Edgegap uses this list of public IPs to determine where to place the game server geographically. For our purposes, we don’t care about this right now. In a production environment, we’d create the deployment programmatically and would provide the public IPs of all players to ensure the game server is optimally placed.
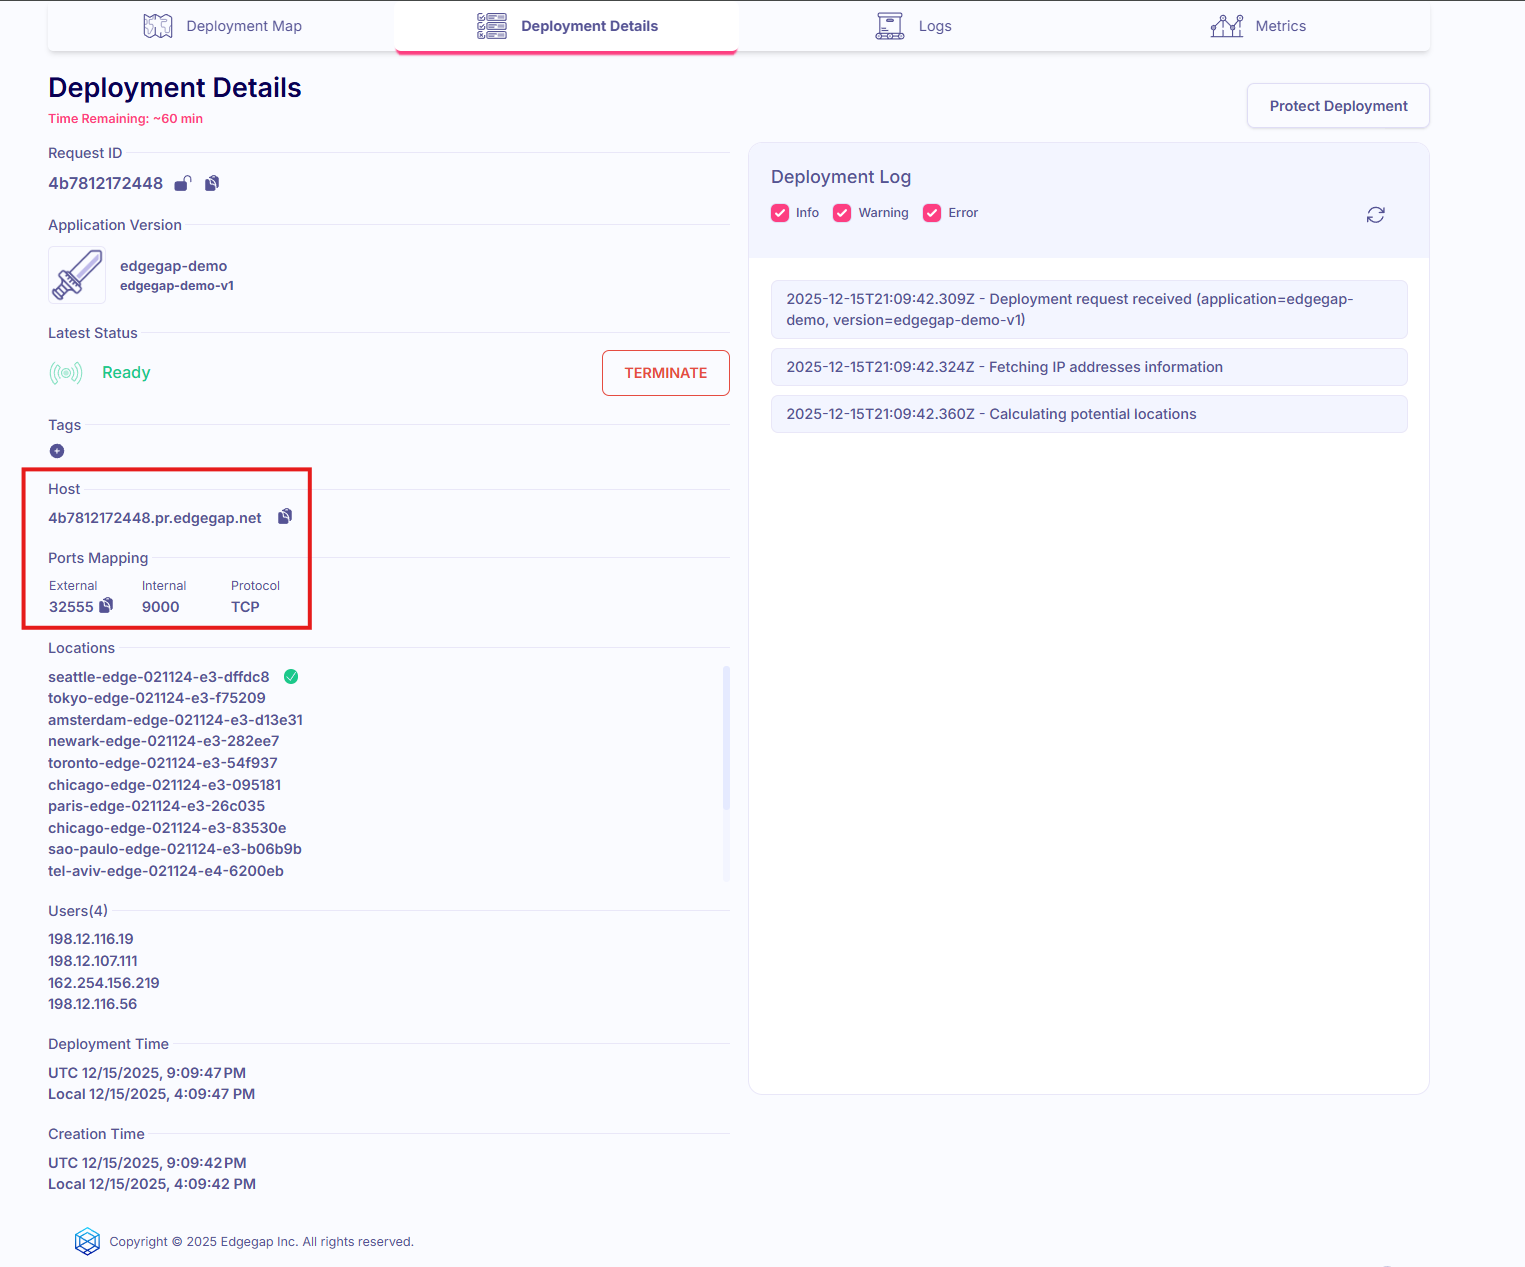
Step 3: Connect Clients to Deployment
Now you can configure client to connect to your server in new terminal windows. Look for the “Host” and the “External Port Mapping” on the “Deployment Details” page for your Deployment on the Edgegap dashboard.
# Mock client
$ go run ./cmd/mockclient --host {your_edgegap_host} --port {your_edgegap_port}

# Graphical client (WASD + mouse)
$ go run ./cmd/client --host {your_edgegap_host} --port {your_edgegap_port}
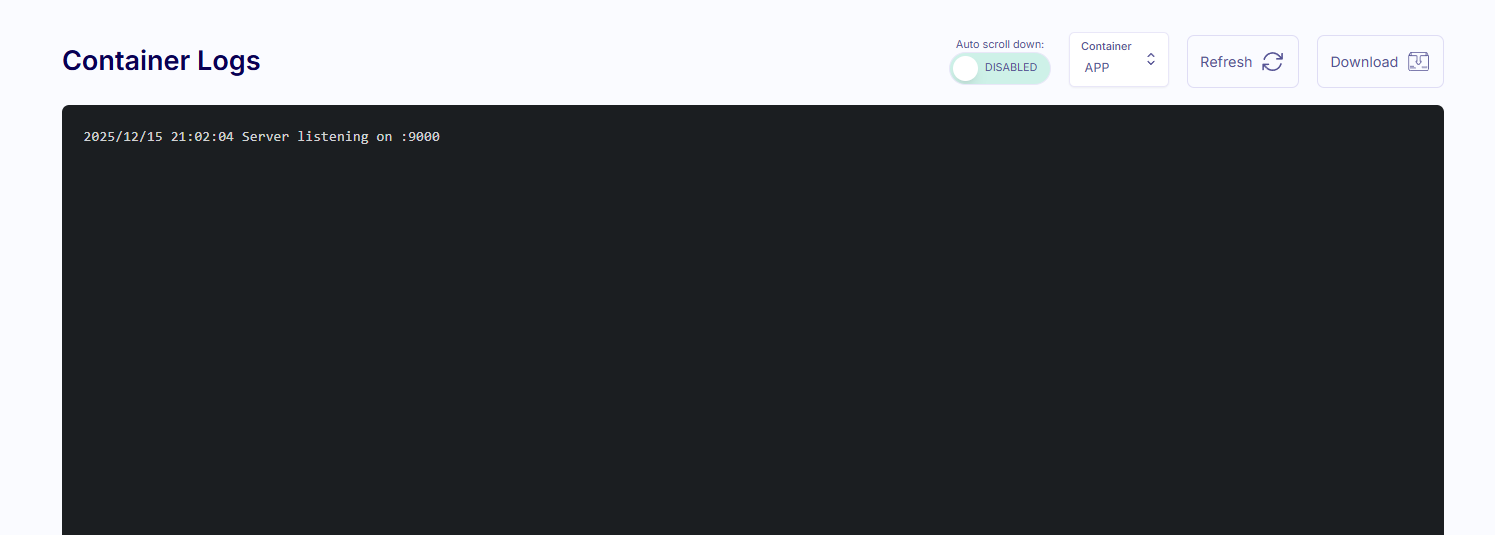
Debugging
Edgegap makes it easy for you to know what’s happening with your game servers!
If you click on the “logs” section of your deployment, you should see relevant logs, such as information about clients that have connected.
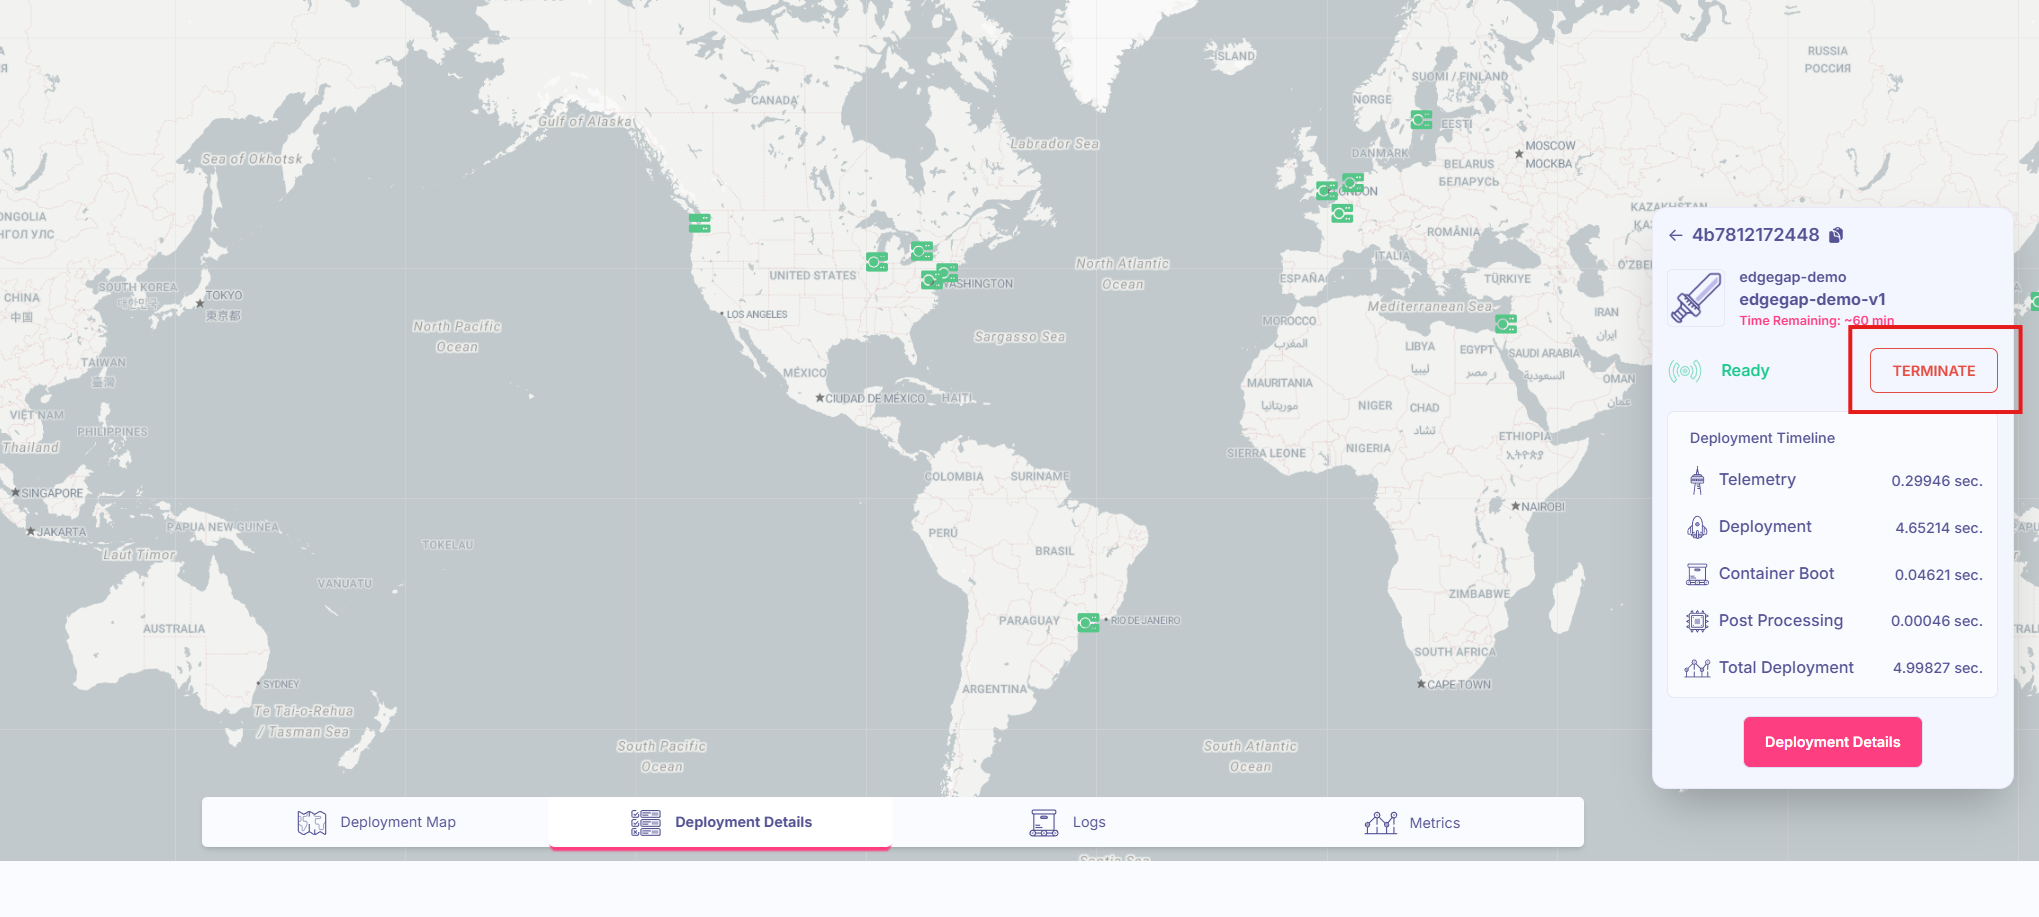
Clean Up
The idle timeout should automatically terminate server processes that extend past the time constraints you configured on your Application Version. If you want to manually terminate them earlier, you can do so by clicking on the Deployment on the dashboard and selecting “Terminate”.
What’s Next?
Now that you have a Deployment up and running, here are a few next steps and tools worth checking out:
- Edgegap Orchestration - Explore advanced concepts such as integrating with Edgegap’s Matchmaker, hosting persistent worlds with Edgegap’s Private Fleets, and optimizing for latency with Edgegap’s Ping Beacons
- API Reference - Read the API Reference to learn how to achieve the same results as we did in this guide programmatically (e.g. from your CI/CD or your matchmaker)
- Unreal Engine Integration Guide - Read the Unreal Engine Integration Guide to learn how to achieve the same results as we did in this guide with the Unreal Engine plugin that Edgegap provides
- Unity Engine Integration Guide - Read the Unity Integration Guide to learn how to achieve the same results as we did in this guide with the Unreal Engine plugin that Edgegap provides
- Sample Projects - Read through the sample projects that Edgegap provides to get a better idea of how to utilize their service with various engine/netcode setups