SlateIM: Immediate Mode UI in Unreal Engine Without External Dependencies


At Rushdown, we’re no strangers to both using and writing developer tooling to help build game features. This post will cover an approach to writing developer tooling using an immediate mode GUI technique in Unreal Engine. Specifically, we will be approaching this without requiring adding third party library dependencies to your project. Allowing you to quickly get up and running with a debug UI and get back to writing feature logic.
Introduction
For debugging in games, where iteration speed is a major factor, immediate mode GUIs are some of the best tools to turn to. Being able to rapidly turn around a visual representation of game state is incredibly valuable. Especially in cases where having a overview of state is greatly beneficial. One of the most popular libraries for immediate mode GUI is Dear ImGui.
Dear ImGui is used in many different contexts, including games with custom engines, desktop applications, and importantly for us, in some Unreal Engine projects as an external dependency. That being said, there are some pain points for Dear ImGui integration in Unreal. It’s API is not designed with Unreal in mind, and typically requires some kind of adapter plugin in front of it to facilitate rendering, input routing, and so on. Additionally, it requires maintaining a third party library dependency, which on its own can be cumbersome.
There is, however, a native solution built-in to Unreal Engine that has been introduced somewhat recently. That solution is SlateIM.
Overview of SlateIM
SlateIM was introduced in Unreal Engine 5.6. It effectively wraps the Slate UI system to expose a way to author immediate mode UIs native to the engine. Its API is very similar to that of Dear ImGui and other immediate mode UI libraries. Exposing a collection of global functions for manipulating the state of the UI each frame. Though, the API more closely follows the naming convention of Slate rather than Dear ImGui.
Example Overview
In this example, we will go through:
- Enabling
SlateIMin the project - Creating a new debug tools module with a game instance subsystem responsible for SlateIM draw calls
- Drawing a simple frame with hello world text
- Adding buttons to call functions in our game module
- Toggling SlateIM rendering with a key combination
This example will also build off of the work from the previous blog post around the UMG Viewmodel plugin.
Enabling SlateIM
To enable SlateIM in your project, you can either go through the editor and enable the plugin. Or you can directly edit your uproject descriptor file and add the plugin to the plugin array. Here is an example of adding the plugin descriptor to the project file directly with a text editor:
{
	// ...
	"Plugins": [
		// ...
		{
			"Name": "SlateIM",
			"Enabled": true
		}
		// ...
	]
	// ...
}
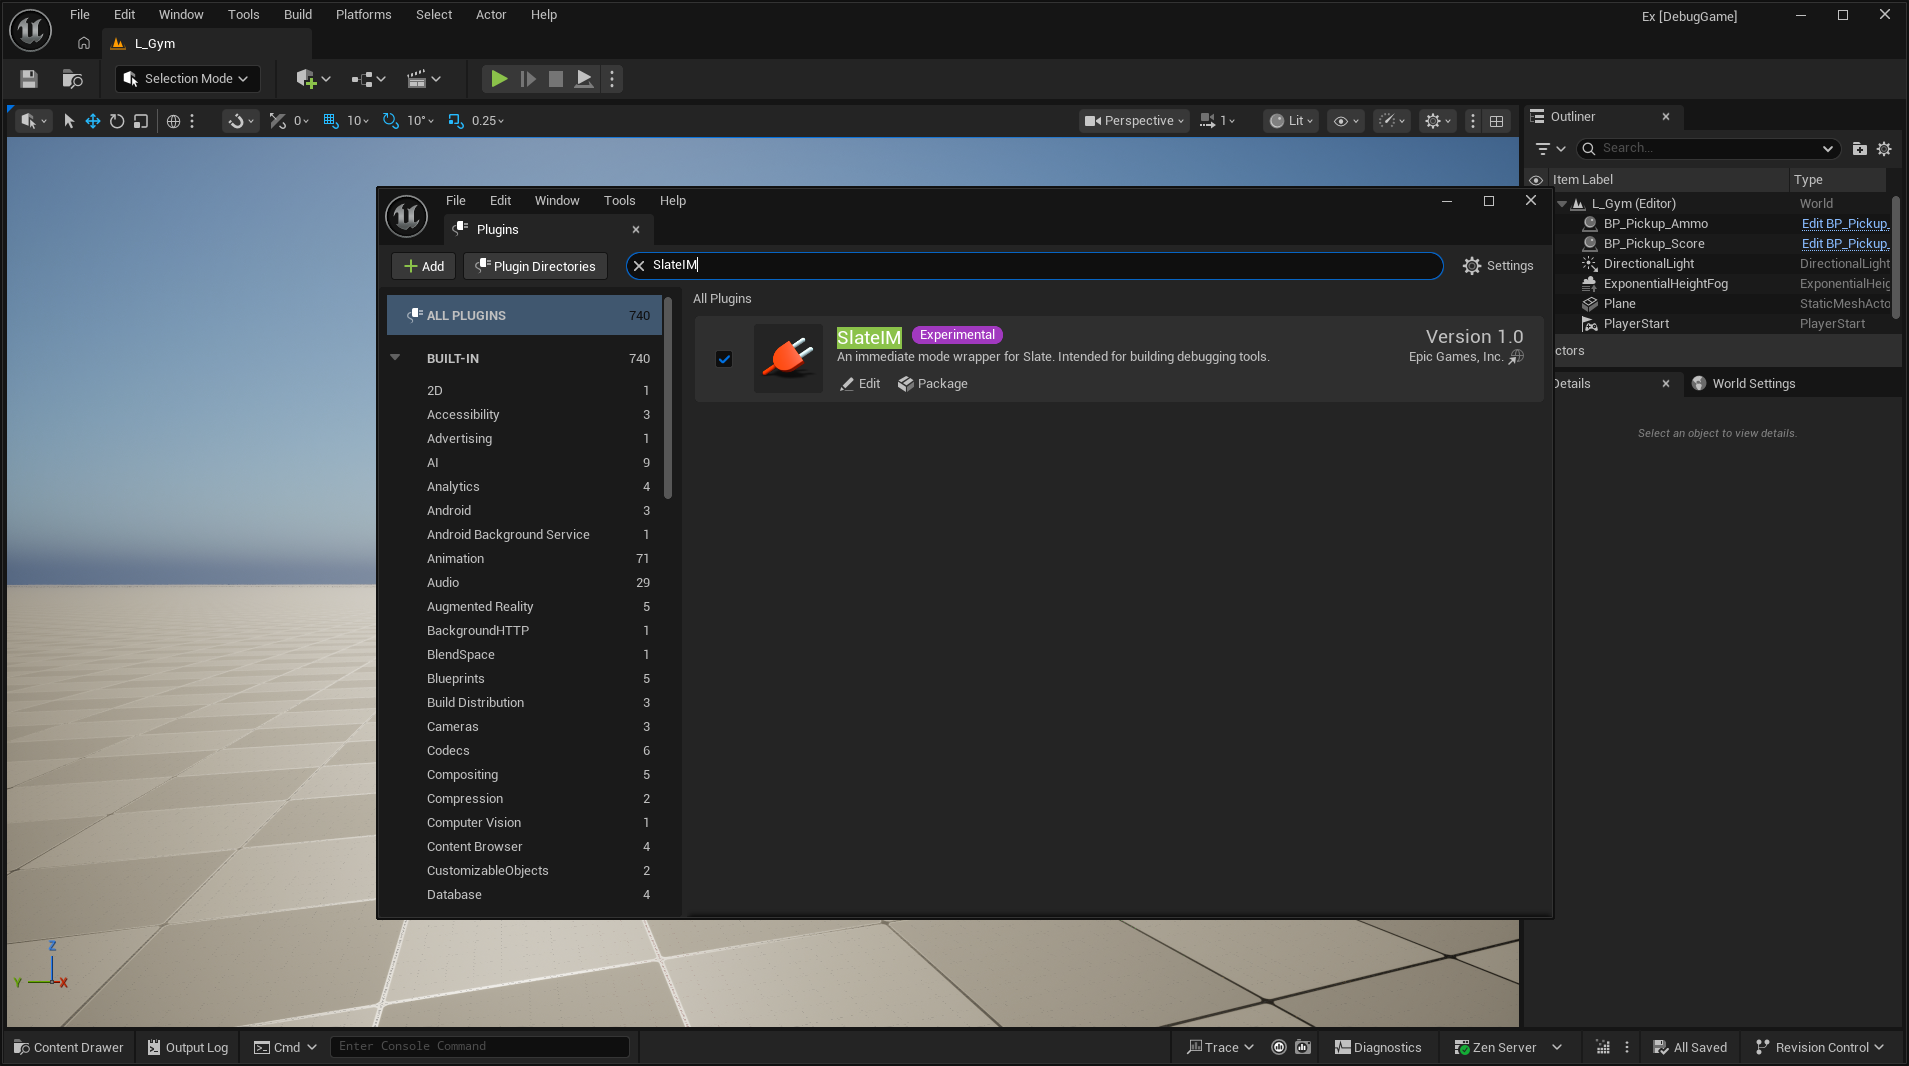
Alternatively, if you would like to use the editor UI to enable the plugin, open the “Edit” dropdown in the main editor window. From there, open the “Plugins” window at the bottom of the dropdown. This should open a window with a list of categories and plugins. Search for SlateIM and tap the checkbox next to it to enable it.
Once enabled, you are going to want to close the editor to move to the next step.
Create a DebugTools Module with SlateIM support
For this example, we will be creating a module separate from our main game module that will be responsible for SlateIM drawing and other logic. This module will be excluded from Shipping builds. This is not strictly necessary, as you can add SlateIM to your game module and make use of it there. But in many cases where the intent is to have SlateIM be used for development-only tooling, having this separation makes it easier to exclude in non-development builds. An additional benefit is that you can test your game module as if it is being called from an external source.
Our example project is named Ex, so we will create a new module in the project called ExDebugTools. To do so, we will create a new folder in the project source folder with the name of our module. Inside of that directory we will add two files, the first is the ExDebugTools.Build.cs file:
using UnrealBuildTool;

public class ExDebugTools : ModuleRules
{
	public ExDebugTools(ReadOnlyTargetRules Target) : base(Target)
	{
		PCHUsage = PCHUsageMode.UseExplicitOrSharedPCHs;

		PublicDependencyModuleNames.AddRange([
			"Core",
			"CoreUObject",
			"Engine",
			"InputCore"
		]);

		PrivateDependencyModuleNames.AddRange([
			"Slate",
			"SlateCore",
			"SlateIM",
		]);
	}
}
Importantly, we are adding the SlateIM module to the private dependencies of our debug tools module. Next, we will create a ExDebugTools.cpp file implementing our module:
#include "Modules/ModuleManager.h"

class FExDebugToolsModule : public IModuleInterface
{
public:
		virtual void StartupModule() override;
		virtual void ShutdownModule() override;

};

void FExDebugToolsModule::StartupModule()
{
}

void FExDebugToolsModule::ShutdownModule()
{
}

IMPLEMENT_MODULE(FExDebugToolsModule, ExDebugTools);
We will create two more files for this module, a header and source file for our game instance subsystem that will manage SlateIM. First is ExDebugToolsSubsystem.h:
#pragma once

#include "CoreMinimal.h"
#include "Subsystems/GameInstanceSubsystem.h"
#include "ExDebugToolsSubsystem.generated.h"

UCLASS()
class UExDebugToolsSubsystem : public UGameInstanceSubsystem
{
		GENERATED_BODY()

public:
		virtual void Initialize(FSubsystemCollectionBase& Collection) override;
		virtual void Deinitialize() override;

};
Next, we will define our methods for this subsystem in ExDebugToolsSubsystem.cpp:
#include "ExDebugToolsSubsystem.h"

DEFINE_LOG_CATEGORY_STATIC(LogExDebugToolsSubsystem, Log, All);

void UExDebugToolsSubsystem::Initialize(FSubsystemCollectionBase& Collection)
{
		Super::Initialize(Collection);

		UE_LOG(LogExDebugToolsSubsystem, Log, TEXT("Initialize()"));
}

void UExDebugToolsSubsystem::Deinitialize()
{
		Super::Deinitialize();
}
We also defined a new log category and added a log line to the Initialize method of the subsystem as an indicator that we have set up the module properly. Finally, we need to add our new module to the project descriptor. In our example, we added:
{
	// ...
	"Modules": [
		// ...
		{
			"Name": "ExDebugTools",
			"Type": "Runtime",
			"LoadingPhase": "Default",
			"TargetConfigurationDenyList": [
				"Shipping"
			]
		}
		// ...
	],
	// ...
}
At this point, regenerate project files and run the editor. Run the game with PIE and in the logs you should see your subsystem’s initialize log.
SlateIM Hello World
At this point, we can begin with a simple SlateIM hello world, drawing border that contains a line of text. First, we need to register a tick function that will be used to issue SlateIM commands each frame. For this, we can hook into the PreTick delegate of the global Slate application. We declare the Tick method that will we will bind in our subsystem’s header file:
// ...

protected:
		void Tick(float DeltaSeconds);

// ...
Next, we will add logic in the Initialize and Deinitialize methods of our subsystem to add the tick method to the PreTick delegate, along with defining a stub of our tick method.
// ...

#include "Framework/Application/SlateApplication.h"

// ...

void UExDebugToolsSubsystem::Initialize(FSubsystemCollectionBase& Collection)
{
		// ...

		FSlateApplication& SlateApp = FSlateApplication::Get();
		SlateApp.OnPreTick().AddUObject(this, &ThisClass::Tick);
}

void UExDebugToolsSubsystem::Deinitialize()
{
		FSlateApplication& SlateApp = FSlateApplication::Get();
		SlateApp.OnPreTick().RemoveAll(this);

		// ...
}

void UExDebugToolsSubsystem::Tick(float DeltaSeconds)
{
}
Now for the SlateIM calls. We will start by setting up a new SlateIM root that we will draw into. This root will be set to draw into the main viewport from our game instance.
void UExDebugToolsSubsystem::Tick(float DeltaSeconds)
{
		UGameInstance* GameInstance = GetGameInstance();
		check(GameInstance != nullptr);

		if (SlateIM::BeginViewportRoot(TEXT("ExDebugToolsViewport"), GameInstance->GetGameViewportClient()))
		{
		}
		SlateIM::EndRoot();
}
In the BeginViewportRoot call, the first argument is a unique name identifying the new viewport root. We then pass in the viewport from the game instance. Familiar to other immediate mode libraries, the begin call will return a boolean indicating if it is able to be drawn into. Subsequent SlateIM calls should only be done within that if statement block. Outside of the block, we want to call EndRoot to signal that we are done drawing to that viewport.
Now, we can add a border widget to the new root. A border in Slate is a basic container that can hold and lay out other widgets, along with having a brush to draw a background. To add a border widget, we can call BeginBorder and EndBorder:
// In SlateIM::BeginViewportRoot ...

SlateIM::BeginBorder(TEXT("ToolPanel.GroupBorder"));
{
}
SlateIM::EndBorder();
Note that we pass a string referring to ToolPanel.GroupBorder. This is a reference to a built-in Slate brush in Unreal used for the background of the border. You can also pass a pointer to an FSlateBrush structure if you want explicit control of the border background.
Finally, inside of the block between the begin and end calls of the border, we can add our text:
// In block between BeginBorder and EndBorder ...

SlateIM::Text(TEXT("Hello world from ExDebugTools in SlateIM!"));
Now, we can run the editor and start a PIE session. Once the PIE session has loaded, you should see something similar to the following.
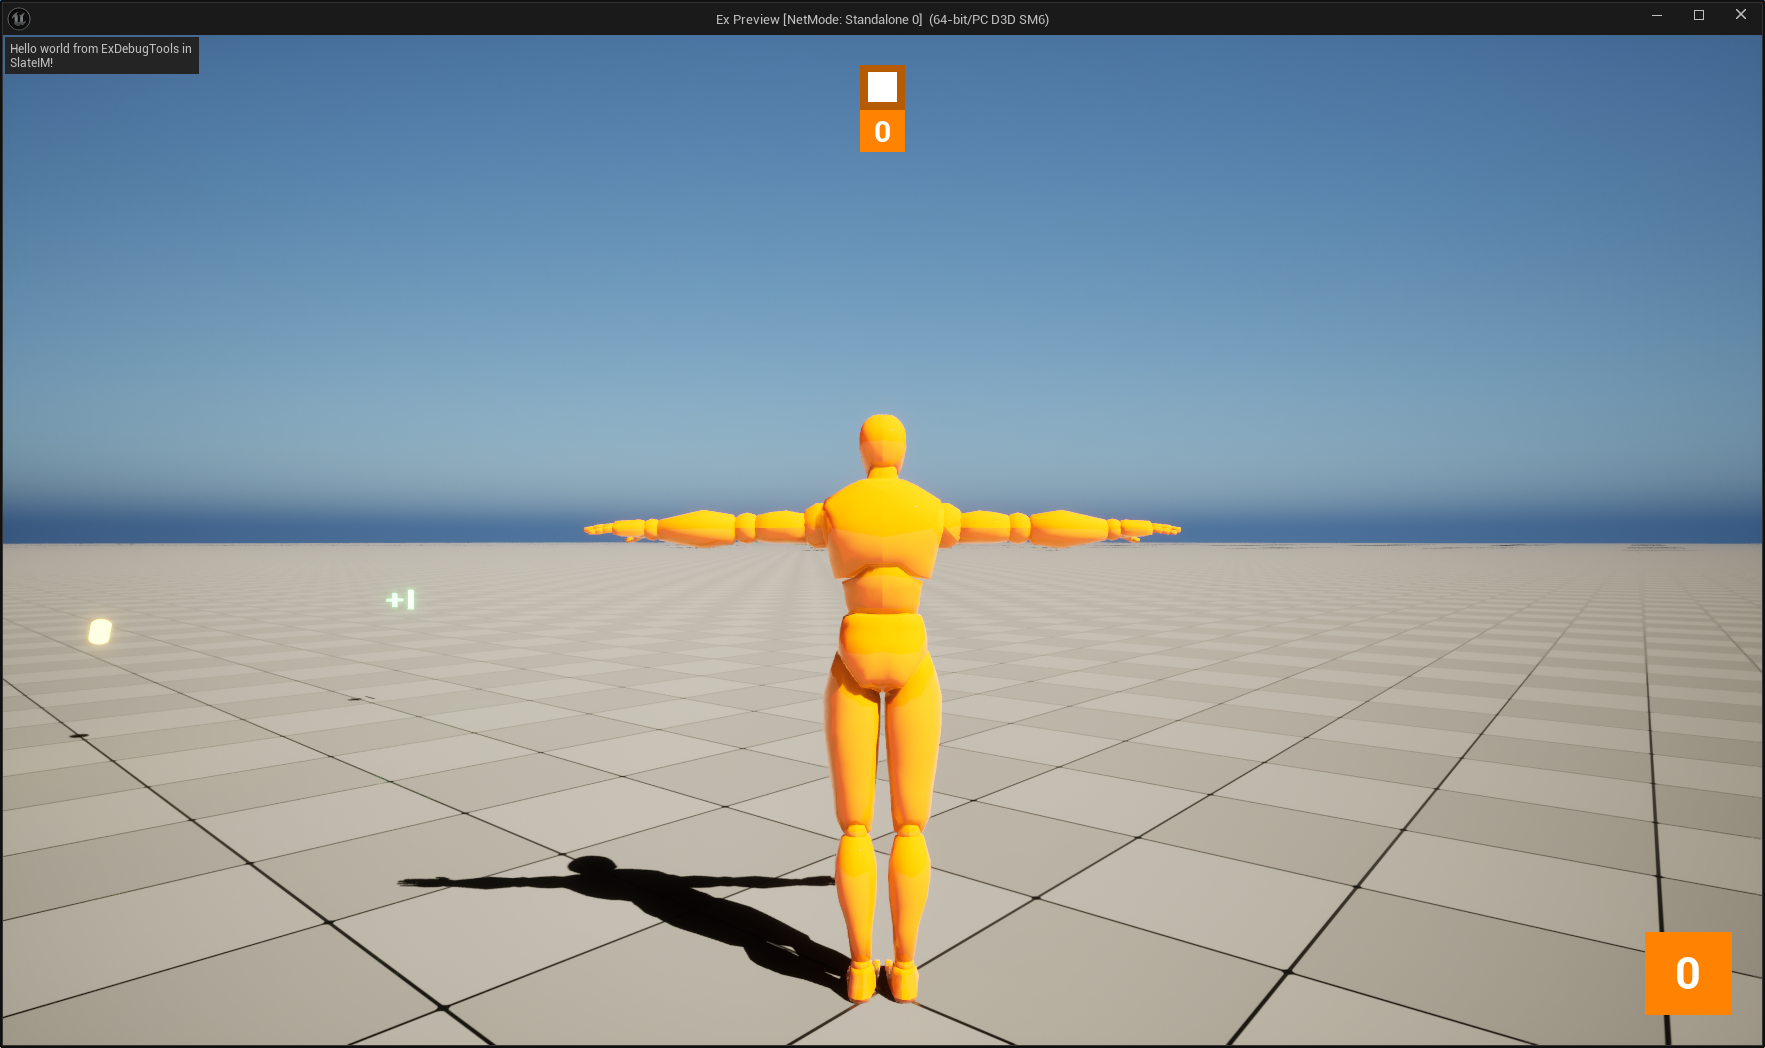
At this point, we have successfully drawn a hello world UI with SlateIM. Next, we will move to a more complex UI that will call two functions from our game module. Before moving on however, the text on screen seems awfully small… SlateIM functions may have optional parameters to control widget behavior or styling. Checking the function declaration in the source is a great way to learn what you are able to control about a widget. For the text widget, we have an optional parameter to control the text style. We want to keep other style parameters the same, but increase the size of the text to 18. To do so, we can create a new FTextBlockStyle structure based on the default values of a Slate text block, and pass that to the text call:
STextBlock::FArguments DefaultTextArguments{};
FTextBlockStyle HelloTextStyle = *DefaultTextArguments._TextStyle;
HelloTextStyle.SetFontSize(24.0f);
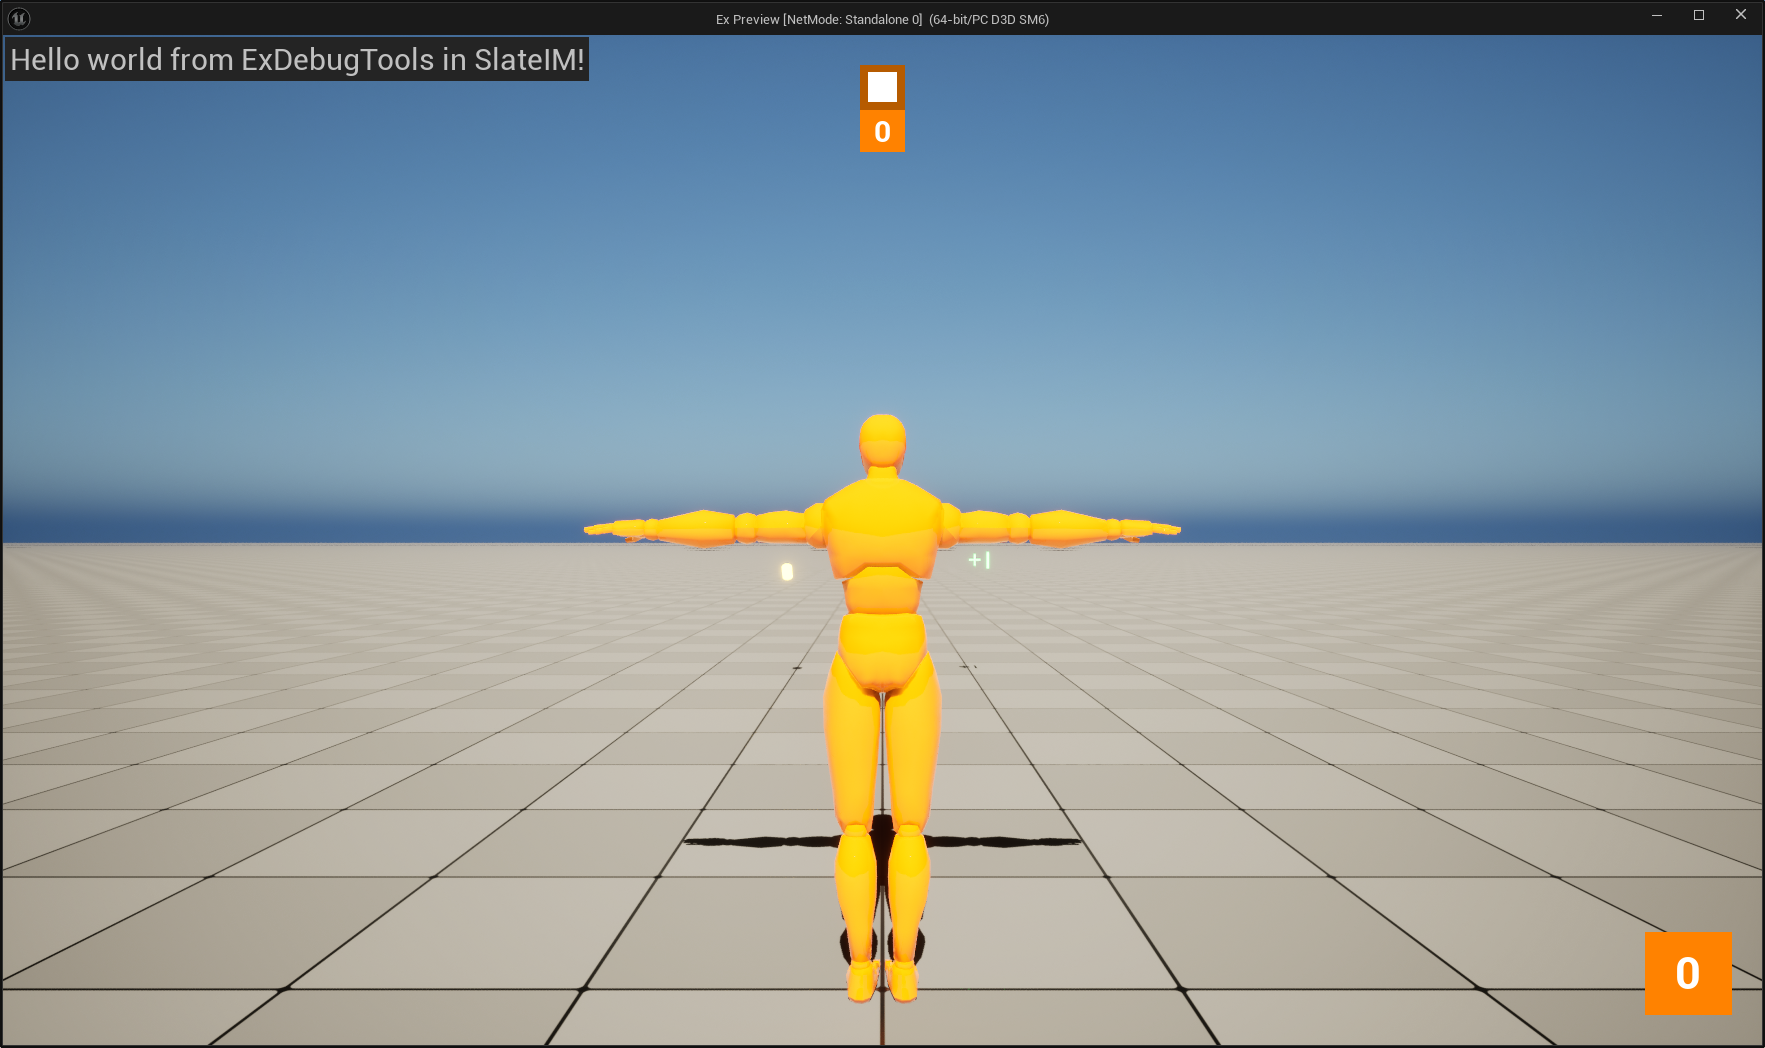
SlateIM::Text(TEXT("Hello world from ExDebugTools in SlateIM!"), &HelloTextStyle);
Compile and rerun the editor and start a PIE session and you should see the size of the text has changed.
Interact with Game Module in SlateIM
Now that we have a foundation to build on, we want to convert our hello world frame to a frame that contains a vertical layout of:
- A combo box to select a target player to manipulate
- A button to add ammo to the player
- A button to add score to the player
We will start by scaffolding out the UI, modifying the block between BeginBorder and EndBorder
// In block between BeginBorder and EndBorder ...

int32 SelectedPlayerIndex{};
TArray<FString> PlayerStrings{};

SlateIM::HAlign(HAlign_Fill);
SlateIM::VAlign(VAlign_Top);
SlateIM::ComboBox(PlayerStrings, SelectedPlayerIndex);

SlateIM::HAlign(HAlign_Fill);
SlateIM::VAlign(VAlign_Top);
if (SlateIM::Button(TEXT("Add Ammo")))
{
}

SlateIM::HAlign(HAlign_Fill);
SlateIM::VAlign(VAlign_Top);
if (SlateIM::Button(TEXT("Add Score")))
{
}
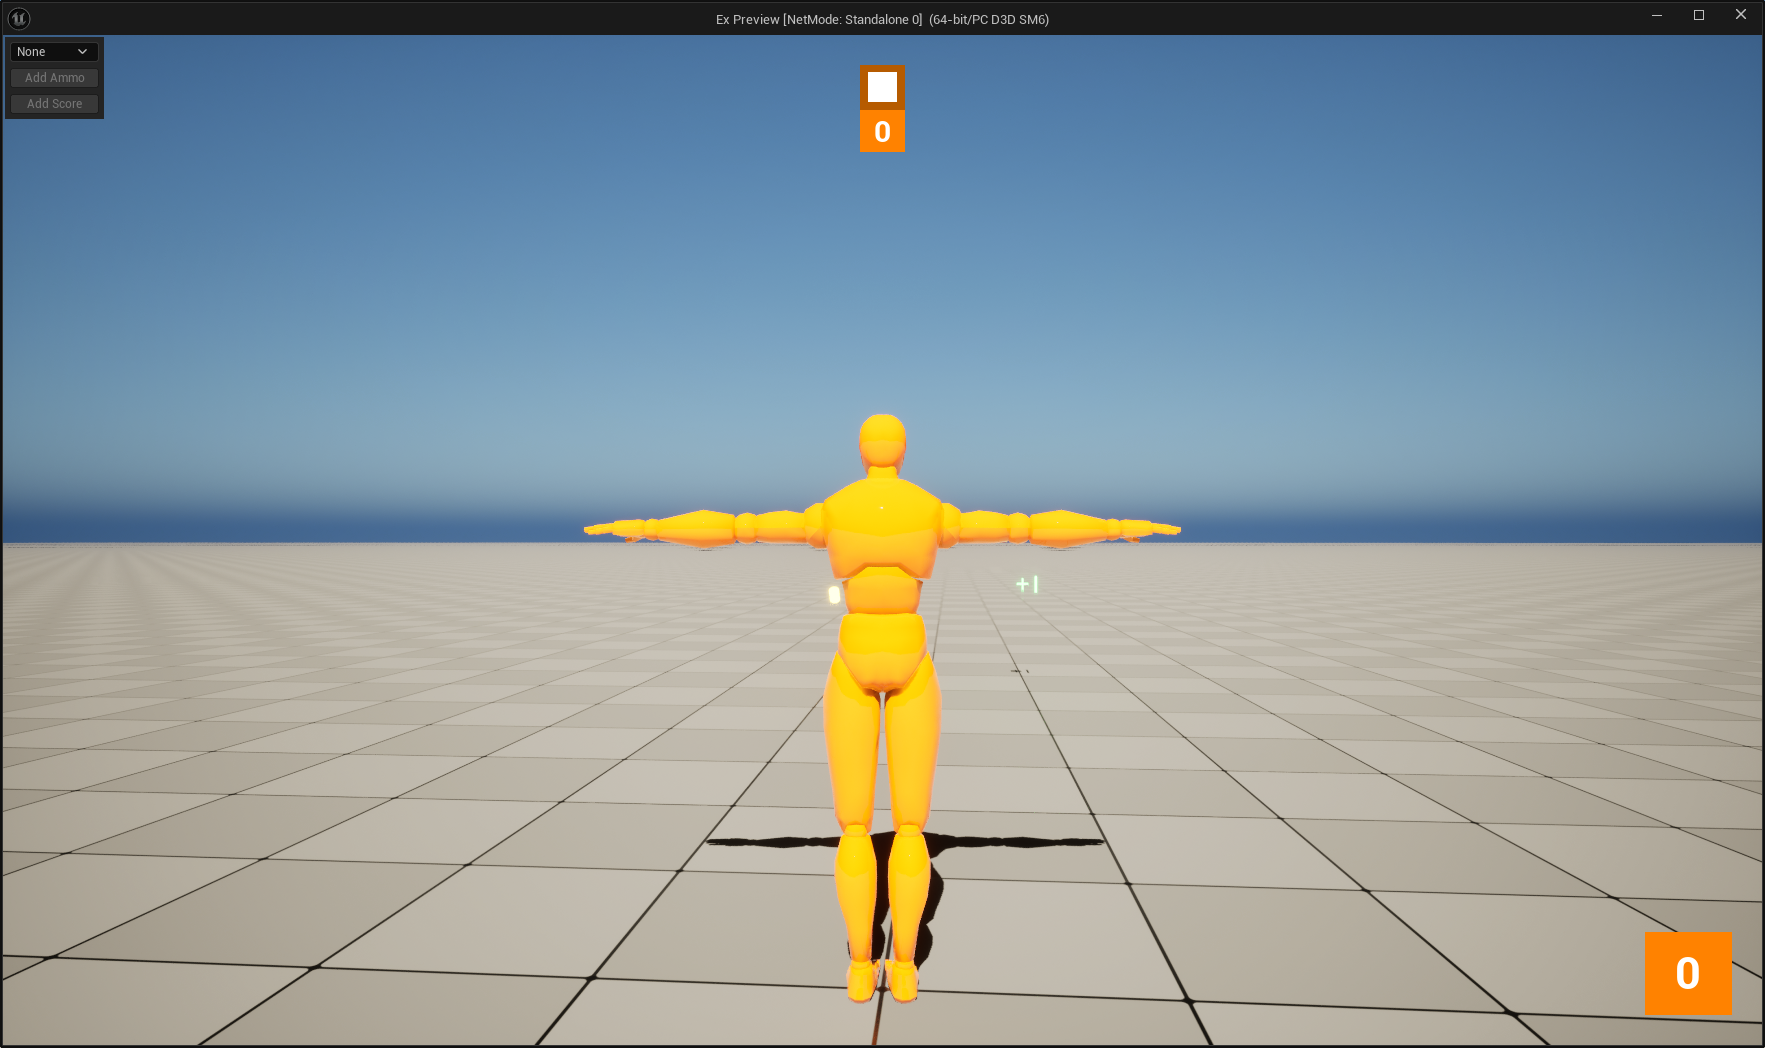
If you were to run the editor and PIE session again, you should see these elements laid out within the border.

Now we will start adding functionality to this UI skeleton, starting with the player select combo box. We will populate the selection box with player names taken from the player state array in the game state. We also will have a selectable value for None to allow for not having any player selected. To begin, we want to move the SelectedPlayerIndex variable declared earlier to the subsystem class members, as well as add another member for the last known size of the player state array.
// ...

private:
		int32 LastPlayerCount{};
		int32 SelectedPlayerIndex{};

// ...
Next we will add the logic to populate the PlayerStrings array from player state data.
UWorld* World = GameInstance->GetWorld();
AGameStateBase* GameState{};
if (World != nullptr)
{
		GameState = World->GetGameState();
}

TArray<APlayerState*> PlayerStates{};
if (GameState != nullptr)
{
		PlayerStates = GameState->PlayerArray;
}

TArray<FString> PlayerStrings{};
PlayerStrings.Reserve(PlayerStates.Num() + 1);

PlayerStrings.Add(TEXT("None"));
for (const APlayerState* PlayerState : PlayerStates)
{
		PlayerStrings.Add(PlayerState->GetPlayerName());
}
PlayerStrings array as well in a real application. But for this example it is simpler to reallocate each tick.Finally, we define a boolean that indicates whether the combo box requires a refresh, based on the current player count and the last player count. Then we change the combo box call to add that boolean to the arguments, and update the last player count after that call.
// ...

const bool bShouldRefreshPlayerCombo = PlayerStates.Num() != LastPlayerCount;
SlateIM::ComboBox(PlayerStrings, SelectedPlayerIndex, bShouldRefreshPlayerCombo);

LastPlayerCount = PlayerStates.Num();

// ...
We can also define a new variable storing the selected player state after setting the new last player count. With a special case to map zero or less to nullptr.
// ...

APlayerState* SelectedPlayer = SelectedPlayerIndex > 0
	? PlayerStates[SelectedPlayerIndex - 1]
	: nullptr;

// ...
To make sure that this logic works, we want to wrap our two buttons in BeginDisabledState and EndDisabledState calls if the selected player is null. Putting that all together, your tick method would look like the following:
void UExDebugToolsSubsystem::Tick(float DeltaSeconds)
{
		UGameInstance* GameInstance = GetGameInstance();
		check(GameInstance != nullptr);

		if (SlateIM::BeginViewportRoot(TEXT("ExDebugToolsViewport"), GameInstance->GetGameViewportClient()))
		{
				SlateIM::BeginBorder(TEXT("ToolPanel.GroupBorder"));
				{
						UWorld* World = GameInstance->GetWorld();
						AGameStateBase* GameState{};
						if (World != nullptr)
						{
								GameState = World->GetGameState();
						}

						TArray<APlayerState*> PlayerStates{};
						if (GameState != nullptr)
						{
								PlayerStates = GameState->PlayerArray;
						}

						TArray<FString> PlayerStrings{};
						PlayerStrings.Reserve(PlayerStates.Num() + 1);

						PlayerStrings.Add(TEXT("None"));
						for (const APlayerState* PlayerState : PlayerStates)
						{
								PlayerStrings.Add(PlayerState->GetPlayerName());
						}

						SlateIM::HAlign(HAlign_Fill);
						SlateIM::VAlign(VAlign_Top);

						const bool bShouldRefreshPlayerCombo = PlayerStates.Num() != LastPlayerCount;
						SlateIM::ComboBox(PlayerStrings, SelectedPlayerIndex, bShouldRefreshPlayerCombo);

						LastPlayerCount = PlayerStates.Num();

						APlayerState* SelectedPlayer = SelectedPlayerIndex > 0
								? PlayerStates[SelectedPlayerIndex - 1]
								: nullptr;

						if (SelectedPlayer == nullptr)
						{
								SlateIM::BeginDisabledState();
						}

						SlateIM::HAlign(HAlign_Fill);
						SlateIM::VAlign(VAlign_Top);
						if (SlateIM::Button(TEXT("Add Ammo")))
						{
						}

						SlateIM::HAlign(HAlign_Fill);
						SlateIM::VAlign(VAlign_Top);
						if (SlateIM::Button(TEXT("Add Score")))
						{
						}

						if (SelectedPlayer == nullptr)
						{
								SlateIM::EndDisabledState();
						}
				}
				SlateIM::EndBorder();
		}
		SlateIM::EndRoot();
}
Now, when running a PIE session in the editor, you should see disabled buttons when None is selected.
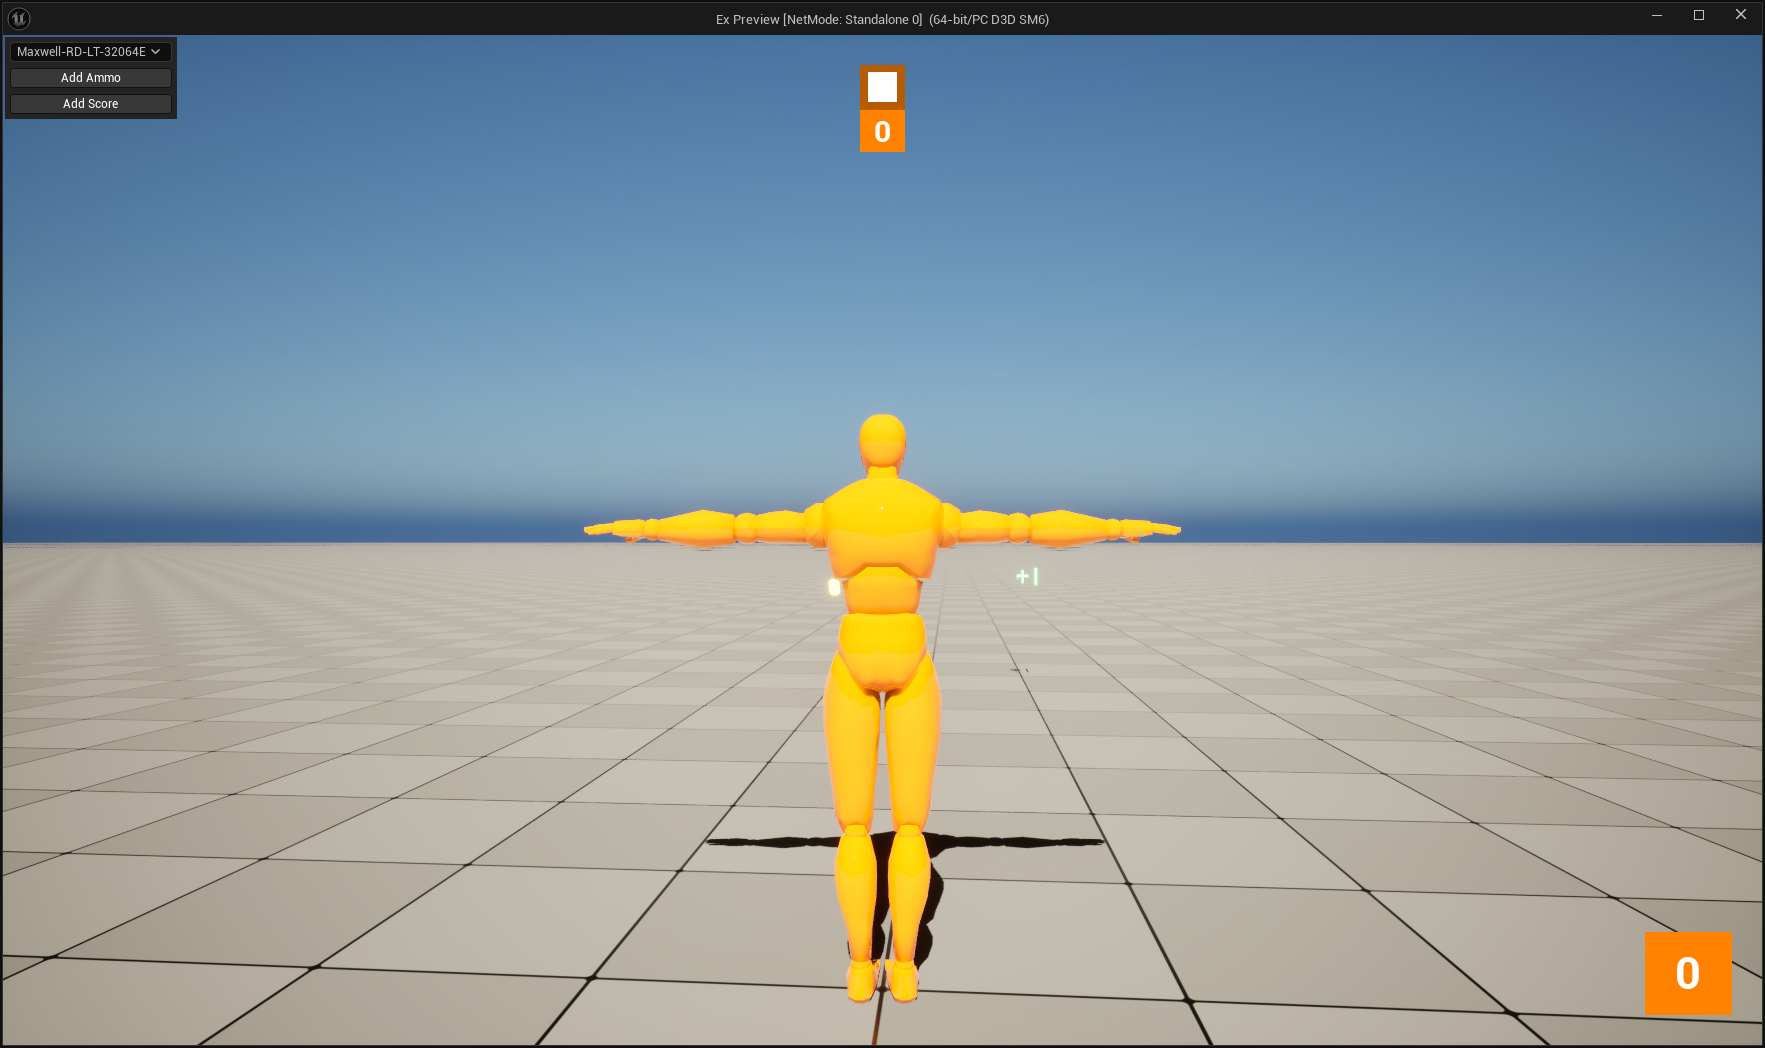
You should see the name of your player when you open the combo box.
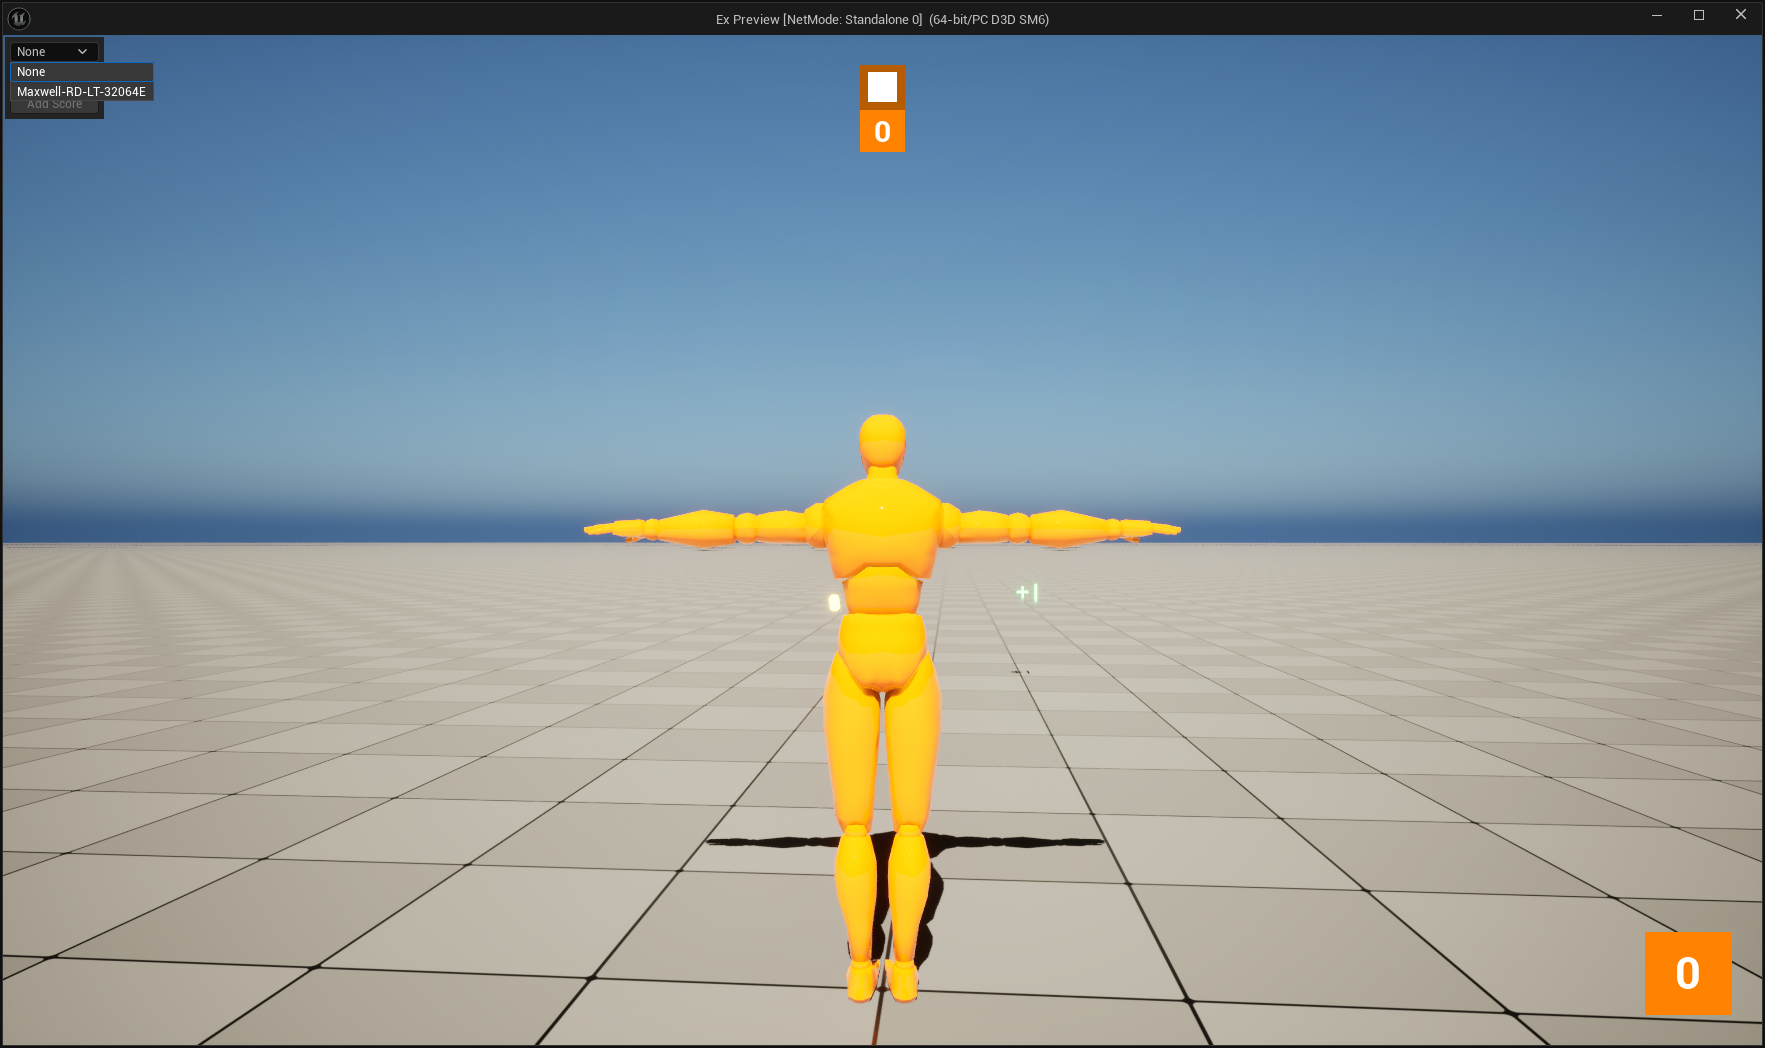
Finally, if you select your player, the buttons should be enabled again.
Now, with the selected player state, we can add the action logic for the two buttons. We’ll start with the button to add score, as it will be the most simple. Inside of the if block for the button, we just need to get the current score from the player state, increment that by one, and set the score on the player state.
// ...

if (SlateIM::Button(TEXT("Add Score")))
{
	const int32 CurrentScore = SelectedPlayer->GetScore();
	SelectedPlayer->SetScore(CurrentScore + 1);
}

// ...
Next, we will implement the click handling for the add ammo button. In our example, we grab the pawn from the player state, cast it to our project’s subclass, and then call our AddAmmo method if valid.
// ...

if (SlateIM::Button(TEXT("Add Ammo")))
{
		AExCharacter* ExCharacter = SelectedPlayer->GetPawn<AExCharacter>();
		if (ExCharacter != nullptr)
		{
				ExCharacter->AddAmmo(1);
		}
}

// ...
With that implemented. You can now compile, run the editor, and test in a PIE session. If you select a player and click the “Add Score” button, you should see your score increment by one. If you click the “Add Ammo” button, you should see your ammo increment by one.
We only have one feature left to implement that we mentioned in the overview. That is the ability to toggle the debug UI based on a key bind. One approach might be to use Enhanced Input to bind a new mapping context for debug tools, and bind an action to open the menu. In our example, we will bind an input processor to the same Slate application that we used to register our pre tick handler. This gives us a straightforward and easy way to consume the key bind that we want for our menu. To begin, we will declare a class that implements the input processor in our subsystem source file:
class FExDebugToolsInputProcessor : public IInputProcessor
{
public:
		FExDebugToolsInputProcessor(UExDebugToolsSubsystem* InDebugToolsSubsystem);

		virtual void Tick(const float DeltaTime, FSlateApplication& SlateApp, TSharedRef<ICursor> Cursor) override;
		virtual bool HandleKeyDownEvent(FSlateApplication& SlateApp, const FKeyEvent& InKeyEvent) override;

		virtual const TCHAR* GetDebugName() const override;

private:
		UExDebugToolsSubsystem* DebugToolsSubsystem{};

};
Our input processor holds on to a pointer to the debug tools subsystem itself. This way we can call it and toggle our show flag when our desired bind is pressed. Next, we will add our show flag to the subsystem declaration and make the input processor a friend so that it can access it. We will also add a shared pointer field that holds on to an input processor instance.
// UExDebugToolsSubsystem declaration ...

private:
		friend class FExDebugToolsInputProcessor;
		bool bShowDebugTools{false};

		TSharedPtr<FExDebugToolsInputProcessor> InputProcessor{};

// ...
From here, we will define the methods that we declared in the input processor.
FExDebugToolsInputProcessor::FExDebugToolsInputProcessor(UExDebugToolsSubsystem* InDebugToolsSubsystem)
		: DebugToolsSubsystem(InDebugToolsSubsystem)
{
}

void FExDebugToolsInputProcessor::Tick(const float DeltaTime, FSlateApplication& SlateApp, TSharedRef<ICursor> Cursor)
{
}

bool FExDebugToolsInputProcessor::HandleKeyDownEvent(FSlateApplication& SlateApp, const FKeyEvent& InKeyEvent)
{
		const FModifierKeysState& ModifierKeyState = InKeyEvent.GetModifierKeys();
		const FKey& Key = InKeyEvent.GetKey();
		if (ModifierKeyState.IsControlDown() && ModifierKeyState.IsShiftDown() && Key == EKeys::Q)
		{
				DebugToolsSubsystem->bShowDebugTools = !DebugToolsSubsystem->bShowDebugTools;
				return true;
		}

		return false;
}

const TCHAR* FExDebugToolsInputProcessor::GetDebugName() const
{
			return TEXT("ExDebugToolsInputProcessor");
}
In this example, the key bind we are using for opening the debug menu is Control+Shift+Q. Now, in our subsystem’s Initialize method, we will handle initializing our processor and registering it with the Slate application. In our Deinitialize method, we will unregister the processor and reset our reference to it for clean up.
void UExDebugToolsSubsystem::Initialize(FSubsystemCollectionBase& Collection)
{
		// ...

		InputProcessor = MakeShared<FExDebugToolsInputProcessor>(this);
		SlateApp.RegisterInputPreProcessor(InputProcessor);

		// ...
}

void UExDebugToolsSubsystem::Deinitialize()
{
		// ...

		SlateApp.UnregisterInputPreProcessor(InputProcessor);
		InputProcessor.Reset();

		// ...
}
Finally, we will add a call to show the mouse cursor when the debug tools menu is shown, that way it is able to be interacted with. Along with an early return if the debug menu is not supposed to be shown. Here is what the subsystem tick method definition looks like afterwards:
void UExDebugToolsSubsystem::Tick(float DeltaSeconds)
{
	UGameInstance* GameInstance = GetGameInstance();
	check(GameInstance != nullptr);

	APlayerController* PC = GameInstance->GetFirstLocalPlayerController();
	if (PC != nullptr)
	{
		PC->SetShowMouseCursor(bShowDebugTools);
	}

	if (!bShowDebugTools)
	{
		return;
	}

	if (SlateIM::BeginViewportRoot(TEXT("ExDebugToolsViewport"), GameInstance->GetGameViewportClient()))
	{
		SlateIM::BeginBorder(TEXT("ToolPanel.GroupBorder"));
		{
			UWorld* World = GameInstance->GetWorld();

			AGameStateBase* GameState{};
			if (World != nullptr)
			{
				GameState = World->GetGameState();
			}

			TArray<APlayerState*> PlayerStates{};
			if (GameState != nullptr)
			{
				PlayerStates = GameState->PlayerArray;
			}

			TArray<FString> PlayerStrings{};
			PlayerStrings.Reserve(PlayerStates.Num() + 1);

			PlayerStrings.Add(TEXT("None"));
			for (const APlayerState* PlayerState : PlayerStates)
			{
				PlayerStrings.Add(PlayerState->GetPlayerName());
			}

			SlateIM::HAlign(HAlign_Fill);
			SlateIM::VAlign(VAlign_Top);

			const bool bShouldRefreshPlayerCombo = PlayerStates.Num() != LastPlayerCount;
			SlateIM::ComboBox(PlayerStrings, SelectedPlayerIndex, bShouldRefreshPlayerCombo);

			LastPlayerCount = PlayerStates.Num();

			APlayerState* SelectedPlayer = SelectedPlayerIndex > 0
				? PlayerStates[SelectedPlayerIndex - 1]
				: nullptr;

			if (SelectedPlayer == nullptr)
			{
				SlateIM::BeginDisabledState();
			}

			SlateIM::HAlign(HAlign_Fill);
			SlateIM::VAlign(VAlign_Top);
			if (SlateIM::Button(TEXT("Add Ammo")))
			{
				AExCharacter* ExCharacter = SelectedPlayer->GetPawn<AExCharacter>();
				if (ExCharacter != nullptr)
				{
					ExCharacter->AddAmmo(1);
				}
			}

			SlateIM::HAlign(HAlign_Fill);
			SlateIM::VAlign(VAlign_Top);
			if (SlateIM::Button(TEXT("Add Score")))
			{
				const int32 CurrentScore = SelectedPlayer->GetScore();
				SelectedPlayer->SetScore(CurrentScore + 1);
			}

			if (SelectedPlayer == nullptr)
			{
				SlateIM::EndDisabledState();
			}
		}
		SlateIM::EndBorder();
	}
	SlateIM::EndRoot();
}
Conclusion
After all of that, our debug menu with SlateIM is complete. We now have a solid foundation to extend down the line to add more debug tools. SlateIM also offers a lot more functionality than just this. Keyboard input for specific widgets can be queried. Separate Slate windows can be used as a root. There is also built in line graph support. It’s still marked as an experimental plugin in current Unreal versions, but as a way to author development tools, it is a very solid framework.
Next Steps
At the time of writing, documentation for SlateIM is still very limited. In this guide, we covered a very basic “getting started” style project. But there is much more to the plugin, with more being added with each new Unreal release. One helpful resource when writing SlateIM code would be the SlateIM plugin API reference page. Here you can find all of the types and functions declared in the plugin, useful for finding widgets to use in your UI.
Additionally, being based off of Slate UI, it may be helpful to reference this overview on Slate as a whole. Much of this should be abstracted by the SlateIM plugin, but some aspects like styling and other concepts may be helpful to look into.
You can find the full source code and project assets of the example project on GitHub.