Wrangle Your UI Data: Intro to Unreal Engine's UMG Viewmodel Plugin


Here at Rushdown, while our specialty is in assisting studios with multiplayer implementation in games, such as with backend services. We also have a great depth of experience working on assisting studios with their in-game UI. This post will dive into one approach we have used in the past in developing UI for partner studios: UMG Viewmodel.
Introduction
You’ve created some new fancy UI for your Unreal Engine game. But now you need to display actual state in that UI. This could either come from Blueprint or C++. A typical approach for this is to create a C++ class for your UI elements that you wish to bind data to, and pass data along to that. But that is a cumbersome process, and can lead to headaches when data needs to be shared across multiple elements.
Another less known approach for this is to use the UMG Viewmodel plugin built-in to the engine since version 5.3. It is intended to be used with the UMG UI system to create data bindings for your UI widgets. This plug in follows the architecture design concept, also named Model-view-viewmodel, or MVVM for short.
MVVM, in essence, allows you to separate the layout of your UI from the data model. As an example, think of a user profile widget that shows avatar, display name, and username. With an MVVM approach, you could layout your user profile widget as you see fit, this would be known as the view. Then, you could create an object that encapsulates the user data and provides methods to set and get that data. That object would then be your view model. At that point, the view would have some kind of reference to a view model, and consume and update based on that data. View models also typically expose a way for the view to listen for updates, allowing for element updates as state is changed.

Building a HUD with MVVM in Unreal
Overview
In an example project, I have created a simple HUD UMG widget blueprint. In the HUD, there is a list view at the top with widgets for displaying player scores with their avatar image. Along with a widget in the corner to display an ammo counter.
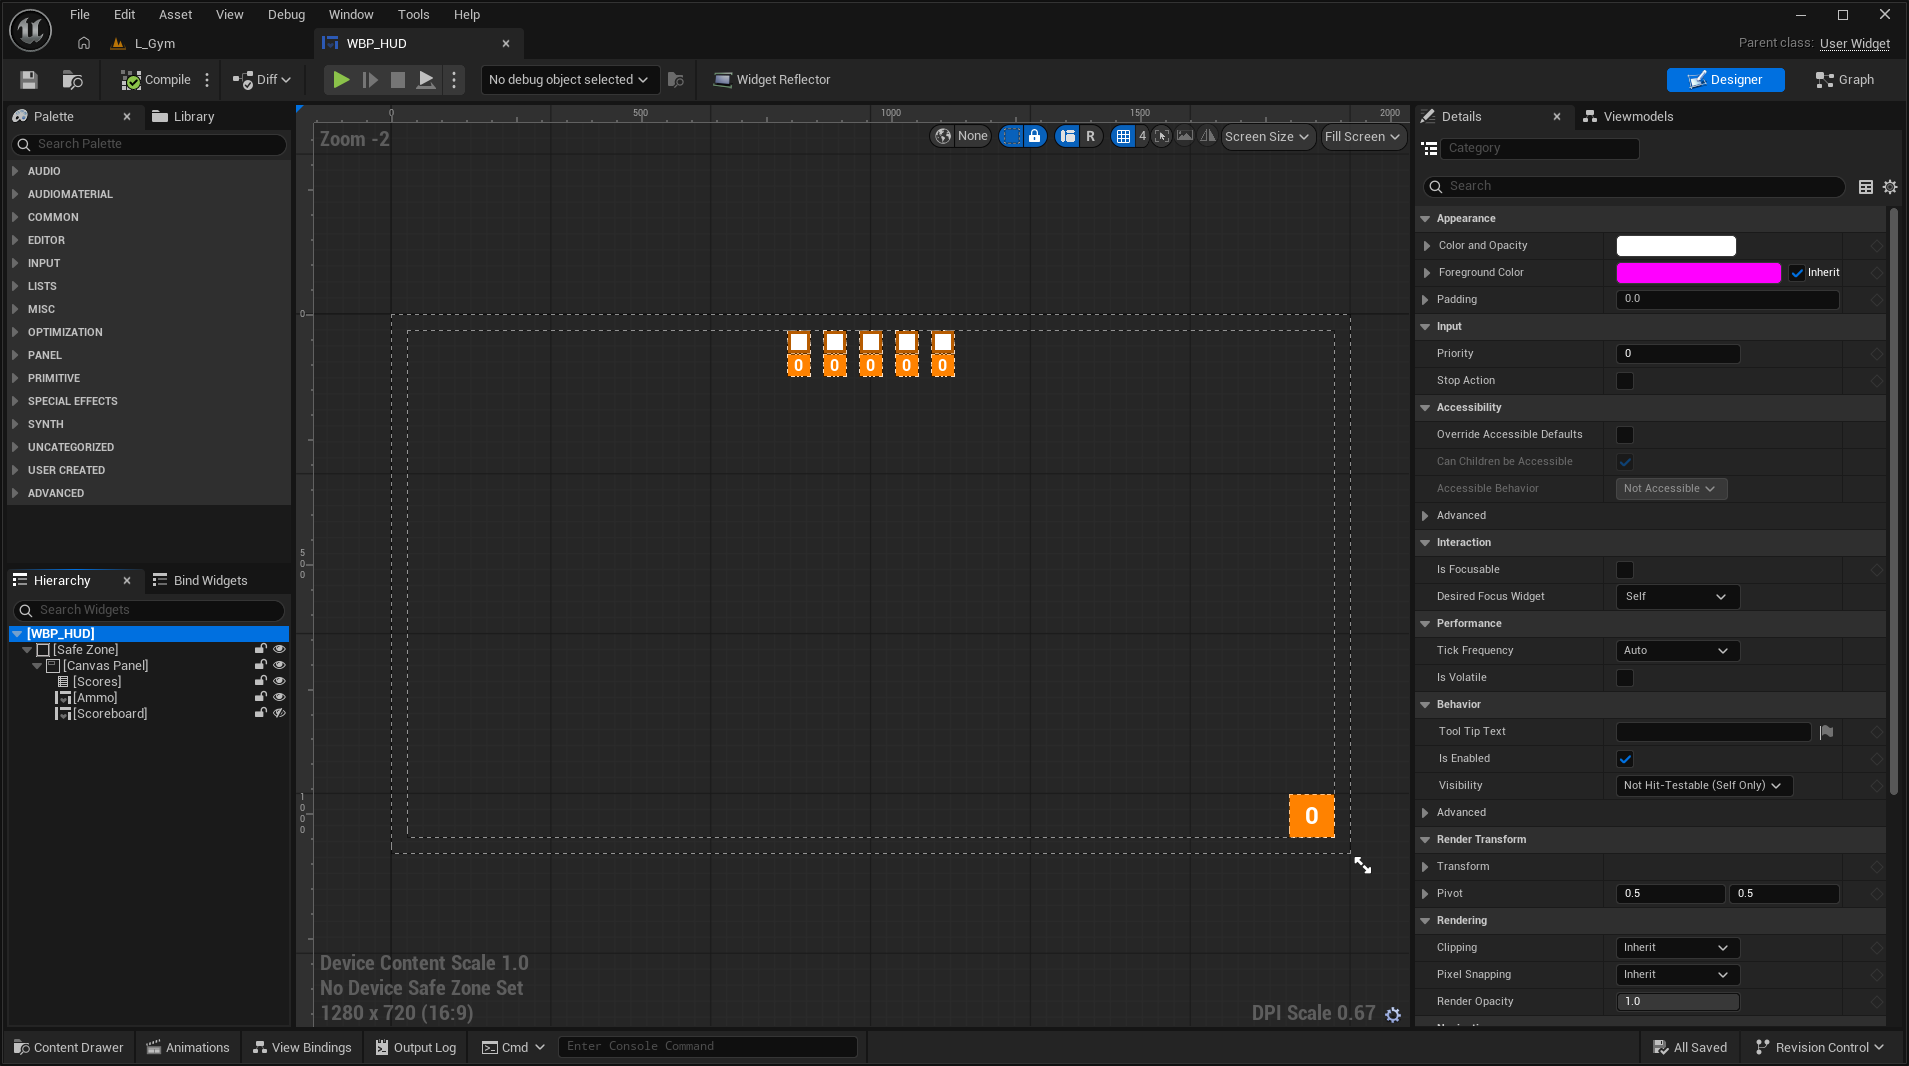
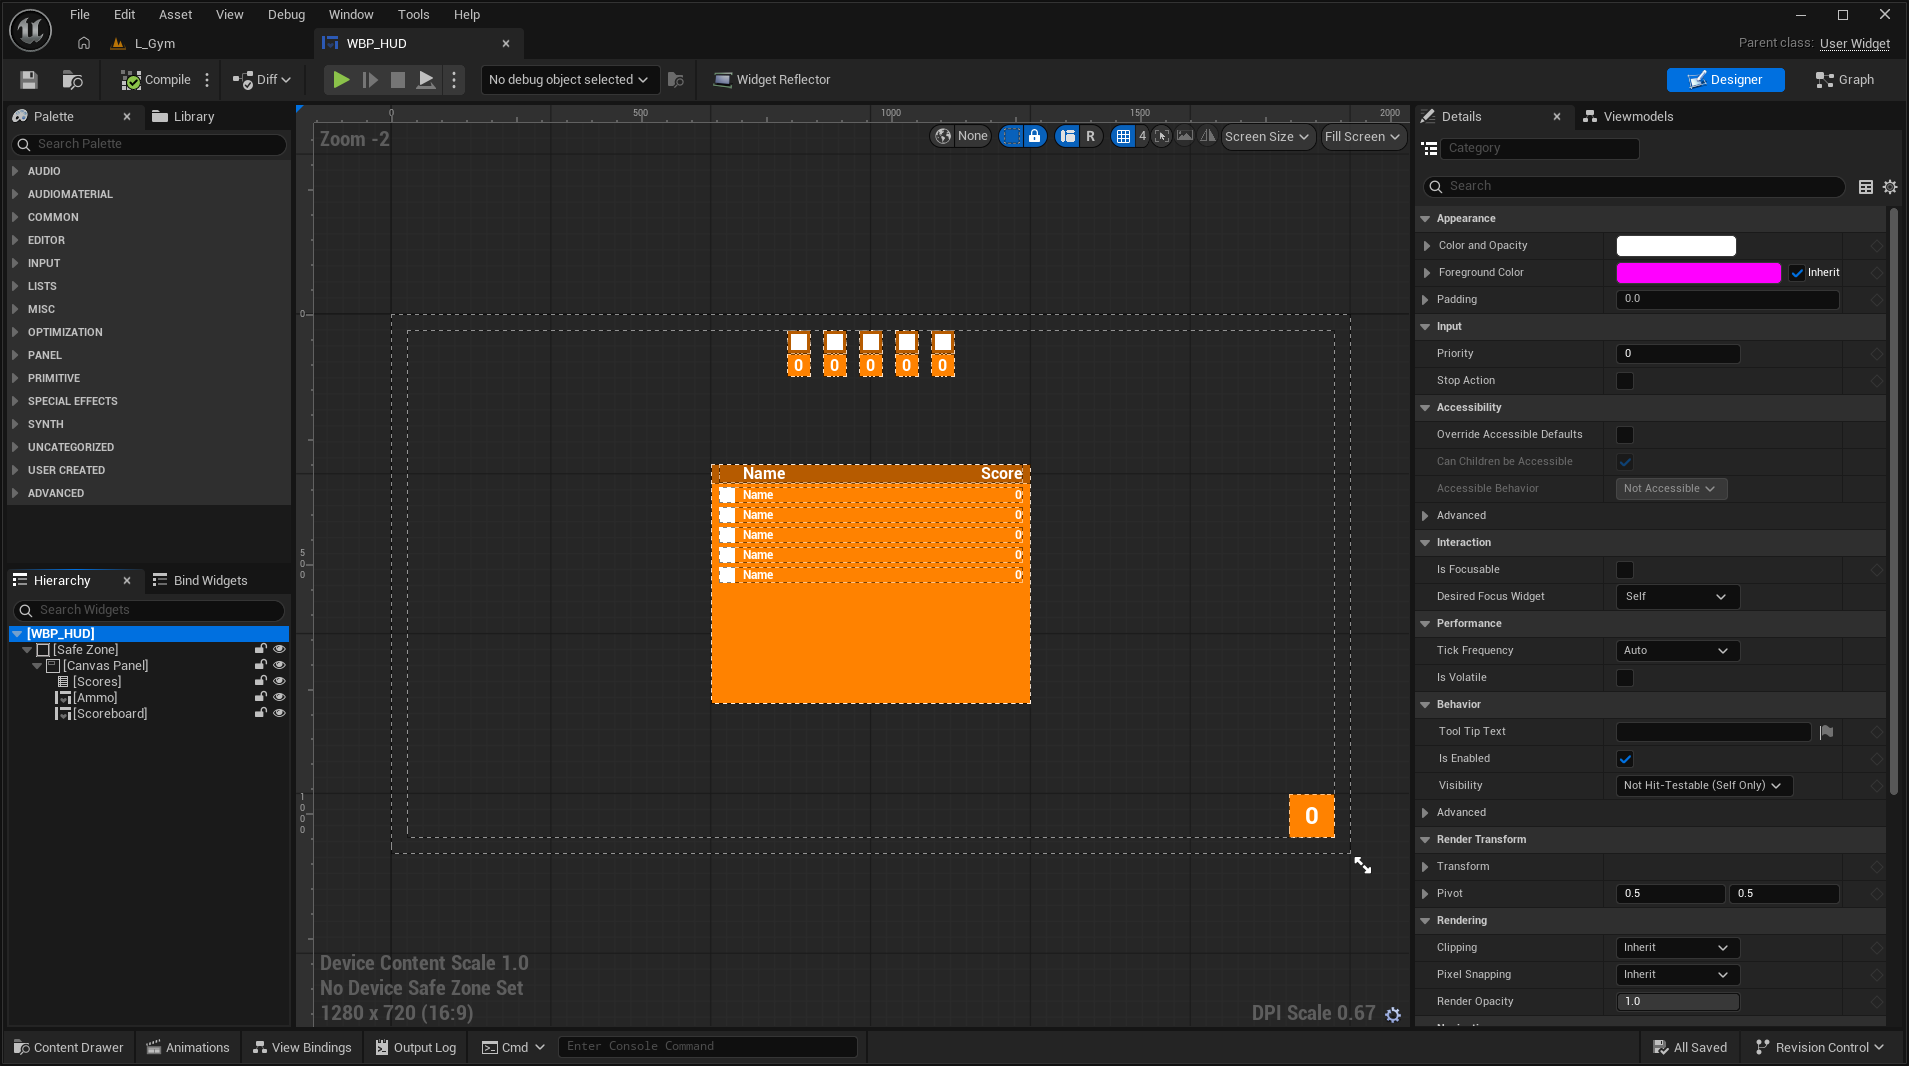
Additionally, there is a scoreboard widget that is hidden by default. This is intended to show a more detailed score view when the player holds the Tab key.
Authoring View Models
See Also: Official Unreal UMG Viewmodel Documentation
To begin binding data to these elements, we will need to create the view model subclasses. In particular, we will want a view model for the HUD as a whole, and a view model for an individual score entry. This sample project is named Ex, so I will create two C++ classes, UExHUDViewModel and UExScoreViewModel, with both of these classes inheriting from UMVVMViewModelBase. You can also create these subclasses as blueprint classes inheriting from the same base class.
With both classes created, we will focus specifically on the general HUD view model for a bit. To start, we want to define a few properties. One representing the ammo count. Another defined as an array of score view models. Finally, we also want a simple boolean to represent whether the full scoreboard is opened. Each of these properties we want to remain protected or private in the class. We also will want to add some specific UPROPERTY specifiers to these properties. All three should have FieldNotify and Getter specifiers added. Additionally, the ammo and show scoreboard properties should have the Setter specifier added. With this, our HUD view model class declaration looks something like:
UCLASS()
class EX_API UExHUDViewModel : public UMVVMViewModelBase
{
	GENERATED_BODY()

protected:
	UPROPERTY(EditAnywhere, BlueprintReadWrite, Setter, Getter, FieldNotify, Category = "HUD")
	int32 Ammo{};

	UPROPERTY(VisibleAnywhere, BlueprintReadOnly, Getter, FieldNotify, Category = "HUD")
	TArray<UExScoreViewModel*> Scores{};

	UPROPERTY(EditAnywhere, BlueprintReadWrite, Setter, Getter, FieldNotify, Category = "HUD")
	bool bShowScoreboard{ false };

};
With the Getter and Setter specifiers, we will need to declare get and set public methods for each property. A getter method should be declared with the following signature:
UFUNCTION()
const {Type}& Get{Name}() const;
With Type corresponding to the property type, and Name being the property name the getter is being defined for. A setter signature would then be:
UFUNCTION()
void Set{Name}({Type} InValue);
After declaring these methods, our class declaration would look as follows:
UCLASS()
class EX_API UExHUDViewModel : public UMVVMViewModelBase
{
	GENERATED_BODY()

public:
	UFUNCTION()
	void SetAmmo(int32 InAmmo);

	UFUNCTION()
	const int32& GetAmmo() const;

	UFUNCTION()
	const TArray<UExScoreViewModel*>& GetScores() const;

	UFUNCTION()
	void SetShowScoreboard(bool bInShowScoreboard);

	UFUNCTION()
	const bool& GetShowScoreboard() const;

protected:
	UPROPERTY(EditAnywhere, BlueprintReadWrite, Setter, Getter, FieldNotify, Category = "HUD")
	int32 Ammo{};

	UPROPERTY(VisibleAnywhere, BlueprintReadOnly, Getter, FieldNotify, Category = "HUD")
	TArray<UExScoreViewModel*> Scores{};

	UPROPERTY(EditAnywhere, BlueprintReadWrite, Setter="SetShowScoreboard", Getter="GetShowScoreboard", FieldNotify, Category = "HUD")
	bool bShowScoreboard{ false };

};
Getter and Setter specifiers support supplying a string value corresponding to the name of the respective method that should be called for either operation. If this was not being used in this example code, your getter would need to be GetbShowScoreboard and the setter would need to be SetbShowScoreboard.Before we move on to defining these methods, there is one more specifier that we added to each property, FieldNotify. FieldNotify is a special specifier that effectively sets up delegates for property changes. This is the essential piece for a view model property. This allows a binding in a view to a property in a view model, and for that binding to automatically update the view when a change has been made.
Next, we will move to the source file for the view model and define each of these getter and setter methods. Once defined, this will look something like the following:
void UExHUDViewModel::SetAmmo(int32 InAmmo)
{
	UE_MVVM_SET_PROPERTY_VALUE(Ammo, InAmmo);
}

const int32& UExHUDViewModel::GetAmmo() const
{
	return Ammo;
}

const TArray<UExScoreViewModel*>& UExHUDViewModel::GetScores() const
{
	return Scores;
}

void UExHUDViewModel::SetShowScoreboard(bool bInShowScoreboard)
{
	UE_MVVM_SET_PROPERTY_VALUE(bShowScoreboard, bInShowScoreboard);
}

const bool& UExHUDViewModel::GetShowScoreboard() const
{
	return bShowScoreboard;
}
Notice the usage of the UE_MVVM_SET_PROPERTY_VALUE macro in the SetAmmo and SetShowScoreboard methods. This macro first checks if the property does not match the given value. If it does match, then nothing happens. But if they do match, the property is updated to the given value. Finally, if the property was updated, it also broadcasts the associated field notify delegate for that property. With this, when SetAmmo is called with an updated value, that delegate broadcast will be caught and the associated binding will be updated.
Let’s quickly switch gears and declare the score view model. For this view model, we will want four properties. One integer property for a player ID. A 2D texture reference for the player’s avatar. Next a string for the player’s name. Finally, an integer for the player’s current score. All of these properties should have setter, getter, and field notify specifiers. We will then want to declare the set and get methods for each property. With all of this combined, our score view model declaration should look like:
UCLASS()
class EX_API UExScoreViewModel : public UMVVMViewModelBase
{
	GENERATED_BODY()

public:
	UFUNCTION()
	void SetId(int32 InId);

	UFUNCTION()
	const int32& GetId() const;

	UFUNCTION()
	void SetAvatar(UTexture2D* InAvatar);

	UFUNCTION()
	const UTexture2D* GetAvatar() const;

	UFUNCTION()
	void SetName(FString InName);

	UFUNCTION()
	const FString& GetName() const;

	UFUNCTION()
	void SetScore(int32 InScore);

	UFUNCTION()
	const int32& GetScore() const;

protected:
	UPROPERTY(EditAnywhere, BlueprintReadWrite, Setter, Getter, FieldNotify, Category = "HUD")
	int32 Id{};

	UPROPERTY(EditAnywhere, BlueprintReadWrite, Setter, Getter, FieldNotify, Category = "HUD")
	UTexture2D* Avatar{};

	UPROPERTY(EditAnywhere, BlueprintReadWrite, Setter, Getter, FieldNotify, Category = "HUD")
	FString Name{};

	UPROPERTY(EditAnywhere, BlueprintReadWrite, Setter, Getter, FieldNotify, Category = "HUD")
	int32 Score{};

};
Just like before with the HUD view model, we will now define all of these methods in the source file for the score view model. After which our source file should look like:
void UExScoreViewModel::SetId(int32 InId)
{
	UE_MVVM_SET_PROPERTY_VALUE(Id, InId);
}

const int32& UExScoreViewModel::GetId() const
{
	return Id;
}

void UExScoreViewModel::SetAvatar(UTexture2D* InAvatar)
{
	UE_MVVM_SET_PROPERTY_VALUE(Avatar, InAvatar);
}

const UTexture2D* UExScoreViewModel::GetAvatar() const
{
	return Avatar;
}

void UExScoreViewModel::SetName(FString InName)
{
	UE_MVVM_SET_PROPERTY_VALUE(Name, InName);
}

const FString& UExScoreViewModel::GetName() const
{
	return Name;
}

void UExScoreViewModel::SetScore(int32 InScore)
{
	UE_MVVM_SET_PROPERTY_VALUE(Score, InScore);
}

const int32& UExScoreViewModel::GetScore() const
{
	return Score;
}
Like the HUD view model, we use the UE_MVVM_SET_PROPERTY_VALUE macro to update the property value and broadcast the change event to the view bindings.
We have one last piece we need to add to the view models, specifically the HUD view model. We never specified that the array of score view models have a setter. This is because we do not necessarily want to have a user manipulate the score array directly. Instead, it would be better to have a way to get a score view model reference for a given player ID and let the user update entries that way. With that in mind, we need to declare a public GetOrAddScore method on the HUD view model. For this method, our signature should look something like:
public:
		// ...

		UExScoreViewModel* GetOrAddScore(int32 PlayerId);

		// ...
In essence, we want this method to:
- Check the
Scoresarray to see if an existing view model exists for the given player ID. - If an existing view model is found, return it.
- Otherwise, if no view model is found, create a new view model initialized with the given player ID.
- Add newly created score view model to the
Scoresarray. - Return the newly created score view model to the player.
Putting all of that together, our method definition would look something like:
UExScoreViewModel* UExHUDViewModel::GetOrAddScore(int32 PlayerId)
{
	UExScoreViewModel** FoundScore = Scores.FindByPredicate([&PlayerId](const UExScoreViewModel* Score) {
		return Score->GetId() == PlayerId;
	});

	if (FoundScore != nullptr)
	{
		return *FoundScore;
	}

	UExScoreViewModel* NewScore = NewObject<UExScoreViewModel>(this);
	NewScore->SetId(PlayerId);

	Scores.Add(NewScore);
	UE_MVVM_BROADCAST_FIELD_VALUE_CHANGED(Scores);

	return NewScore;
}
To notify that we have added a new score to the score array, we use the UE_MVVM_BROADCAST_FIELD_VALUE_CHANGED macro. This will broadcast the associated field notify delegate to inform that the field was updated.
Creating View Model Bindings in UMG
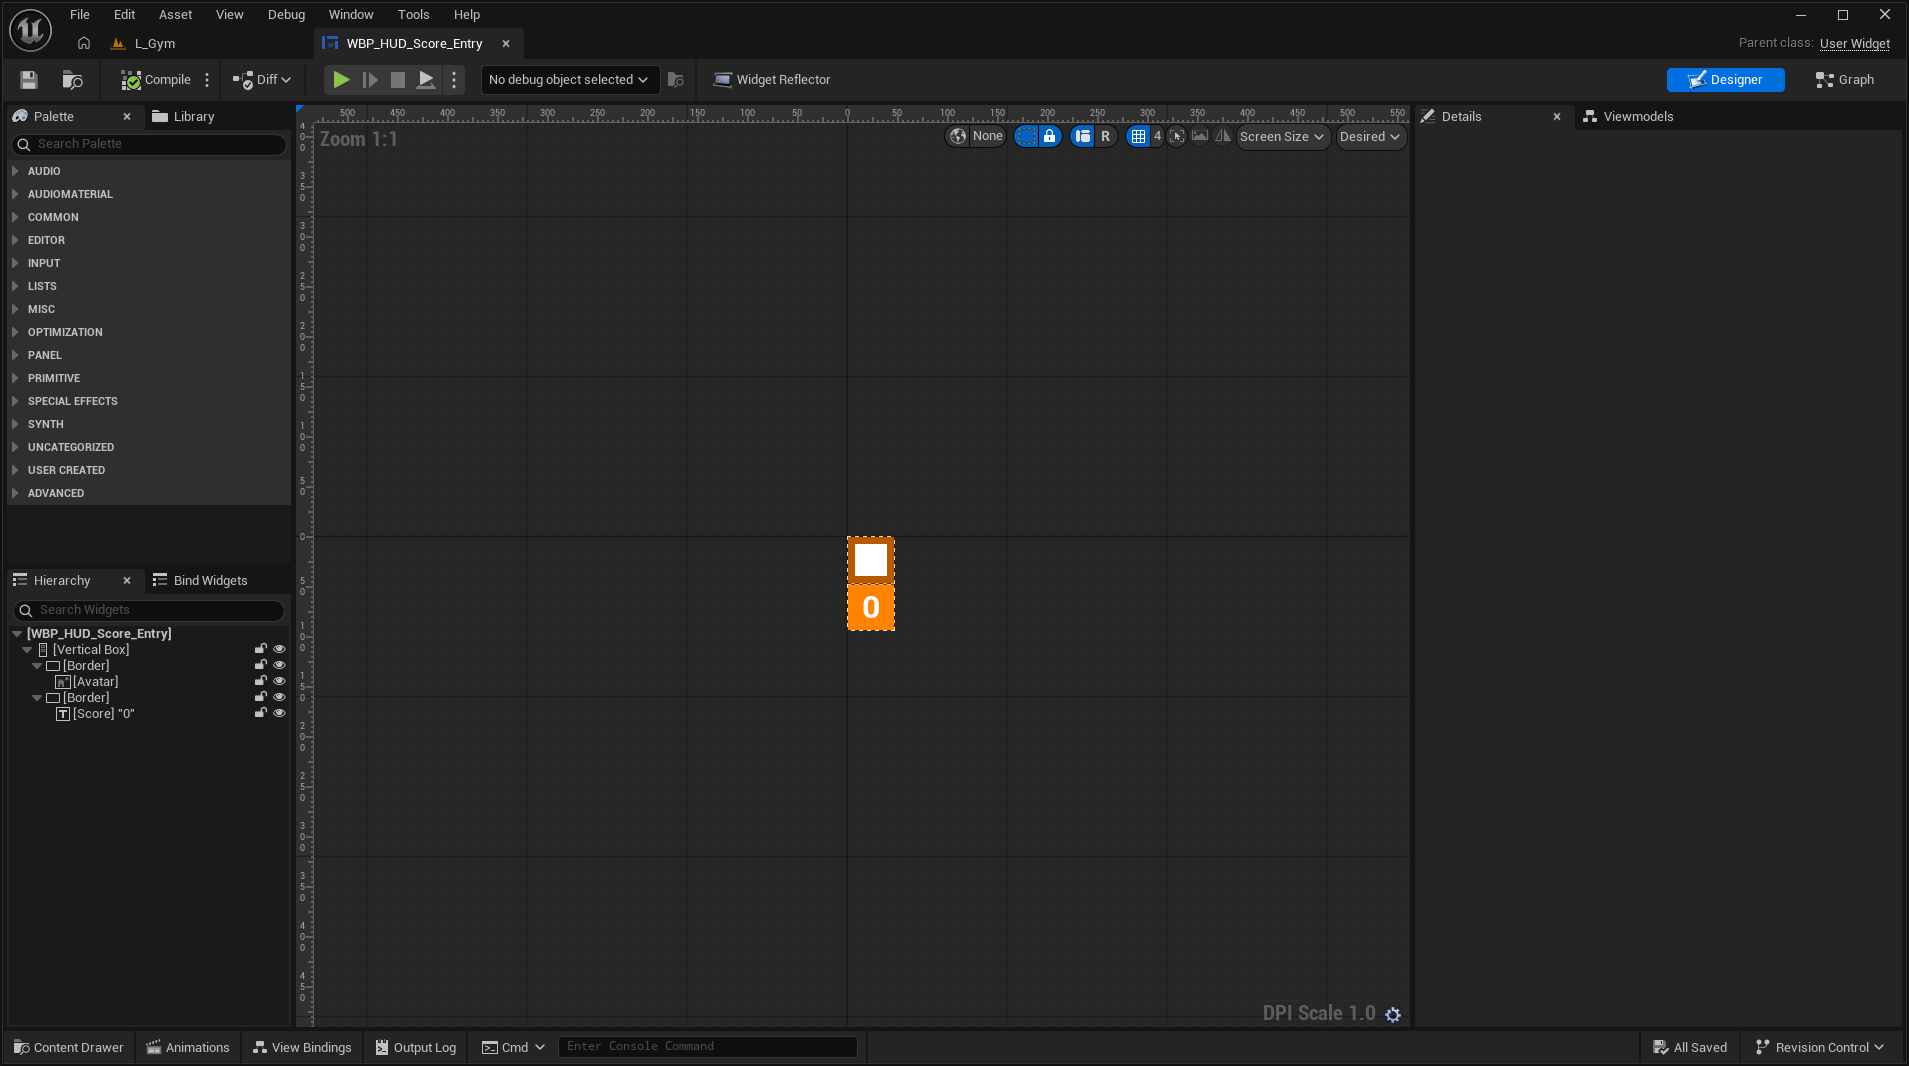
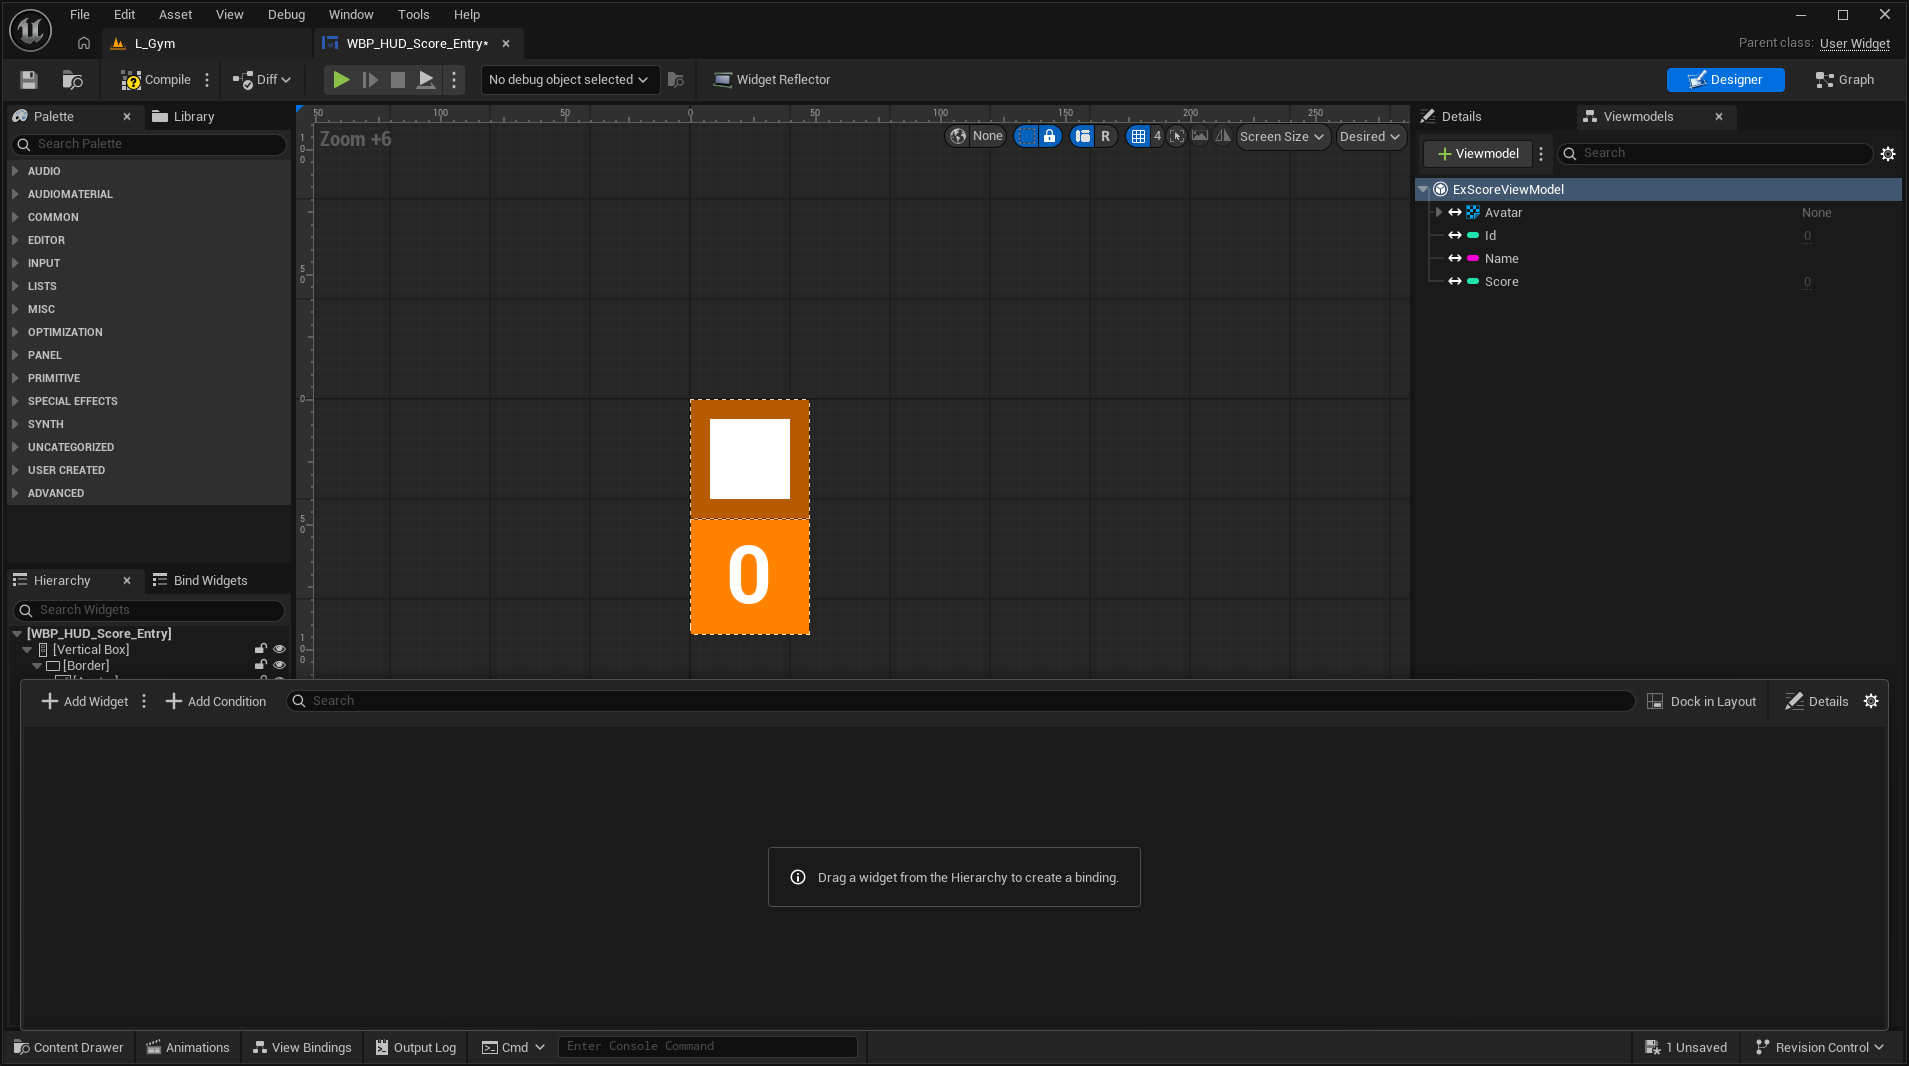
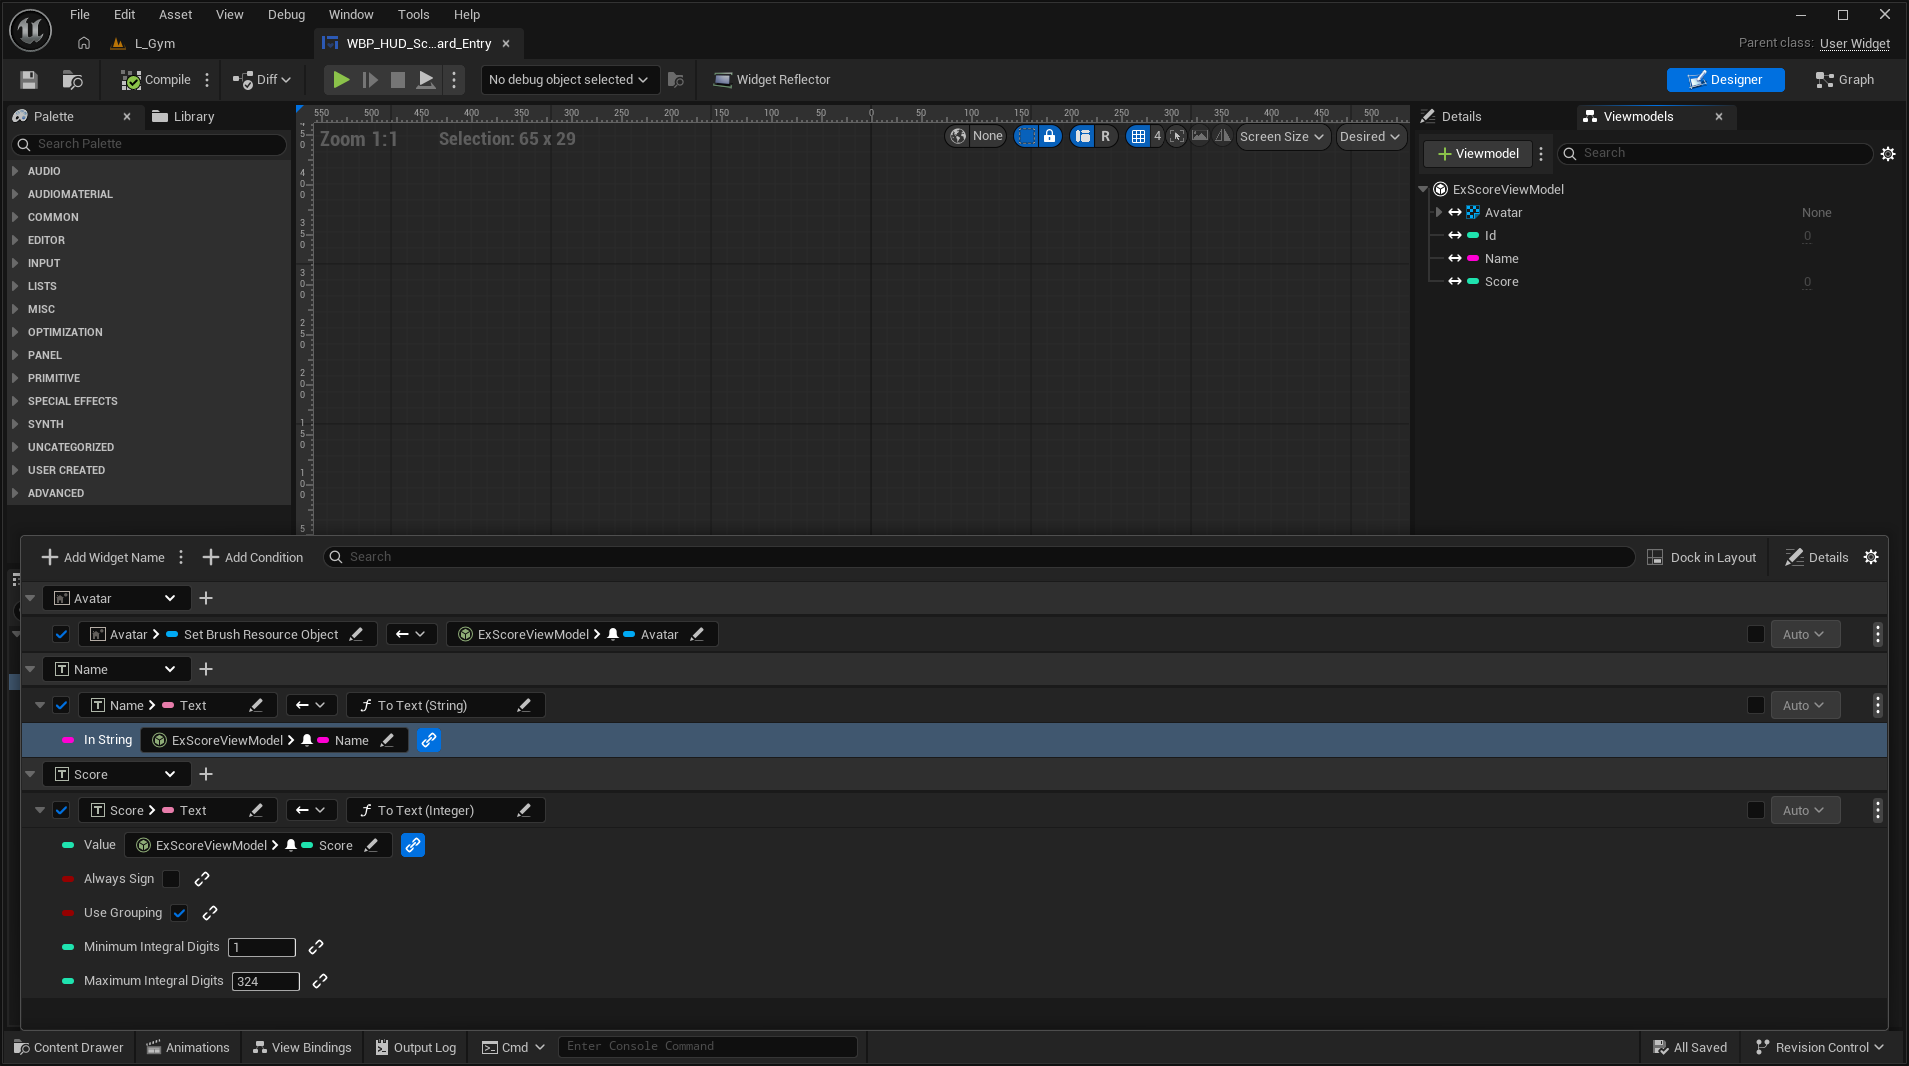
Now that we have defined our view models, we can work on adding bindings in our UMG widgets. We’ll start with the score view model. Since our score display in the HUD is a list view, I will open the score entry widget blueprint. In this example, it looks something like this:
On the right hand side of the window, there are two tabs, “Details” and “Viewmodels”. Open the Viewmodels tab. If you do not have this tab in your UI, click on the “Window” menu at the top left of the window. From there, there should be a “Viewmodels” button at the bottom of the “Widget Designer” section. Click that and the viewmodels window should show.
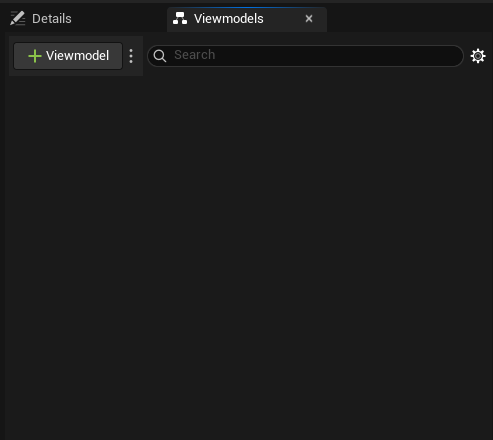
When opened, you should see a practically empty section with an add Viewmodel button at the top left. Click that button. Once clicked, a dropdown will appear displaying the MVVM base Viewmodel class and its subclasses.
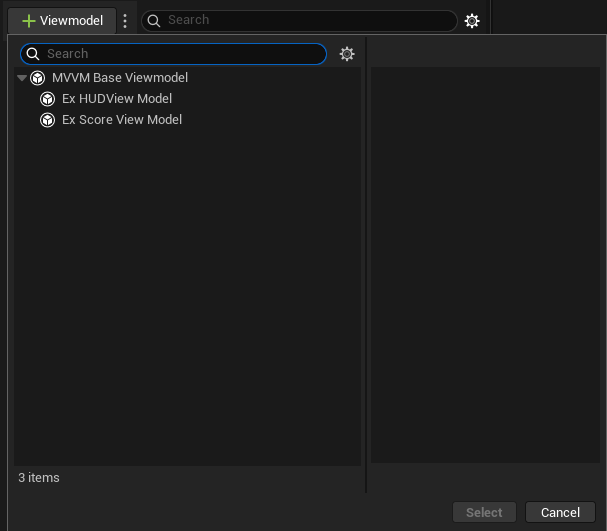
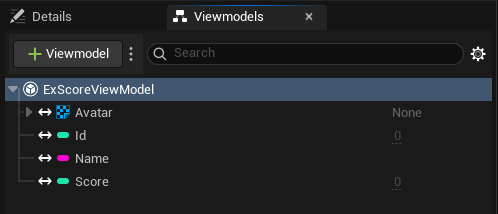
In this case, we want to select our score view model class. In our example, it is named Ex Score View Model. After clicking that, press the blue “Select” button at the bottom right of the dropdown. At this point, your Viewmodels window should look something like the following:
One important note is that there are some properties about this Viewmodel that can be customized. If you select your Viewmodel, in our example this would be clicking the “ExScoreViewModel” entry, and then go to the details tab, you should see something like this:
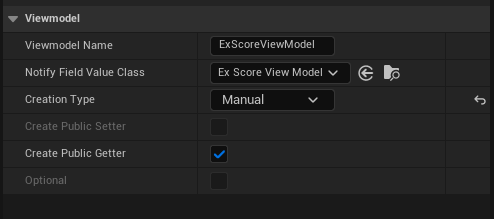
These properties can be customized to control how the Viewmodel is created and exposed to other classes/blueprints. One of the more interesting properties is the “Creation Type” field.
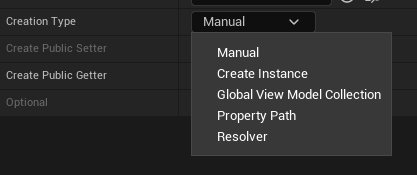
This field controls how the Viewmodel for this widget is constructed. Manual means that you are responsible for either constructing or setting a view model for this widget. Create Instance means that a new Viewmodel instance will be automatically constructed for the widget. Global View Model Collection allows you to reference a view model that has been added to a central view model collection in the MVVM game instance subsystem. This global collection can be retrieved from the UMVVMGameSubsystem instance. Property Path can retrieve a view model using the path for a reflected property or function. Finally, Resolver can be used to retrieve a view model using a subclass of UMVVMViewModelContextResolver, allowing for more complex search/creation logic for view models.
For this Viewmodel, we will leave Creation Type to Manual and leave all other properties as is. Next, open the “View Bindings” tab at the bottom left of the window. Like the Viewmodels window, if it is not there, you can find it in the “Window” tab under the “Widget Designer” section.
This window is where we can bind properties from our view model to properties and functions of specific widgets. For this view, we will add two bindings, one for the avatar image and another for the score text. We want to bind our Avatar texture property in the view model to the Set Brush Resource Object function of the image widget. For the score widget, we want to bind the Score integer in our view model to the text property of the widget. To do this, we will need to use a conversion function. A conversion function is a simple static function exposed to Blueprint that allows conversion of a view model property to a desired data type. For this example, we will want to use the To Text (Integer) conversion function. Once that is set up, your view bindings window should look like the following:
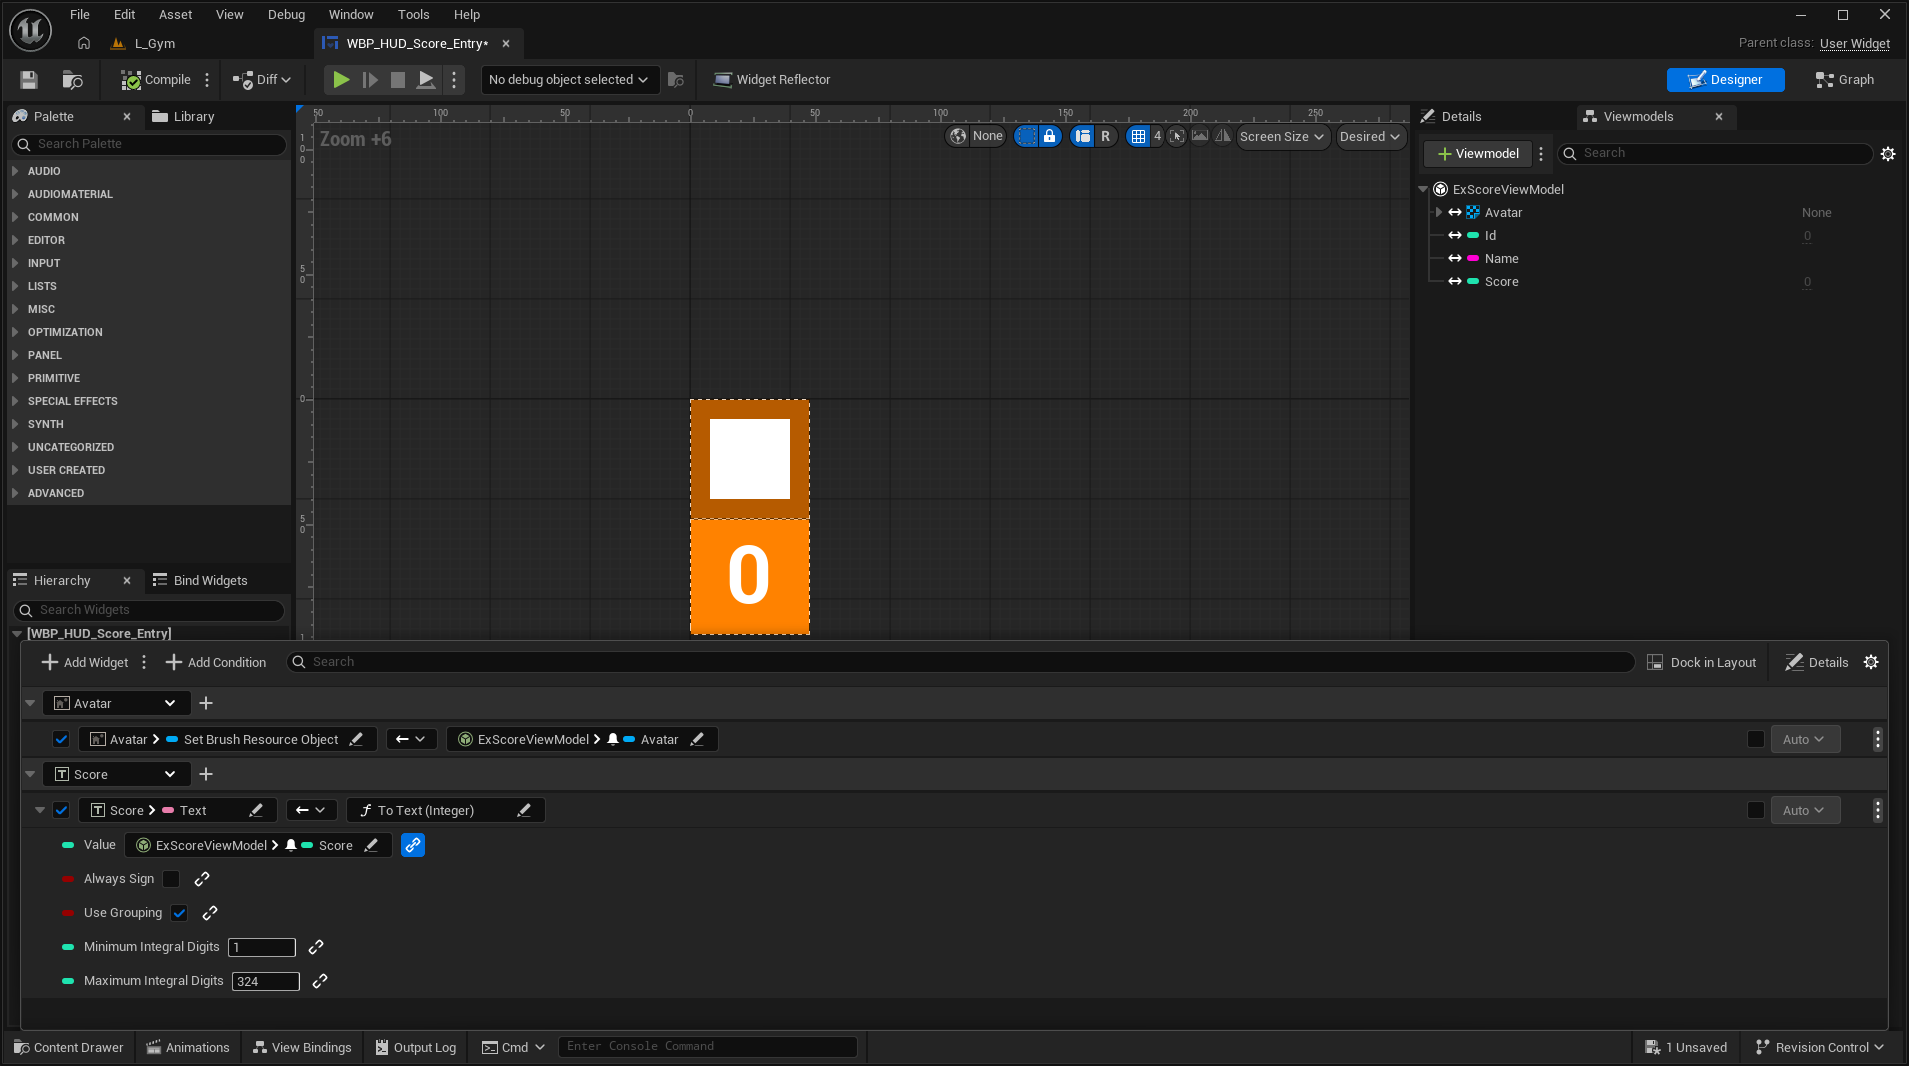
Populated view bindings for both the score text widget and the avatar image
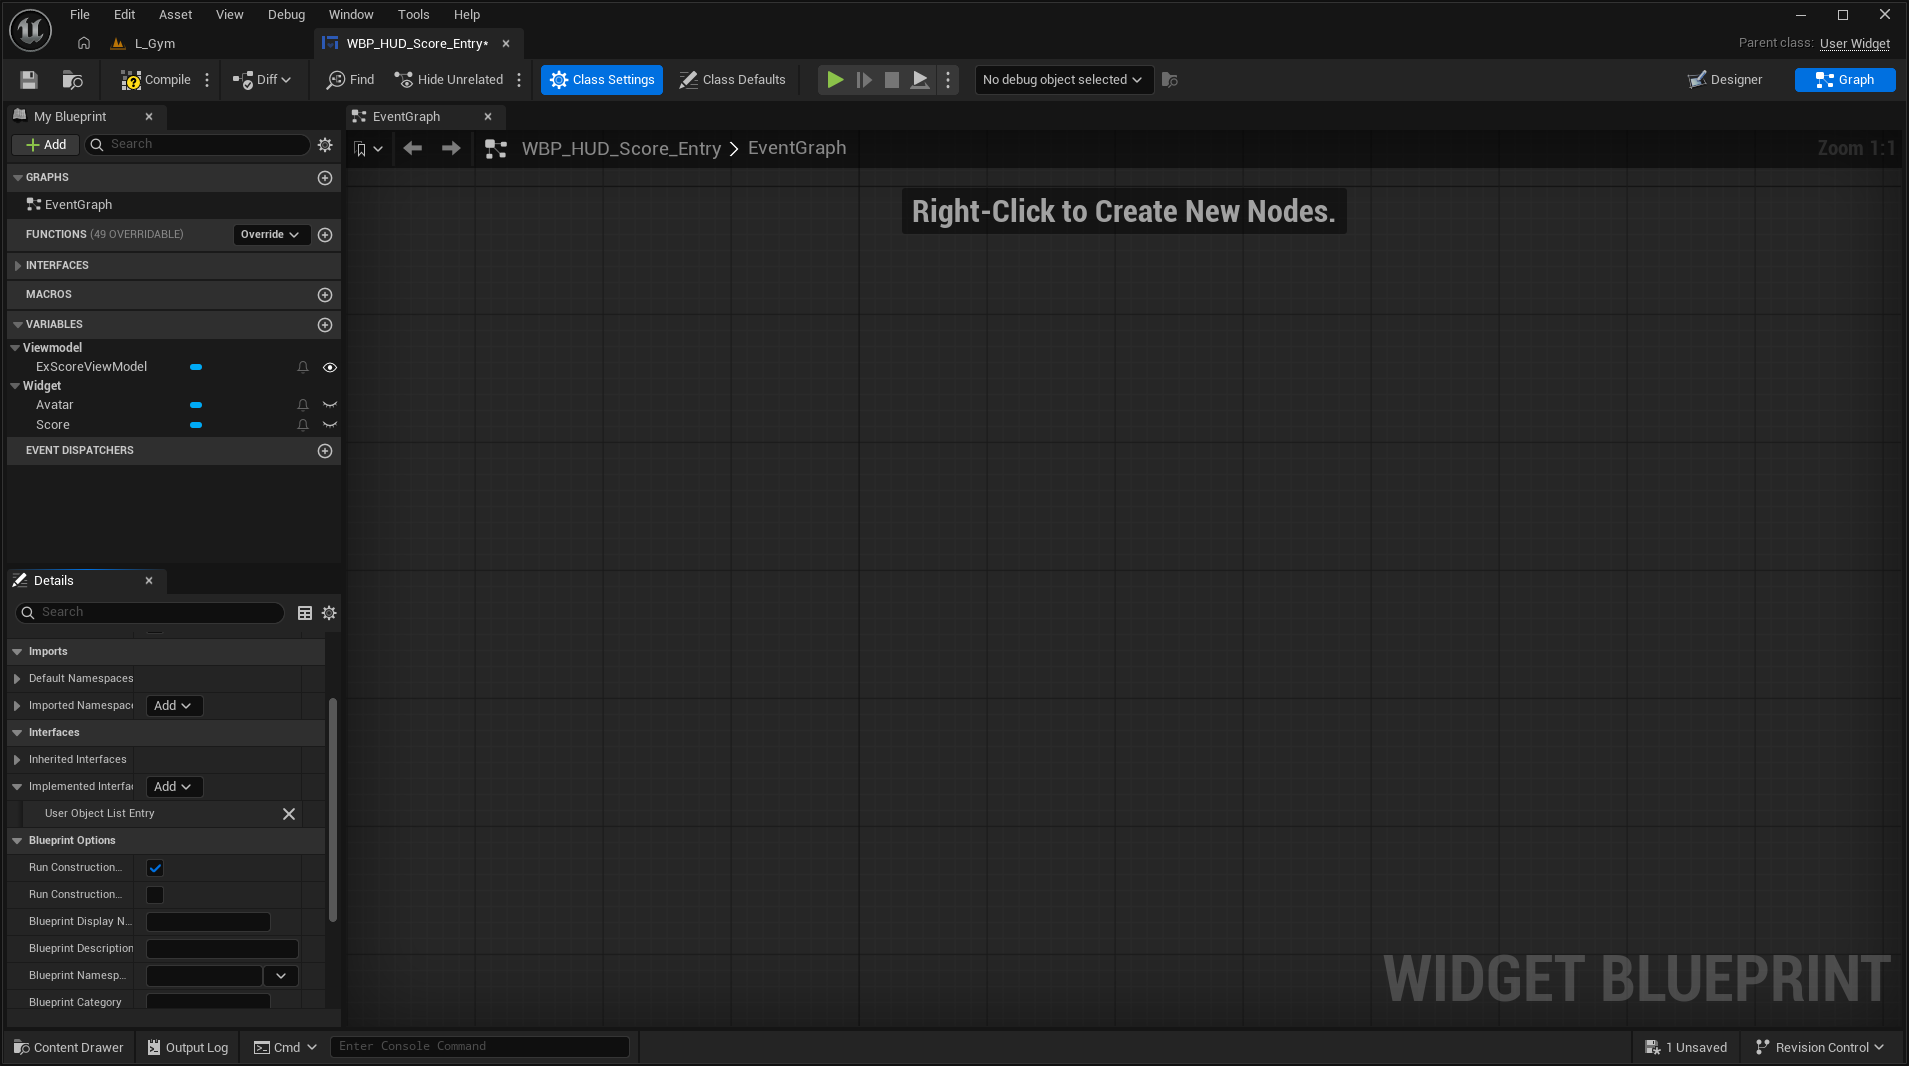
At this point, since this widget is intended to be used as a list item entry, we need to set up one last thing before moving on. To start, we want to make this widget inherit from the UserObjectListEntry interface. This can be done by going to the event graph of the widget, then clicking “Class Settings” in the topbar, and then adding the aforementioned interface to the Implemented Interfaces field, as shown below:
Once that has been done, compile and save the widget. Next, in the event graph, add the Event On List Item Object Set node. This event is called when the item widget has received the list item that it needs to display. In our example, this object will be our view model. As such, we want to cast to the view model and set our view model instance afterwards. Once finished, your graph should look like the following:
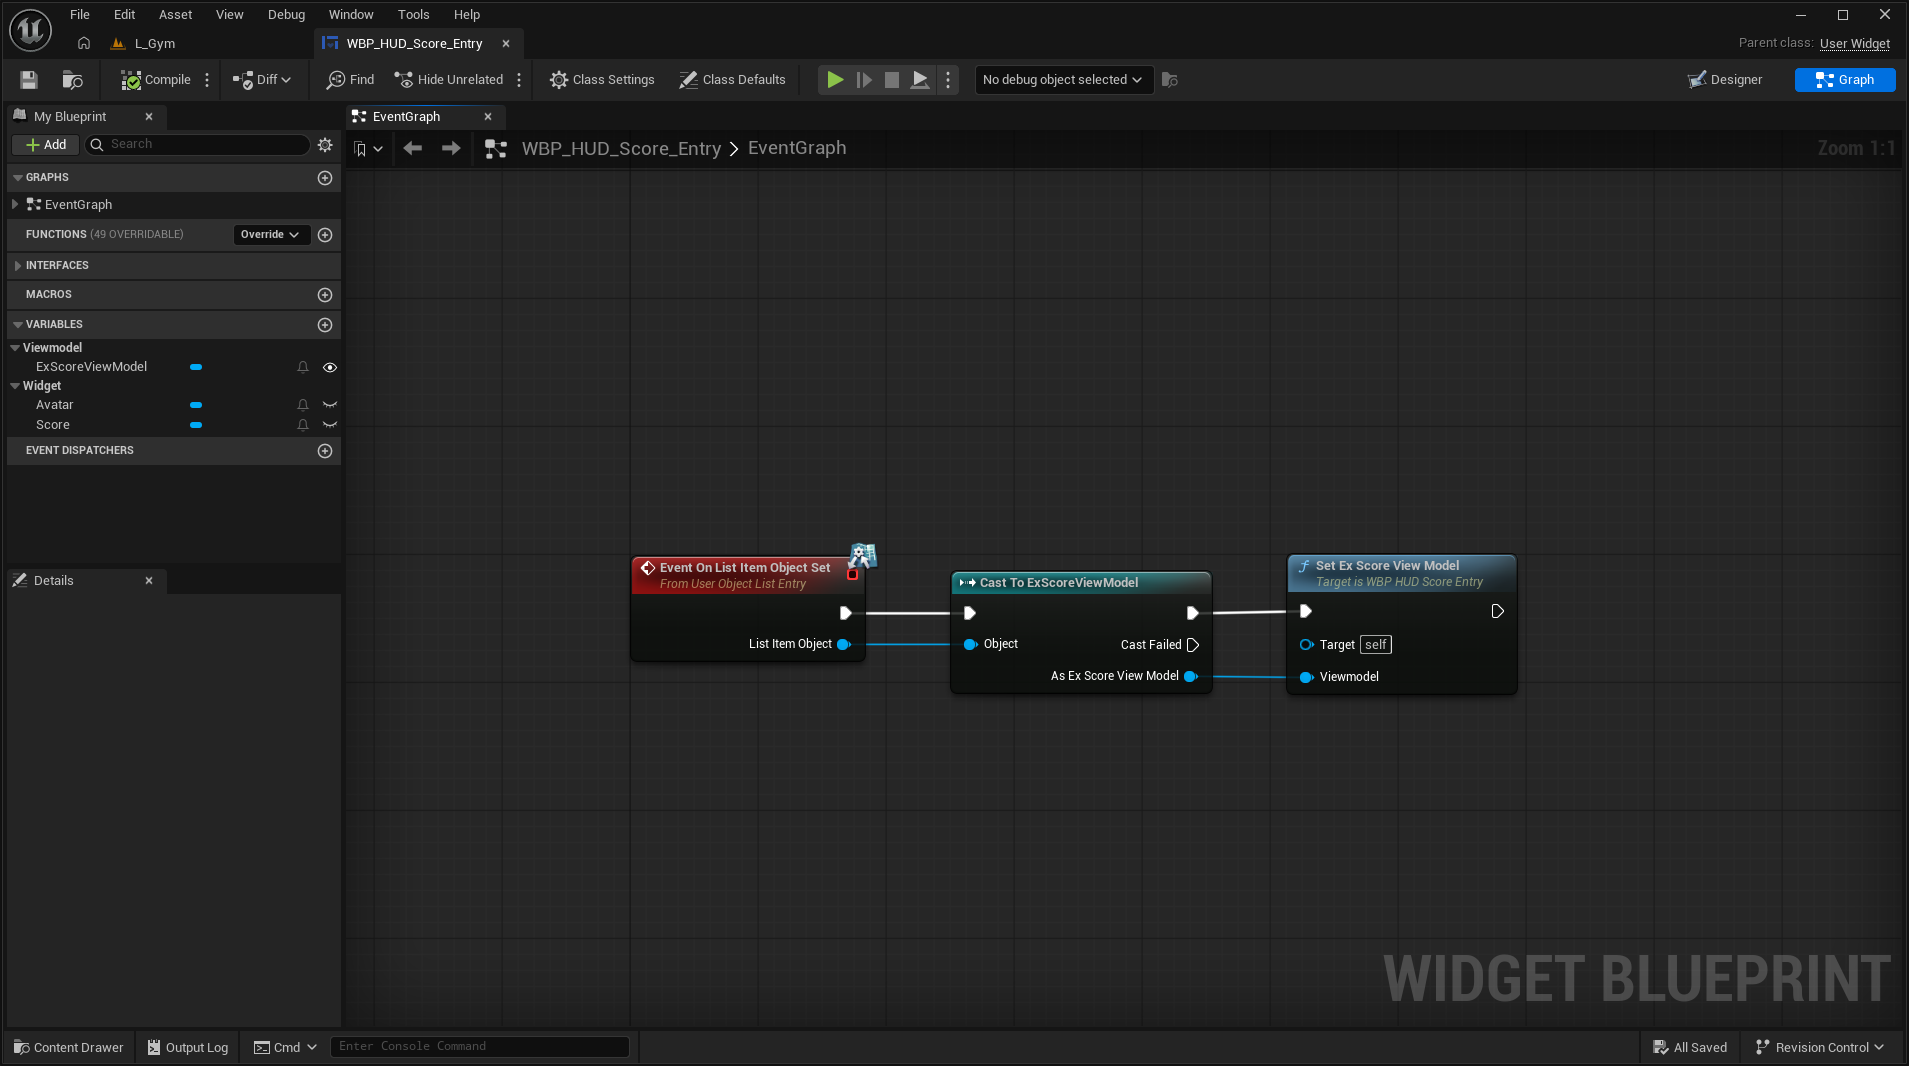
Compile and save the widget blueprint once again. With that, we have finished preparing the HUD score widget for view model binding. However, we still need to hook up the full scoreboard list entry widget, and the overall HUD widget. For the full scoreboard list entry, we can use the same manual binding method with the list entry event as the HUD score widget. Once finished, that widget’s bindings would look like the following:
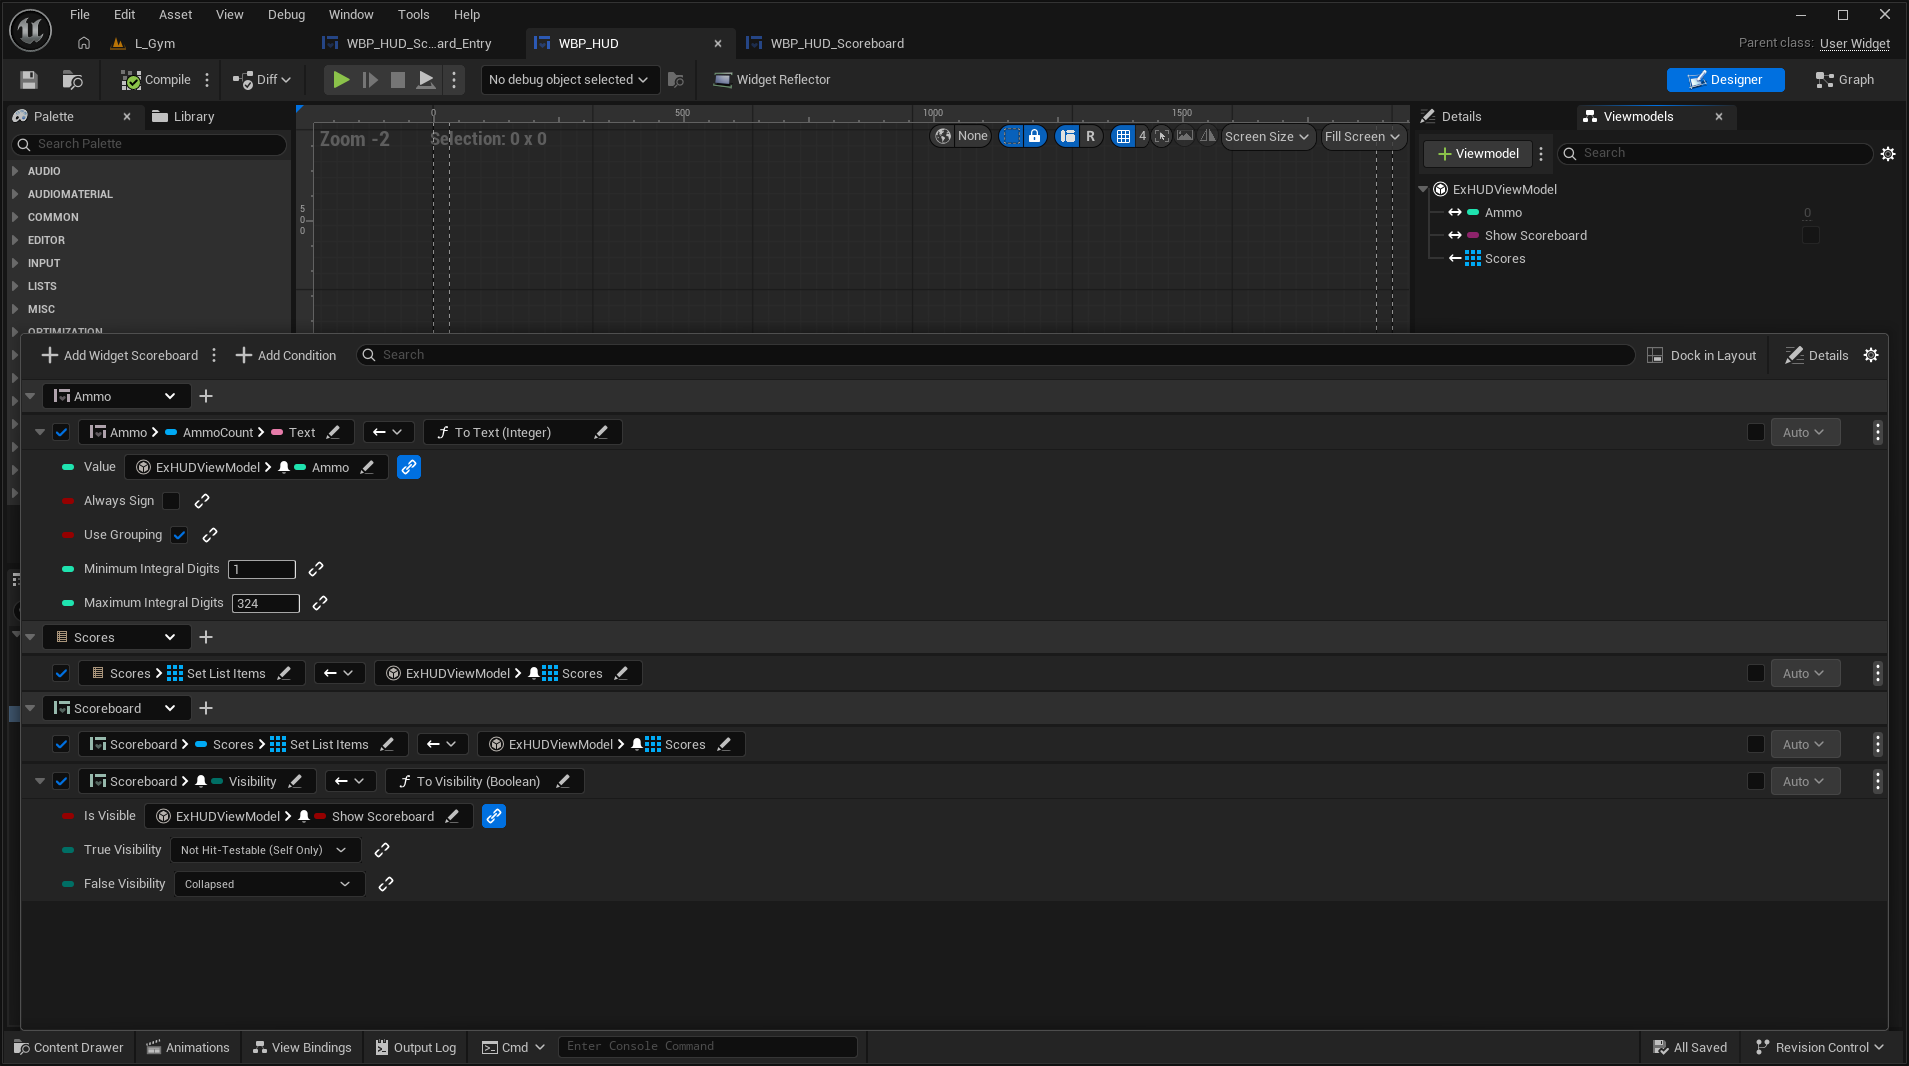
Finally, we need to set up bindings for the HUD widget. These bindings need to:
- Bind the ammo counter widget to the property in the view model
- Bind the array of score view models to the HUD score list view
- Bind the array of score view models to the list view in the scoreboard widget
- Toggle the visibility of the scoreboard based on the boolean property in the view model
For the first, our ammo counter widget has the count text field exposed as a variable. So we can bind our property directly to that widget variable’s text field. For the second, we can bind our score view models array to the Set List Items function of the list view. For the third, we can do the same binding to the list item setter, but accessing the list view variable of the scoreboard widget. Finally, for the visibility toggle, we can bind to the scoreboard widgets visibility property, and use a conversion function to convert a boolean to visibility enum. Putting all of that together, the HUD view binding set up should look like the following:
At this point, we have fully hooked up all of our viewmodels and bindings for each relevant UMG widget. All that remains is to populate view models with data and forward those to the widgets.
Getting Viewmodels to a View
In this example, we just need to create an instance of the overall HUD viewmodel and bind that to the HUD view widget. For added context, in this example, our HUD is added to the player’s viewport using a subclass of the AHUD actor from the Unreal gameplay framework. That subclass has a TSubclassOf<UUserWidget> property that we have set to our HUD widget blueprint. Once our HUD subclass is constructed, we construct a new instance of the HUD widget blueprint from the subclass property, and then add it to the viewport. For reference, here is the declaration of the HUD subclass:
UCLASS()
class EX_API AExHUD : public AHUD
{
	GENERATED_BODY()

public:
	UPROPERTY(EditDefaultsOnly, BlueprintReadOnly, Category = "HUD")
	TSubclassOf<UUserWidget> HUDWidgetClass{};

protected:
	UPROPERTY(VisibleAnywhere, BlueprintReadOnly, Category = "HUD")
	TObjectPtr<UUserWidget> HUDWidget{};

protected:
	virtual void BeginPlay() override;
	virtual void EndPlay(const EEndPlayReason::Type EndPlayReason) override;

};
Along with the definition for the begin and end play methods:
void AExHUD::BeginPlay()
{
	Super::BeginPlay();

	APlayerController* PlayerController = GetOwningPlayerController();
	check(PlayerController != nullptr);

	HUDWidget = CreateWidget<UUserWidget>(PlayerController, HUDWidgetClass);
	HUDWidget->AddToPlayerScreen();
}

void AExHUD::EndPlay(const EEndPlayReason::Type EndPlayReason)
{
	HUDWidget->RemoveFromParent();
	HUDWidget = nullptr;

	Super::EndPlay(EndPlayReason);
}
We now want to add to this by creating an instance of the HUD view model along with the widget and forwarding a reference of that view model to the widget. To do this, we need to:
- Get the
MVVMViewextension from the constructed widget - Construct a new instance of the HUD viewmodel class
- Call
SetViewModelByClassusing the MVVM view extension, passing in the newly constructed viewmodel class - Store the constructed HUD viewmodel in the HUD subclass
Putting that all together, we want to add the following to our subclass declaration:
protected:
    // ...

    UPROPERTY(VisibleAnywhere, BlueprintReadOnly, Category = "HUD")
    TObjectPtr<UExHUDViewModel> HUDViewModel{};

    // ...
Along with adding the following to the begin and end play definitions:
/// ...
#include "View/MVVMView.h"

void AExHUD::BeginPlay()
{
    // ...

		UMVVMView* MVVMView = HUDWidget->GetExtension<UMVVMView>();
		check(MVVMView != nullptr);

		HUDViewModel = NewObject<UExHUDViewModel>(this);
		MVVMView->SetViewModelByClass(HUDViewModel);
}

void AExHUD::EndPlay(const EEndPlayReason::Type EndPlayReason)
{
		HUDViewModel = nullptr;

		// ...
}
Once that is done, you have finished creating and binding your view model to your view widget. Now all that is left is to update your view model with relevant data.
Data Updates with View Models
In this example, we care about three pieces of data:
- A player’s basic info along with their current score
- Ammo count of the current player
- Whether the full scoreboard should be shown or not
Let’s start with the simplest example, showing the scoreboard. In this example, we have already set up an input action mapped in an input mapping context to the Tab key. In our character class, all we need to do is listen for when that input action has been pressed and released, and show or hide the scoreboard accordingly. Our HUD class also will need to have a method that can forward the show state of the scoreboard to the view model. Starting with the HUD logic, our method declaration would look like:
// ...

public:
	void SetScoreboardState(bool bShowState);

// ...
Our definition would be as follows:
// ...

void AExHUD::SetScoreboardState(bool bShowState)
{
		HUDViewModel->SetShowScoreboard(bShowState);
}

// ...
Next, we need to bind our input trigger and complete states to call that HUD method. In our character class, our input callbacks are declared as:
// ...

private:
		void OnScoreboardOpenInputTriggered(const FInputActionValue& InputValue);
		void OnScoreboardOpenInputCompleted(const FInputActionValue& InputValue);

// ...
Then they are defined as follows:
void AExCharacter::OnScoreboardOpenInputTriggered(const FInputActionValue& InputValue)
{
		APlayerController* PC = GetController<APlayerController>();
		check(PC != nullptr);

		AExHUD* ExHUD = PC->GetHUD<AExHUD>();
		check(ExHUD != nullptr);

		ExHUD->SetScoreboardState(true);
}

void AExCharacter::OnScoreboardOpenInputCompleted(const FInputActionValue& InputValue)
{
		APlayerController* PC = GetController<APlayerController>();
		check(PC != nullptr);

		AExHUD* ExHUD = PC->GetHUD<AExHUD>();
		check(ExHUD != nullptr);

		ExHUD->SetScoreboardState(false);
}
Next on our data binding journey is the ammo counter, as it is the next most simple piece of data to bind. In this example, we simply store the ammo count as an integer property on the player character pawn. From there, the character has methods exposed to add and use ammo, as well as a delegate to listen for ammo change events. These are declared as follows:
// ...

protected:
		UPROPERTY(VisibleAnywhere, Transient, BlueprintReadOnly, Category = "Ammo")
		int32 AmmoCount{};

		DECLARE_DYNAMIC_MULTICAST_DELEGATE_OneParam(FOnAmmoUpdated, int32, NewAmmoCount);

		UPROPERTY(VisibleAnywhere, Transient, BlueprintReadOnly, Category = "Ammo")
		FOnAmmoUpdated OnAmmoUpdated{};

public:
		UFUNCTION()
		void AddAmmo(int32 AmmoDelta);

		UFUNCTION()
		int32 GetAmmo() const;

		UFUNCTION()
		FOnAmmoUpdated& GetAmmoUpdatedDelegate();

// ...
These methods are defined as:
// ...

void AExCharacter::AddAmmo(int32 AmmoDelta)
{
		const int32 NewAmmoCount = AmmoCount + AmmoDelta;
		AmmoCount = FMath::Clamp(NewAmmoCount, 0, std::numeric_limits<int32>::max());
		OnAmmoUpdated.Broadcast(AmmoCount);
}

int32 AExCharacter::GetAmmo() const
{
		return AmmoCount;
}

AExCharacter::FOnAmmoUpdated& AExCharacter::GetAmmoUpdatedDelegate()
{
		return OnAmmoUpdated;
}

// ...
In our HUD class for this example, we want to:
- Get the current pawn possessed by the player controller that owns the HUD
- Ensure that the pawn can cast to our subclass
- Bind a method in the HUD subclass to the character’s AmmoUpdated delegate
- If the owning controller possesses a new pawn, we want to clear the previously bound delegate
To accomplish these points, we need to declare the following methods in the HUD class:
// ...

private:
		void OnPossessedPawnChanged(APawn* OldPawn, APawn* NewPawn);

		UFUNCTION()
		void OnAmmoUpdated(int32 NewAmmoCount);

// ...
Then, in the source file we need to update BeginPlay to bind to the pawn possession change delegate, and define the above two methods:
// ...

void AExHUD::BeginPlay()
{
		// ...

		PlayerController->OnPossessedPawnChanged.AddDynamic(this, &ThisClass::OnPossessedPawnChanged);

		// ...
}

void AExHUD::OnPossessedPawnChanged(APawn* OldPawn, APawn* NewPawn)
{
		AExCharacter* OldExCharacter = Cast<AExCharacter>(OldPawn);
		if (OldExCharacter != nullptr)
		{
				OldExCharacter->GetAmmoUpdatedDelegate().RemoveAll(this);
		}

		AExCharacter* NewExCharacter = Cast<AExCharacter>(NewPawn);
		if (NewExCharacter != nullptr)
		{
				NewExCharacter->GetAmmoUpdatedDelegate().AddDynamic(this, &ThisClass::OnAmmoUpdated);
		}
}

void AExHUD::OnAmmoUpdated(int32 NewAmmoCount)
{
		HUDViewModel->SetAmmo(NewAmmoCount);
}

// ...
At this point, we are finished with the logic to listen and update the ammo count for the view model. Our final property that we need to handle is the score array.
For our player info and scores, this data all resides in the APlayerState class. Instances of this class are owned by the AGameStateBase class. For our example, we will iterate through the player array provided by the game state on each tick and attempt to update score info.
Our tick example to update player scores would be defined as follows:
void AExHUD::Tick(float DeltaSeconds)
{
		Super::Tick(DeltaSeconds);

		UWorld* World = GetWorld();
		check(World != nullptr);

		AGameStateBase* GameState = GetWorld()->GetGameState();
		check(GameState != nullptr);

		for (APlayerState* PlayerState : GameState->PlayerArray)
		{
				UExScoreViewModel* PlayerScoreVM = HUDViewModel->GetOrAddScore(PlayerState->GetPlayerId());
				check(PlayerScoreVM != nullptr);

				PlayerScoreVM->SetName(PlayerState->GetPlayerName());
				PlayerScoreVM->SetScore(PlayerState->GetScore());
		}
}
After that, we are completely done with binding relevant data to our view models. Now all that is left is to test in-game!
Testing HUD with Viewmodel Binding
In our example, we have a very simple level with a basic movable character and two pick ups, one for ammo and one for score. A score pick up gives +1 score to the player. An ammo pick up gives +10 ammo.
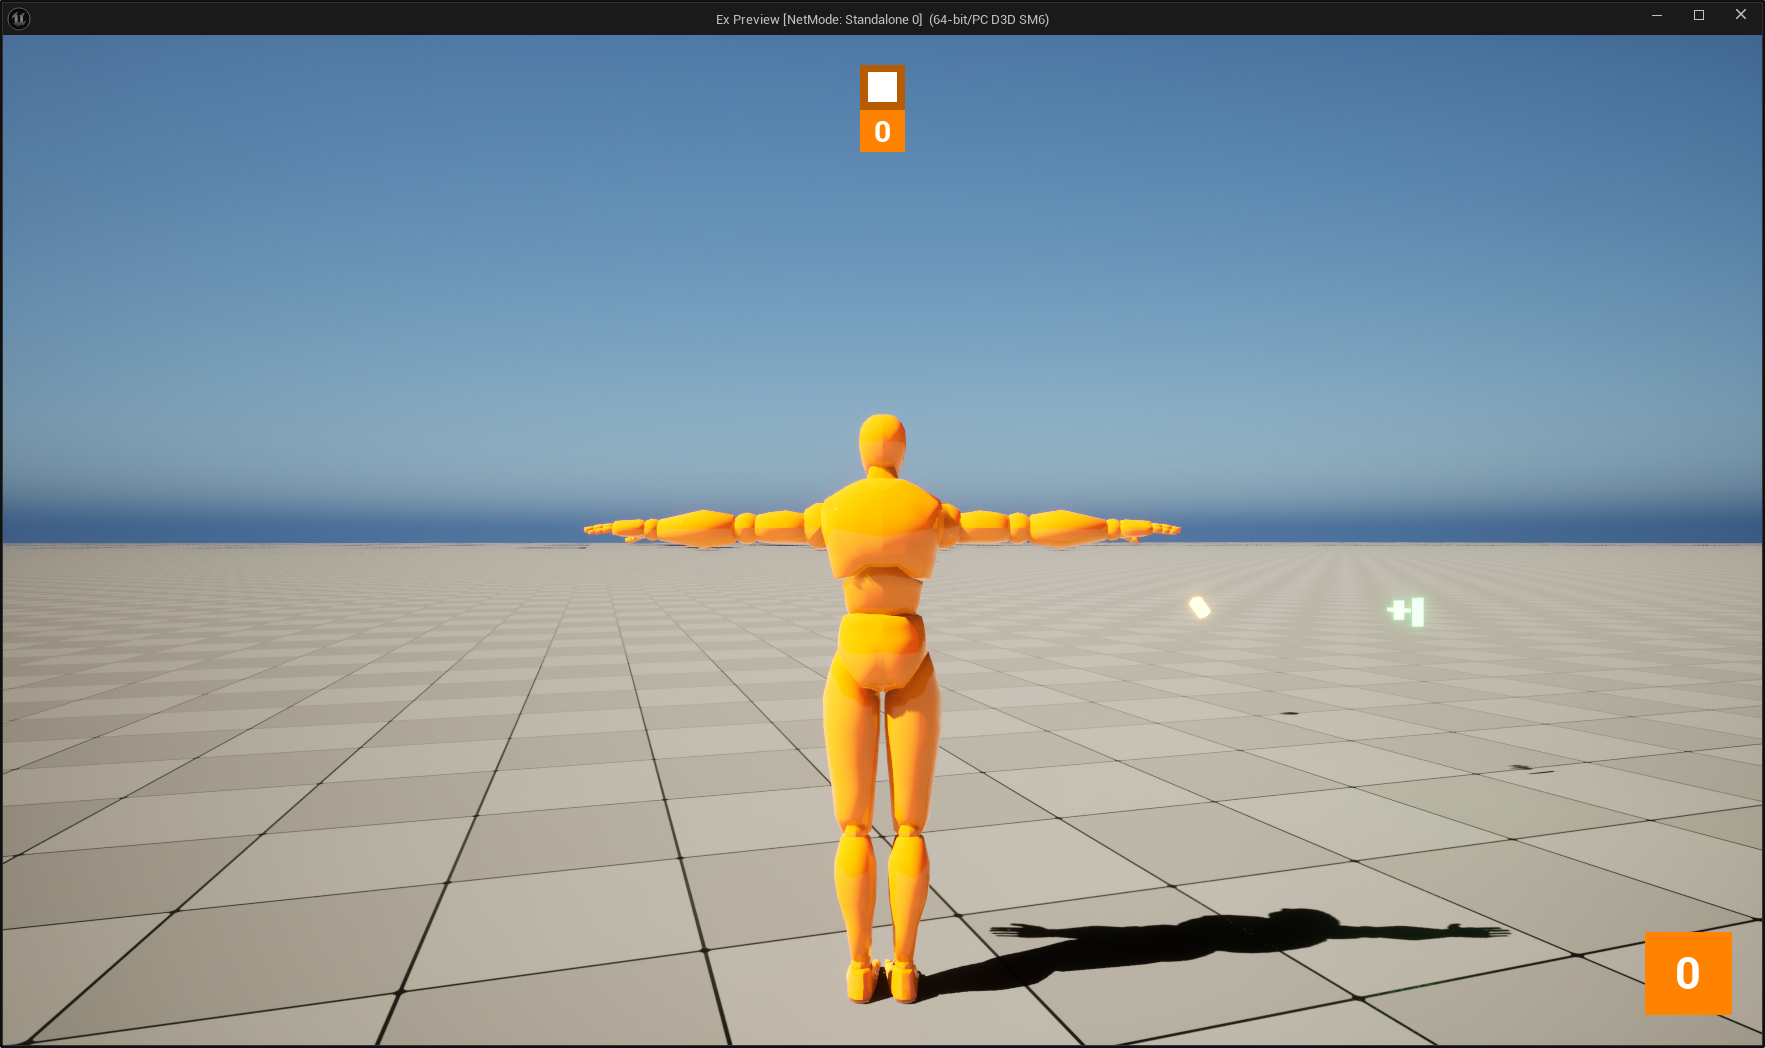
If we walk over both pick ups, we can see that the new value for both ammo and score is reflected in the UI:
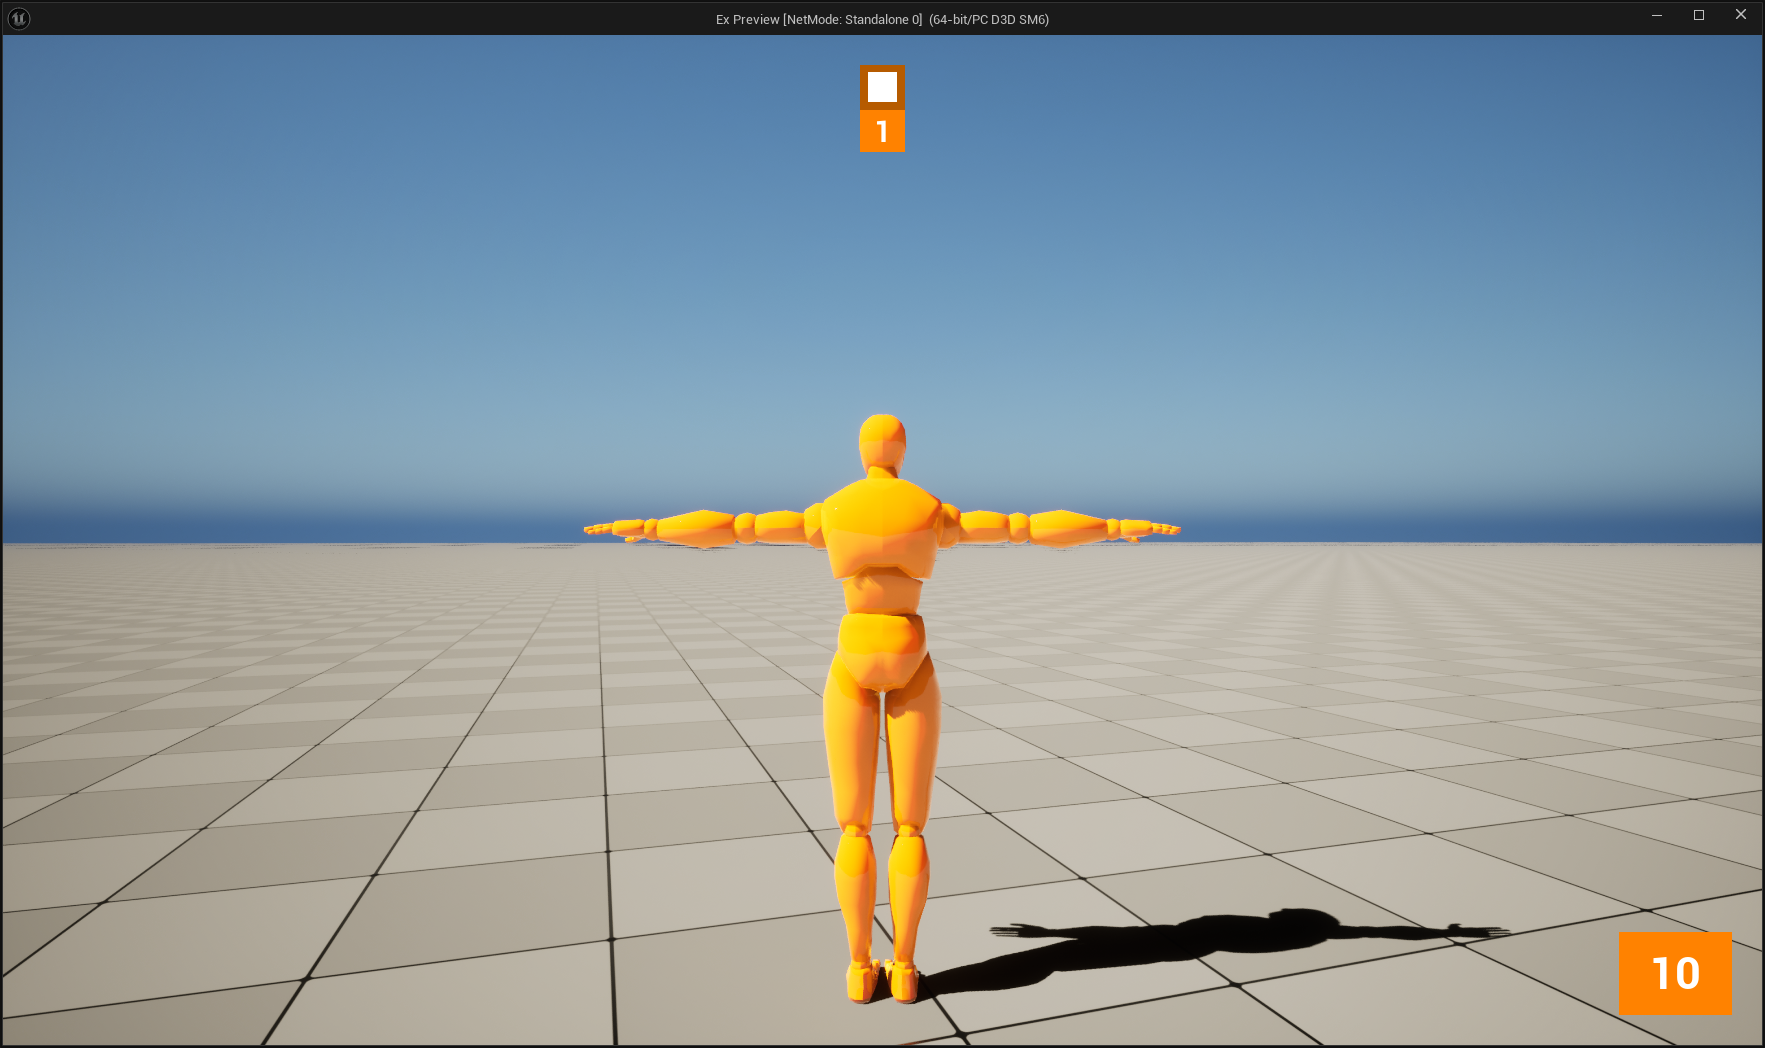
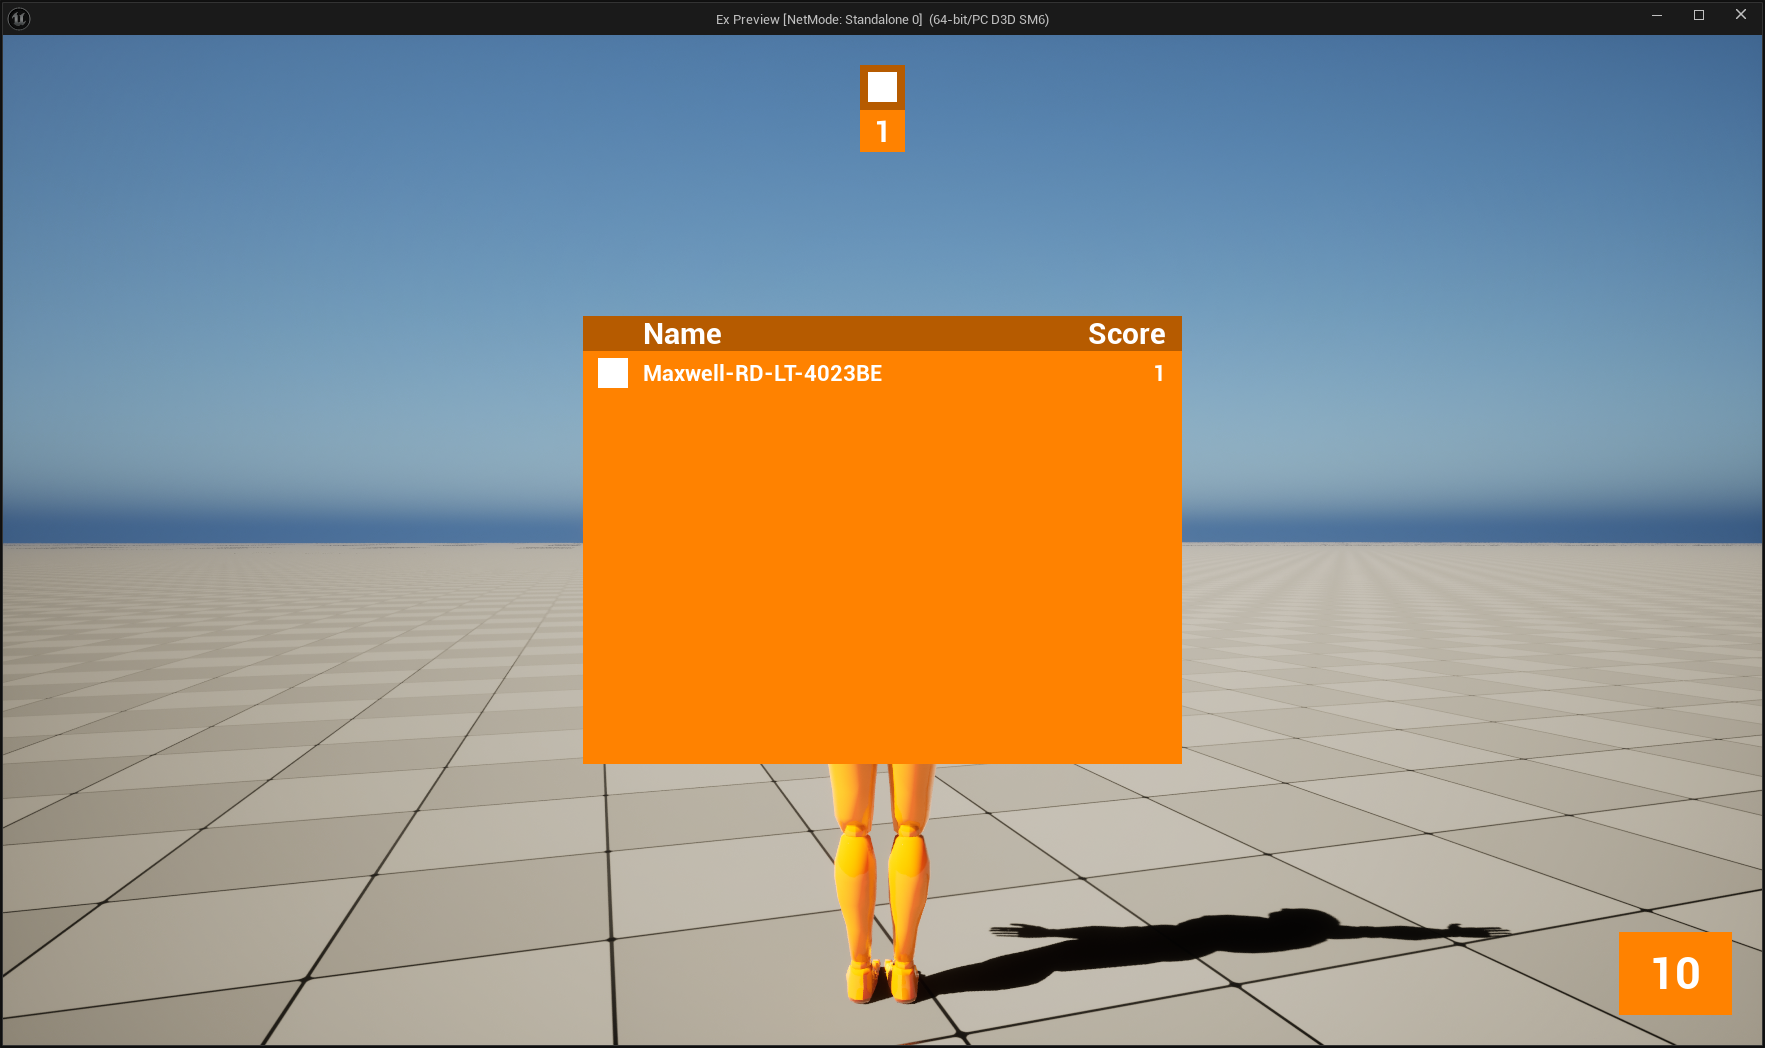
We can also see that our full scoreboard has the same data, but also includes the player name:
Conclusion
This should give a solid foundation to how to work in an MVVM pattern in Unreal. Decoupling the view from the data allows for much more flexibility in creating UIs and flows. It also means that you can easily reuse data in different widgets or views without needing to duplicate logic to retrieve or otherwise prepare the data. Do note that there are many different ways to approach handling view model data, outside of exposing getters and setters. Handling the view model array for the list view is a small example, but how much you expose and the interface you provide for your view models can match closer with your game and overall UI approach.
Further Resources
This post is aimed at being a getting started guide for UMG Viewmodel in Unreal Engine. There are more advanced concepts and approaches in this plugin. To learn more, check out this documentation page directly from Unreal. It not only covers some of the same concepts from this guide, but also advanced topics useful as you dive deeper into developing your game’s UI.
You can find the full project source code and assets on GitHub.