Getting Started With GameFabric

Hi friends! Here at Rushdown multiplayer games are one of our co-dev specialties. This is the fifth post in a series about how to get up and running with popular game server orchestration platforms for your multiplayer game.
For part one, which walks through setting up Amazon GameLift in an afternoon, check out our Amazon GameLift Servers post.
For part two, which walks through setting up Hathora in an afternoon, check out our Hathora Game Servers post. Note: Hathora has discontinued its services for game companies. They have selected GameFabric as their preferred solution for it’s existing customers. More information about the transition path from Hathora to GameFabric can be found here: https://gamefabric.com/hathora/
For part three, which walks through setting up Edgegap in an afternoon, check out our Edgegap Game Servers post.
For part four, which walks through setting up your game servers on a DigitalOcean Droplet, check out our DigitalOcean Game Servers post.
Introduction: Why GameFabric, Why This Post?
GameFabric is a powerful managed service for hosting multiplayer game servers provided by Nitrado. It handles session management, autoscaling, fleet health, and global deployments for you. It also provides first-class interfaces for both session based games and those that have long-running game servers. GameFabric provides an enterprise-grade solution that is trusted by a variety of game studios and platforms. If you’re looking for a game server orchestration solution, GameFabric might be for you.
One thing to note is that GameFabric is not self-serve. If you would like to follow along with this post to evaluate it yourself, you’ll need to Request a Demo.
This post is for engineers that want to kick the tires and get something working fast without understanding every nuance of GameFabric’s product offering. Our goal:
Pre-Requisities
Onboard With GameFabric
In order to utilize GameFabric, you’ll need to first Request a Demo and get onboarded.
Go (Golang)
Our sample game client and game server utilize Golang. To run them you’ll need Go 1.25+, which can be downloaded here.
raylib
Our sample game client utilizes Raylib. You can follow the instructions on the gen2brain/raylib-go GitHub repo to install it.
Docker
GameFabric uses Docker, which is a technology that allows you to package your server project in a portable way so that it can be run in any Linux environment.
Docker Desktop is the easiest way to install Docker. Select your OS to follow the specific installation instructions for your set up. Once you download it and install it you must run it as well.
Hello, World: A Minimal GameFabric Demo
To keeps things approachable, we’re starting with a barebones multiplayer setup - simple enough to grasp quickly, but complete enough to deploy and test with GameFabric. We’re intentionally skipping advanced topics like matchmaking and autoscaling for now; the focus is just on getting a server deployed and talking to clients.
Sample Server
Our sample server is written in Go. The server does the following:
- Initializes the Agones SDK on startup. If you are unfamiliar with Agones, it is an open source framework for running game servers on Kubernetes. It’s also what GameFabric uses under the hood to orchestrate your game server.
- Calls “Ready” via the Agones SDK once the game server is ready to accept player connections
- Periodically sends a “Health” ping via the Agones SDK to prevent Agones from killing the server process
- Calls “Shutdown” via the Agones SDK once the last player leaves the server
- Listens for TCP connections on port 9000
- Accepts JSON position updates from players
- Maintains shared state of all player positions
- Broadcasts the current state to all players every 100ms
It’s not a full game, but it covers the fundamentals: connecting clients, synchronizing state, and communicating with Agones/GameFabric.
Sample Client
We have two options for clients:
- Graphical Client (Raylib): Controls a cube in 3D space. This is overkill for our purposes, but it’s way more fun to play with than console output.
- Mock Client: Simulates a player moving in a circular path. This can be handy when you want to test multiple players moving around.
You don’t need a full game to evaluate GameFabric — just enough networking to validate the server flow.
Goal: Running the Sample Locally
Before moving on, let’s make sure you can successfully clone, build, and run the server and client.
# Clone the repo
$ git clone <https://github.com/Rushdown-Studios/GameFabricDemo.git>
Cloning into 'GameFabricDemo'...
remote: Enumerating objects: 23, done.
...
Receiving objects: 100% (23/23), 12.32 KiB | 2.46 MiB/s, done.
Resolving deltas: 100% (4/4), done.

# cd into the root of the repo
$ cd GameFabricDemo/
(Option 1 - Advanced/Required) Running The Server
To run the server with the same underlying technology that GameFabric will run it with, Docker, tag and run the image.
# Build a Docker image tagged "gamefabric-demo" (we'll use this tag later)
$ docker build -t gamefabric-demo .
$ docker run -p 9000:9000 gamefabric-demo
(Option 2 - Easy/Optional) Running The Server
You can run also the server directly on your machine without any additional dependencies.
# Run the server
$ go run ./cmd/server
2026/06/26 10:10:52 Server listening on :9000
Running The Clients
Once the server is running, you can run clients in separate terminals:
# Mock client
$ go run ./cmd/mockclient

# Graphical client (WASD + mouse)
$ go run ./cmd/client
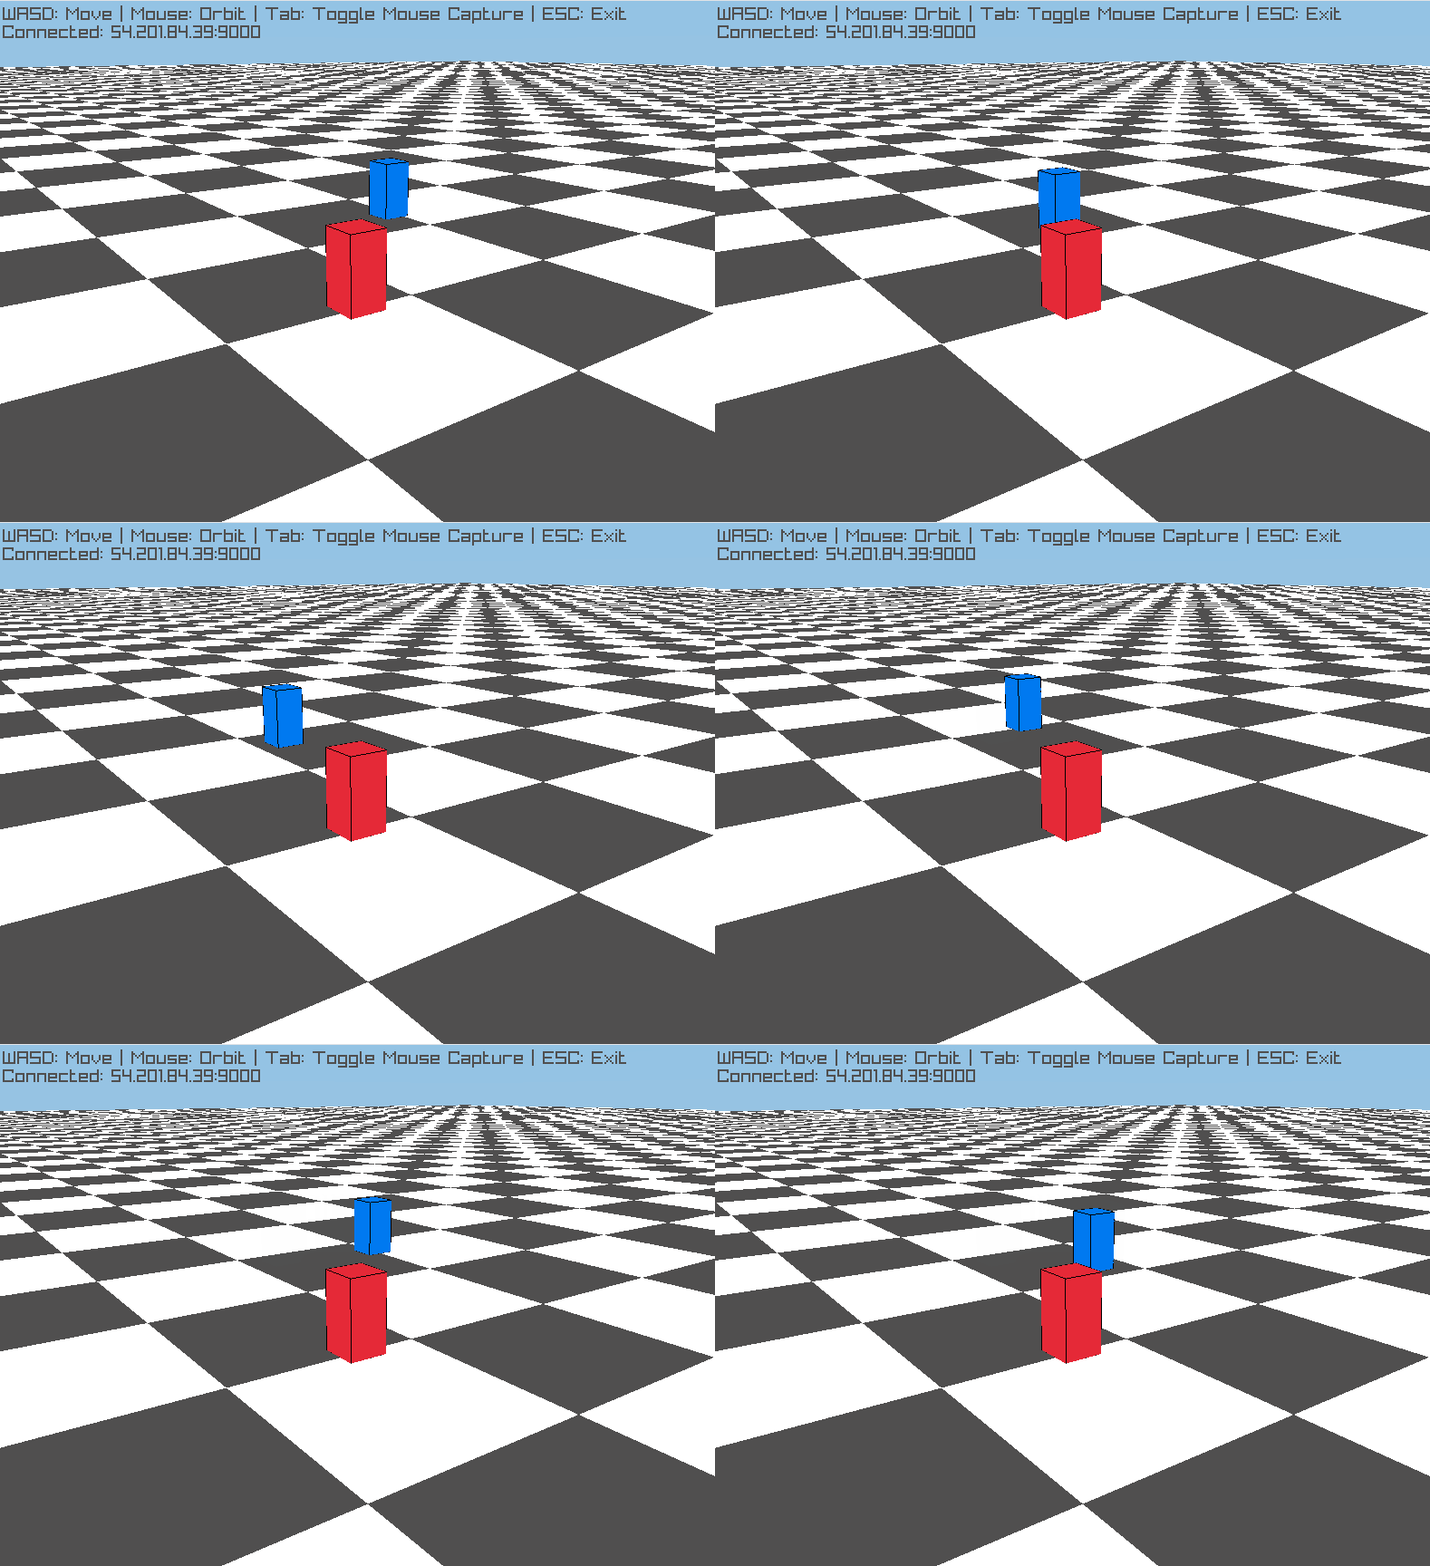
You should be able to control a little red cube with third-person WASD and mouse controls. If you start multiple clients, you should be able to see other clients moving around as blue cubes. If you started the mock, you should see an extra player trace out a circle in the middle of the "map".
Configuring Your Server on GameFabric
We’ll be following along with GameFabric’s Quickstart Guide.
Step 1: Log Into Your GameFabric Account
Once you have been onboarded to GameFabric through your account rep, you should have a subdomain that points towards your installation (e.g. mysubdomain.gamefabric.dev). Sign in using the credentials you were provided.
Step 2: Configure Container Registry and Upload a Build
GameFabric provides its own internal Container Registry, which is used to store your servers’ container images. This Container Registry is a privately managed Docker container repository that works much like standard public registries. If you’re unfamiliar with Docker, that’s okay. We’ll walk you through all the steps you need to follow in this post.
Create a Branch
See also: Glossary (Branch) and Pushing Container Images (Create a Branch)
In production grade configurations you might have a branch per environment. For our purposes we’re going to utilize GameFabric’s “Add Default Branches” feature.
- On the GameFabric dashboard, navigate to https://mysubdomain.gamefabric.dev/ui/branches
- Click “Add Default Branches”
Create a Service Account
See also: Service Accounts
In order to be able to authenticate and upload a build to the Container Registry, we’ll need to configure a service account.
- On the GameFabric dashboard, navigate to https://mysubdomain.gamefabric.dev/ui/rbac/groups-users
- Select “Create Service Account”
- Provide a name for the account. We’re going to use “docker-upload”, but you can call it anything you’d like
- Make sure to note the password that was generated. This is the only time it’s shown
- Once the account is created, you’ll need to add it to the proper group. Look for the
default:image-providersgroup and click the edit button. When the modal pops up, tab over to the “Users” tab - Enter your service account name, for example: docker-upload@mysubdomain.gamefabric.dev
Upload a Build
See also: Pushing Container Images (Push the game server image)
First, you’ll need to log into the registry from the command line. The USERNAME and PASSWORD are your Service Account’s email and password. The URL is your installations URL (e.g. mysubdomain.gamefabric.dev)
docker login -u ${USERNAME} -p {PASSWORD} $URL
Next, you’ll tag your image. We’ll add a tag to the existing image we made previously during local setup.
docker tag gamefabric-demo ${URL}/${BRANCH}/gameserver:v1.0.0
// e.g: "docker tag gamefabric-demo mysubdomain.gamefabric.dev/development/gameserver:v1.0.0"
And finally, you’ll push the image to the registry.
docker push ${URL}/${BRANCH}/gameserver:v1.0.0
// e.g. "docker push mysubdomain.gamefabric.dev/development/gameserver:v1.0.0"
Step 3: Create a GameFabric Environment, Region, and Vessel
Now that you have your game server image uploaded to GameFabric, the next step is to configure the components necessary to deploy and run it.
Create an Environment
See also: Glossary (Environment) and Set up your environment
An Environment is a mechanism for isolating a group of resources within GameFabric.
- On the GameFabric dashboard, navigate to https://mysubdomain.gamefabric.dev/ui/environments
- Select “Create Environment”
- For name and display name, we’re going to use “dev” and “Development” respectively
Create a Region
See also: Glossary (Region), Glossary (Location), and Set up your environment
A Region is a geographic area made up of one or more Locations where resources (your game server) can be hosted.
- On the GameFabric dashboard, navigate to https://mysubdomain.gamefabric.dev/ui/regions
- Click “Create Region”
- For name and display name, we’re going to use the same as what we used for our Environment
- “Types” are a more advanced concept which can allow you to configure how game servers are distributed across the Locations of a Region. For now, leave the defaults and select a Location in the Cloud that is geographically close to you. You can always come back and reconfigure this later once you have your proof of concept complete.
Create a Deployment
One of GameFabric’s strengths is their support for various hosting models. Depending on your game’s specific needs, you may decide to use Formations or Armadas.
- Formations are intended for long-running game servers that have game or player progression associated with them. The individual units of a Formation are called Vessels, which can but do not have to be a part of a Formation.
- Armadas are intended for match or session-based game servers
This post will show you how to set up your game server with a variety of options.
(Option A - Easiest) Create a Vessel
See also: Glossary (Vessel)
We’ll start with creating a Vessel. Even though it’s meant for persistent game servers, it’s the easiest way to get something running quickly.
- On the GameFabric dashboard, navigate to https://mysubdomain.gamefabric.dev/ui/formations
- Click “Create Vessel”
- Name your Vessel anything you’d like. We’re naming ours “gamefabric-demo-vessel”
- Select the Region you created previously
- You can skip Volumes
- For Containers
- For image, select the Branch, image, and tag that you configured previously.
- For environment variables, leave the default.
- For container ports, you can configure policy as “Dynamic”, name as “default”, port as “9000”, network protocol as “TCP”, and protection protocol as “none”. This port configuration configures GameFabric to expose the port that our game server binds to with the correct protocol.
- For command add
./server. This is used to tell GameFabric what to run when booting our image. - For args, add
-agones. This is used by our Go game server to make the proper SDK calls at the proper moments in the game server’s lifecycle. - For volume mounts, config files, and secrets leave the defaults.
- For compute resources, used the pre-populated values.
- You can skip Advanced
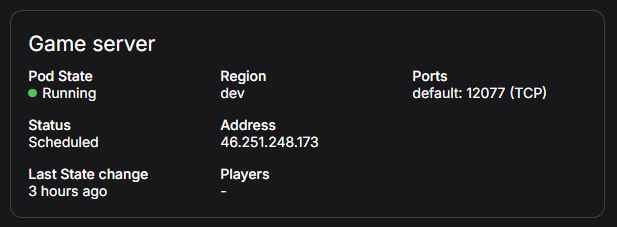
Once your Vessel is created, click on “Details”. You will see a panel called “Game server” that will have the IP Address and Port. Make note of these.
(Option B ) Create a Formation
See also: Glossary (Formation), Identifying Your Hosting Model (Formations)
Formations contain a collection of Vessels. They provide a streamlined way to manage certain characteristics of the Vessels within the Formation, such as the CPU/RAM resource requirements and the container image version to be used.
- On the GameFabric dashboard, navigate to https://mysubdomain.gamefabric.dev/ui/formations
- Click “Create Vessel”
- Name your Vessel anything you’d like. We’re naming ours “demo-formation”
- You can skip Volumes
- For Containers
- For image, select the Branch, image, and tag that you configured previously.
- For environment variables, leave the default.
- For container ports, you can configure policy as “Dynamic”, name as “default”, port as “9000”, network protocol as “TCP”, and protection protocol as “none”. This port configuration configures GameFabric to expose the port that our game server binds to with the correct protocol.
- For command add
./server. This is used to tell GameFabric what to run when booting our image. - For args, add
-agones. This is used by our Go game server to make the proper SDK calls at the proper moments in the game server’s lifecycle. - For volume mounts, config files, and secrets leave the defaults.
- For compute resources, used the pre-populated values.
- For Vessels
- Add a Vessel with the name “gamefabric-demo-vessel”
- Select the Region you configured previously
- Leave defaults for everything else
- In a production environment, you may repeat this to create multiple Vessels within the Formation. For our purposes, we’re going to stop at one
- You can skip Advanced
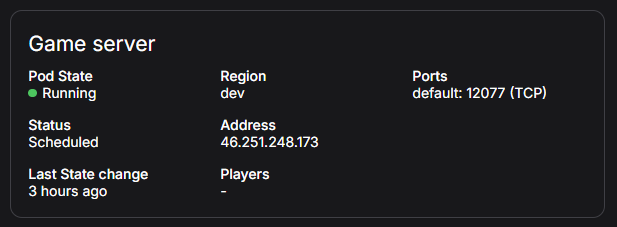
Once your Formation and Vessel are created, you can click on “Details” for the Vessel. You will see a panel called “Game server” that will have the IP Address and Port. Make note of these.
(Option C - Advanced) - Create an Armada
See also: Glossary (Armada), Glossary (Armada Set), Identifying Your Hosting Model (Armadas), Creating an ArmadaSet, Server Allocation Overview, Automatically Registering Game Servers
Armadas will automatically adjust the number of game servers within a given Region based on demand. They are best suited for short-lived session-based games.
Before configuring your Armada, you will need to configure a secret that will be used to register your game server with the GameFabric Allocator.
- On the GameFabric dashboard, navigate to https://mysubdomain.gamefabric.dev/ui/secrets
- Click “Add Secret”
- Name your secret “registrationtoken”.
- For the secret’s key, enter “token”. For the secret’s value, enter the registry token you were provided by your GameFabric account rep.
- Note: Your allocator token and your registry token are different. Make sure you are using your registry token.
While you can create individual Armadas, we recommend using an ArmadaSet instead. An ArmadaSet can create Armadas in one or many Regions.
- On the GameFabric dashboard, navigate to https://mysubdomain.gamefabric.dev/ui/armadas
- Click “Create ArmadaSet”
- Name your ArmadaSet anything you’d like. We’re naming ours “demo-armadaset”
- Keep scale to zero turned off. Set the min replicas, max replicas, and buffer all to 1
- You can skip Volumes
- For Containers
- Sidecar Container
- You will see an option to “Add Sidecar Container”. Select it and choose “Allocation Sidecar”
- You are going to add three environment variables
ALLOC_URL: The allocator URL provided by your GameFabric account rep, ending in/servers. It will look something like https://mysubdomain.gamefabric.dev/allocator/prod/eu/serversALLOC_TOKEN: Select “Secret” as the type. From here you can select the secret you configured previously.ALLOC_REGION: An arbitrary region identifier. We’ll use “dev-allocator” for ours.- Note: This is not the same as the Region you configured earlier. It can be any string you would like to set.
- If you would like to see the other, optional, environment variables that are available to you, refer to Automatically Registering Game Servers
- You can skip all other fields.
- Game Server Container (default)
- For image, select the Branch, image, and tag that you configured previously.
- For environment variables, leave the default.
- For container ports, you can configure policy as “Dynamic”, name as “default”, port as “9000”, network protocol as “TCP”, and protection protocol as “none”. This port configuration configures GameFabric to expose the port that our game server binds to with the correct protocol.
- For command add
./server. This is used to tell GameFabric what to run when booting our image. - For args, add
-agones. This is used by our Go game server to make the proper SDK calls - For volume mounts, config files, and secrets leave the defaults.
- For compute resources, used the pre-populated values.
- You can skip Advanced
- Sidecar Container
Once you have your ArmadaSet configured, you will need to allocate a server on it. A few handy API requests are:
# List Regions
curl --location '<https://mysubdomain.gamefabric.dev/allocator/prod/eu/regions>' \
--header 'Authorization: Bearer {YOUR_ALLOCATOR_TOKEN}'

# Count Available Servers In A Region (We're Selecting "dev-allocator")
curl --location '<https://mysubdomain.gamefabric.dev/allocator/prod/eu/count>' \
--header 'Content-Type: application/json' \
--header 'Authorization: Bearer {YOUR_ALLOCATOR_TOKEN}' \
--data '{
    "attributes": {},
    "region": "dev-allocator"
}'

# Allocate A Server In A Region (We're Selecting "dev-allocator")
curl --location '<https://mysubdomain.gamefabric.dev/allocator/prod/eu/allocate>' \
--header 'Content-Type: application/json' \
--header 'Authorization: Bearer {YOUR_ALLOCATOR_TOKEN}' \
--data '{
    "attributes": {},
    "payload": {},
    "region": "dev-allocator"
}'
When you server has been allocated, you will get a response that contains the IP/port. For example:
{
    "address": "46.251.248.173:13759",
    "ip": "46.251.248.173",
    "ports": {
        "allocator": 13870,
        "default": 13759
    },
    "token": "1774d707-2bb0-4d79-a1cb-793c36e048e5"
}
A full allocator API spec can be found here: https://docs.gamefabric.com/api/multiplayer-servers/allocation-allocator
Connect to Your Game Server
Using the IP/Port that you obtained when setting up your deployment, connect to your game server with locally running client(s).
# Mock client
$ go run ./cmd/mockclient --host {your_gamefabric_address} --port {your_gamefabric_port}

# Graphical client (WASD + mouse)
$ go run ./cmd/client --host {your_gamefabric_address} --port {your_gamefabric_port}
Debugging
See also: Debugging game server integration
Vessels are typically what are recommended for initial integration and debugging, even if your game will ultimately require an Armada. This is because Vessels propagate logs to the GameFabric UI automatically.
Alternatively, you can use Grafana to inspect various logs and metrics about your installation. On the GameFabric dashboard you can select “Monitoring” or you can navigate to https://mysubdomain.gamefabric.dev/monitoring to access your Grafana dashboard.
What’s Next?
We’ve only scratched the surface of what GameFabric provides. They support many different customers with many different specific implementation needs. If you’re interested in diving deeper, advanced features include but are not limited to: